Rejoins Figouz.net sur les réseaux sociaux !


🇫🇷 Cette page dédiée à la conception d'une table de jeu Necromunda modulaire est également disponible en Français.
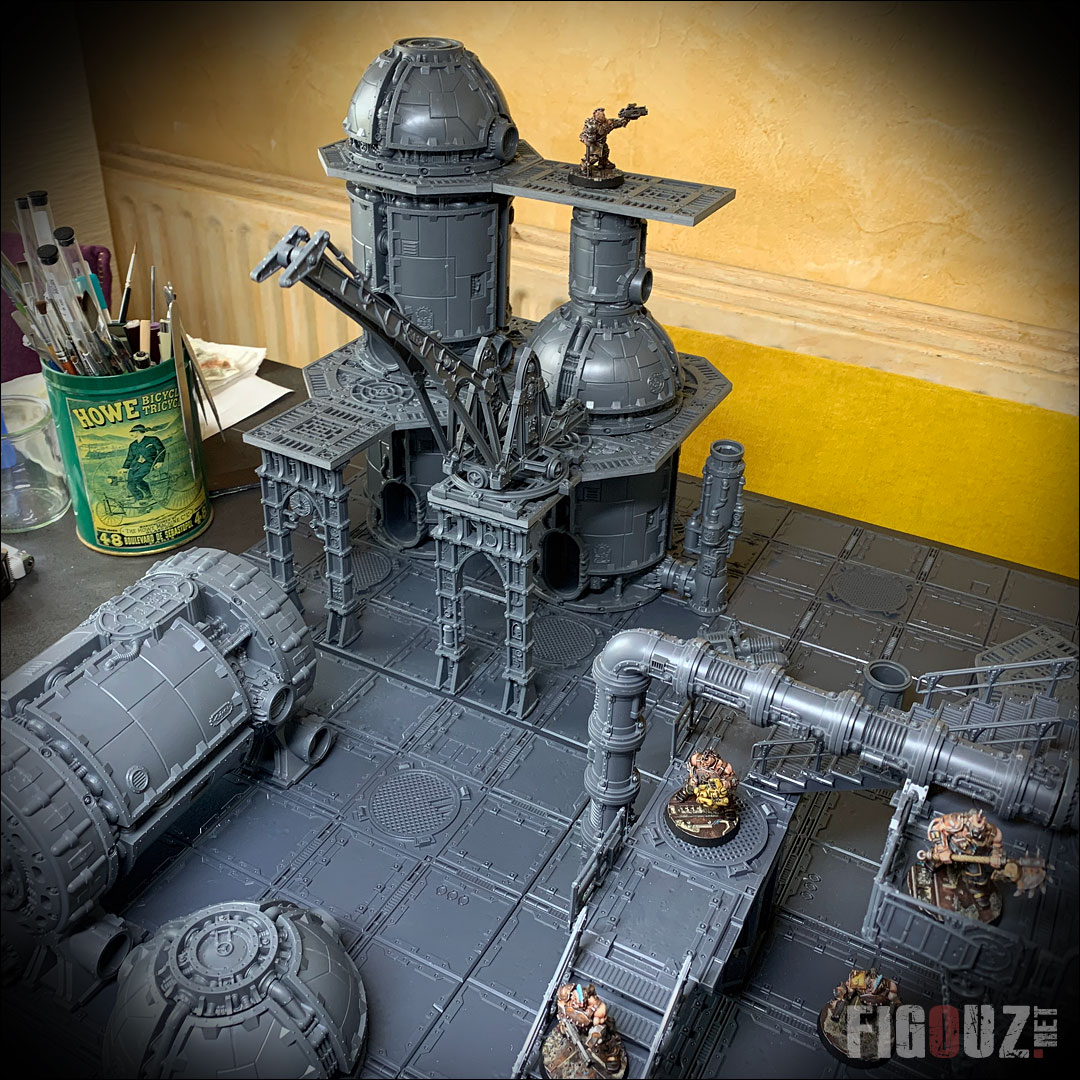
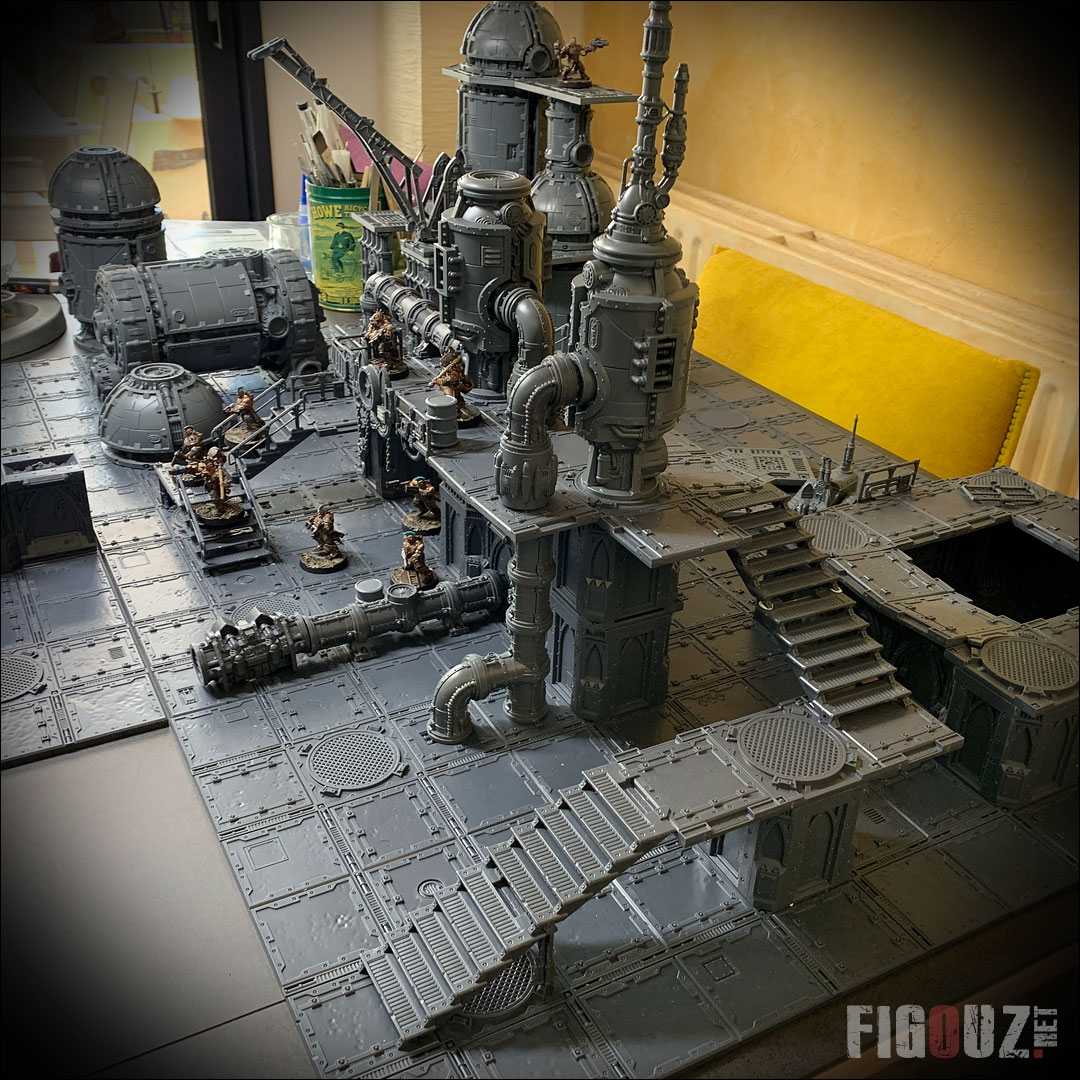
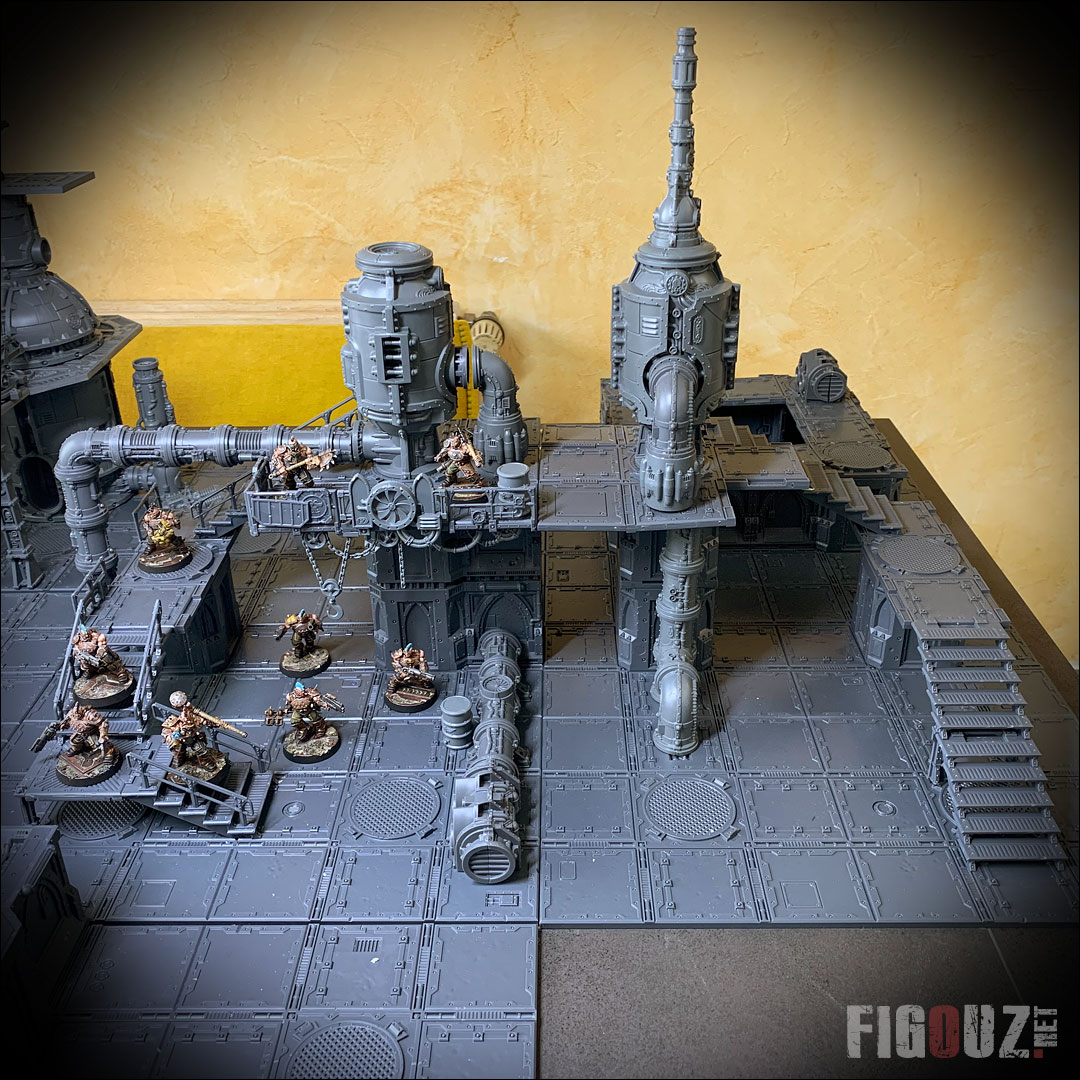
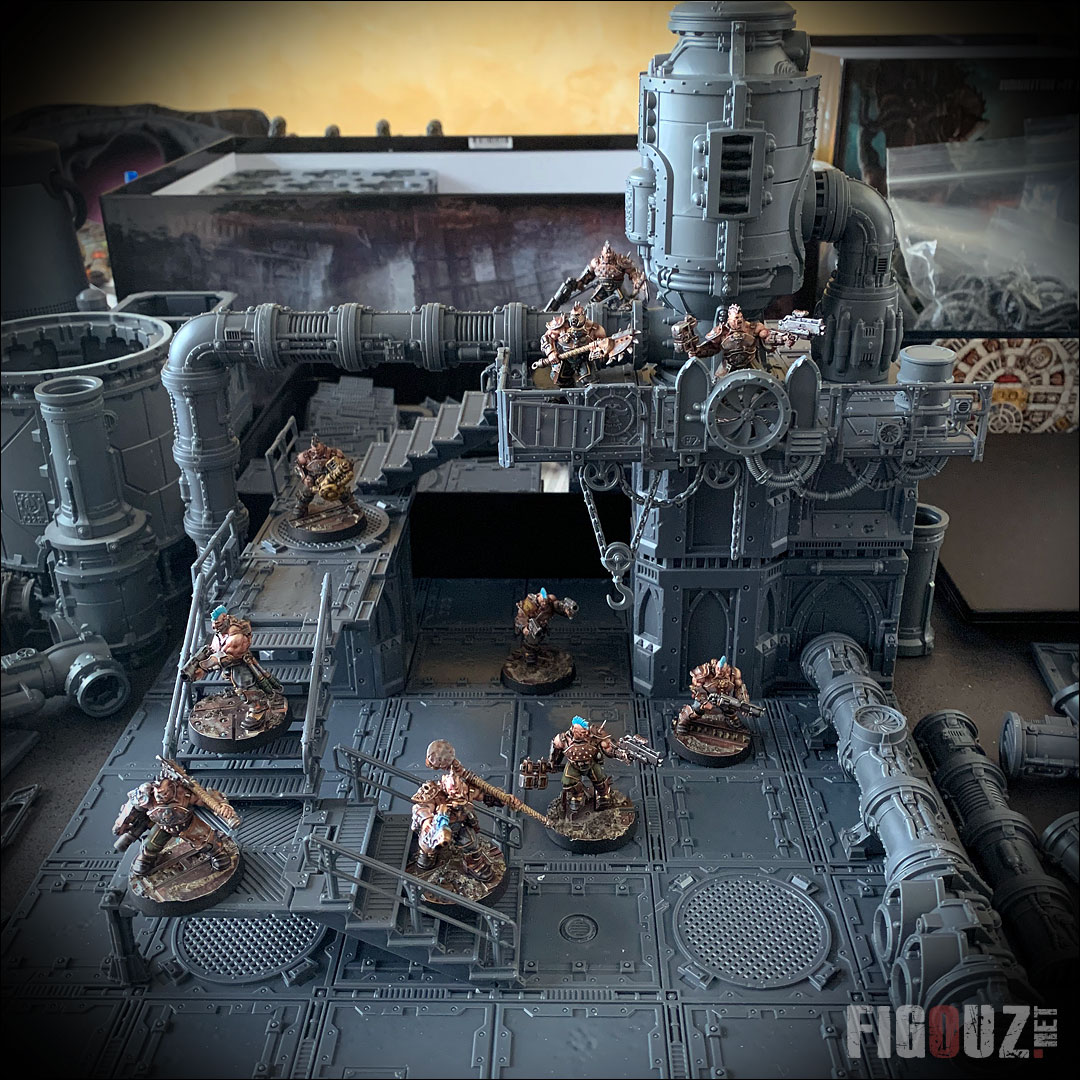
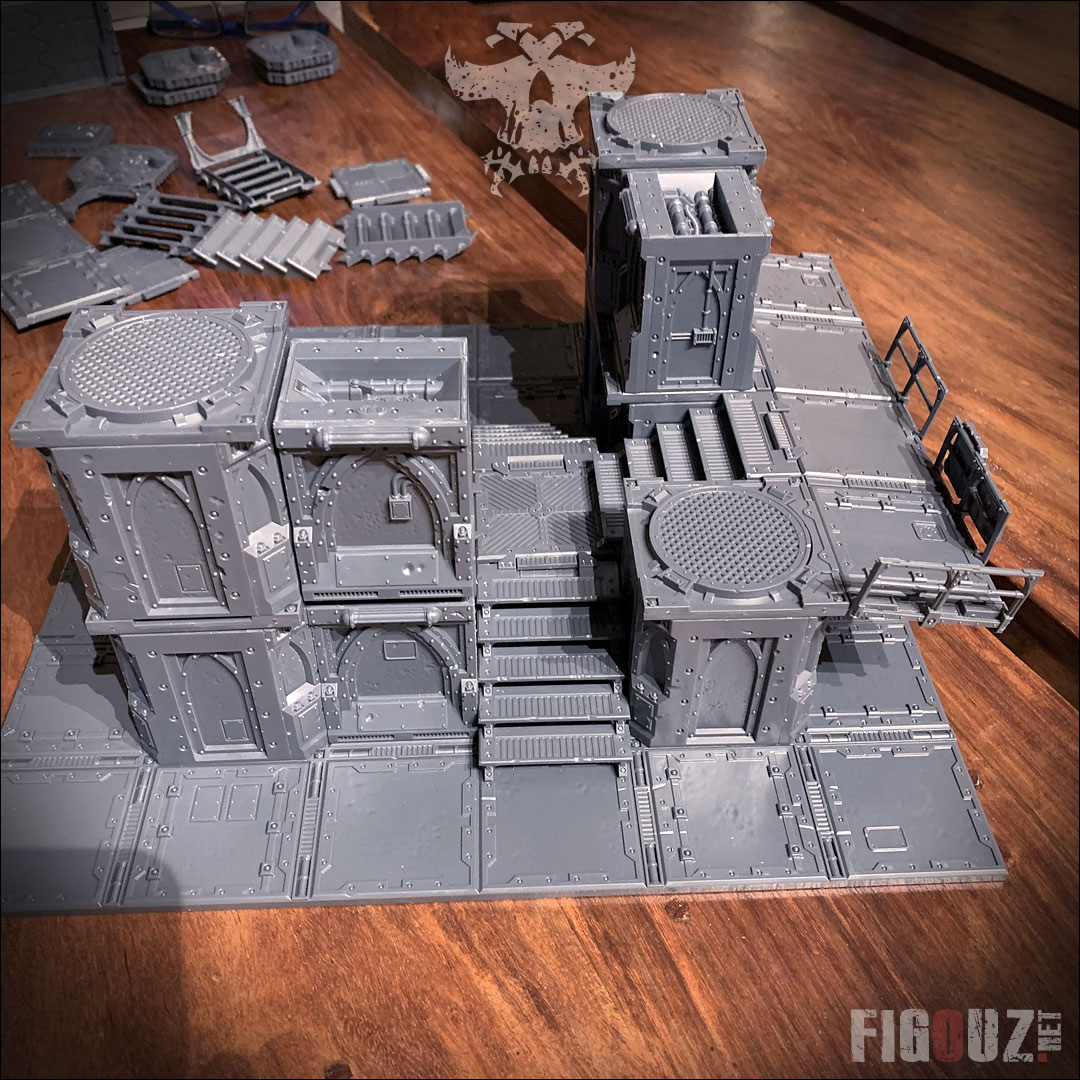
Designing and painting Zone Mortalis & Sector Mechanicus tiles - Modular Necromunda gaming board : The SECTOR 44 # 240!
I decided to invest in the new version of Necromunda for two things : for the skirmish game in the shallows of the hives of the 40K universe of course, but also for the Holy Hobby, namely everything related to figurines, decorating, model making, painting, conversions and designing a beautiful gaming table.
After presenting you my painting work of a Realm Of Battle modular board, this new page gather many articles about the design, the assembly and the painting of a Necromunda modular board.
This Necromunda /Kill Team game table will be mainly based on the Zone Mortalis floor tiles and the Zone Mortalis and Sector Mechanicus scenery!
- Kitbash Zone Mortalis and Sector Mechanicus scenery - Designing a modular Necromunda board -
Click on this picture to open a high resolution picture
You are going to find all the publications posted on the Instagram @figouz and the @figouz.net Facebook page since 2018. These articles contain more than 150 pictures and even videos with step by step, work in progress, close-up, things, astuces, ideas... I hope you'll like this new content!
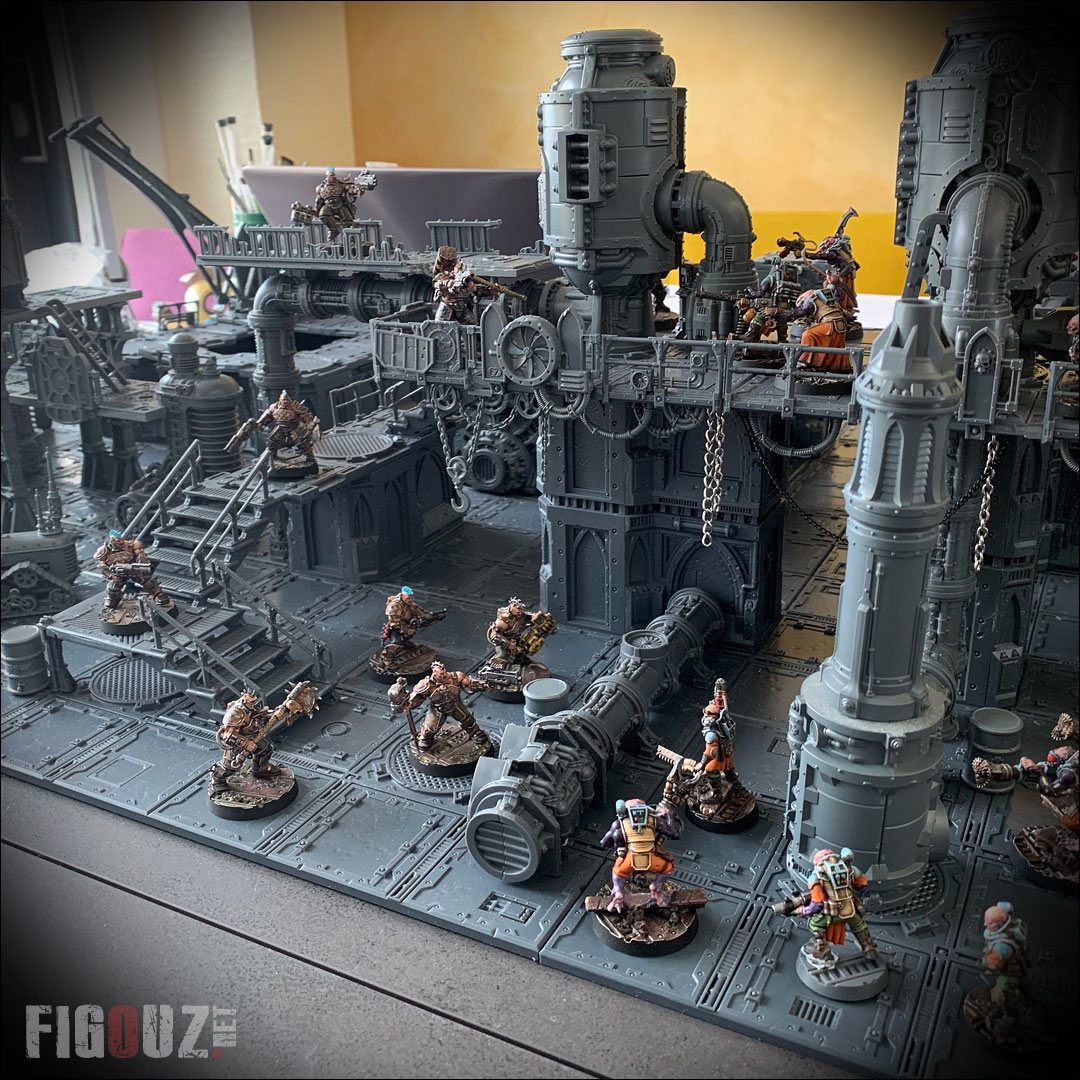
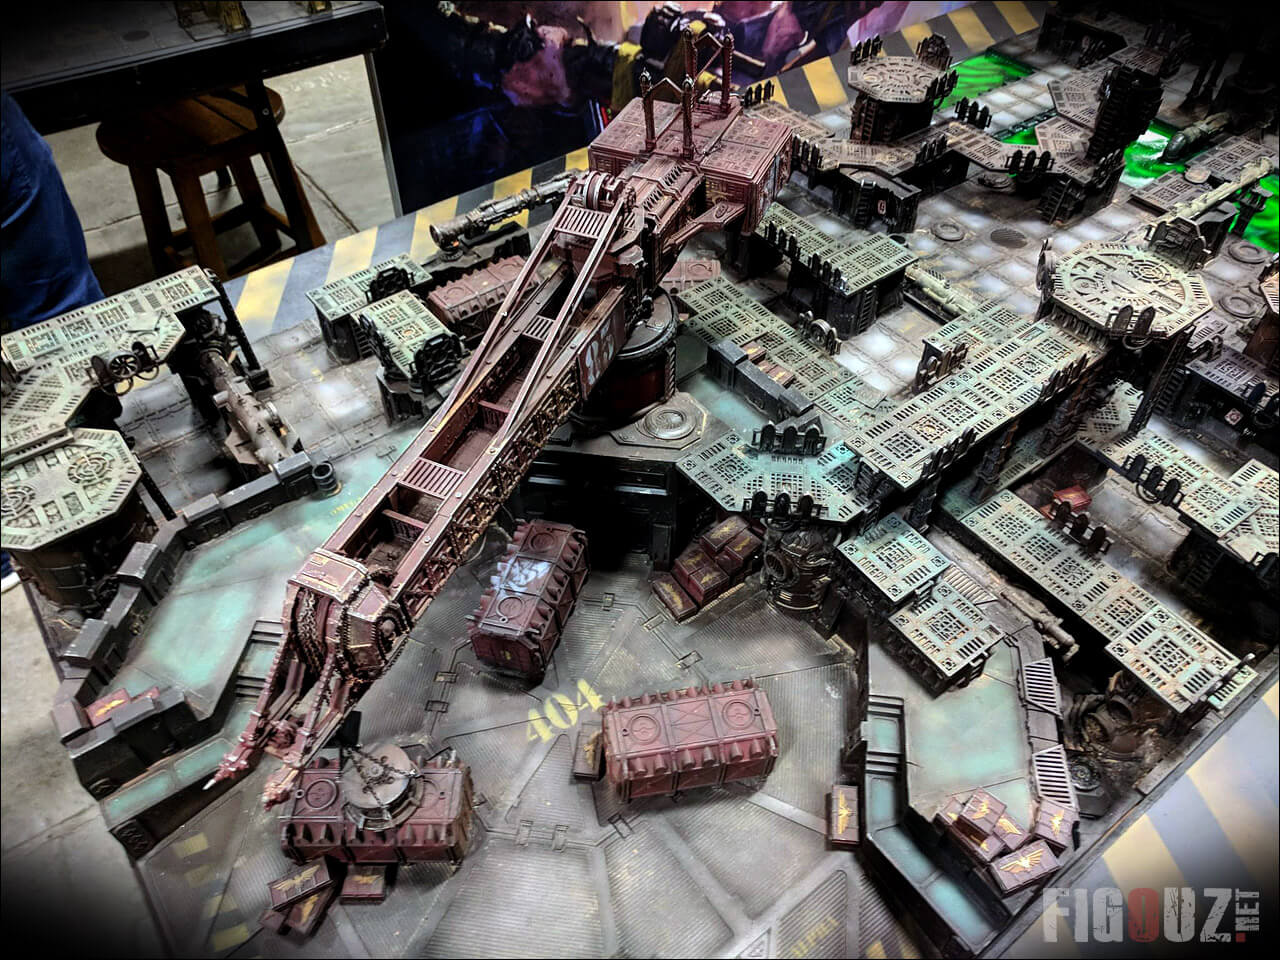
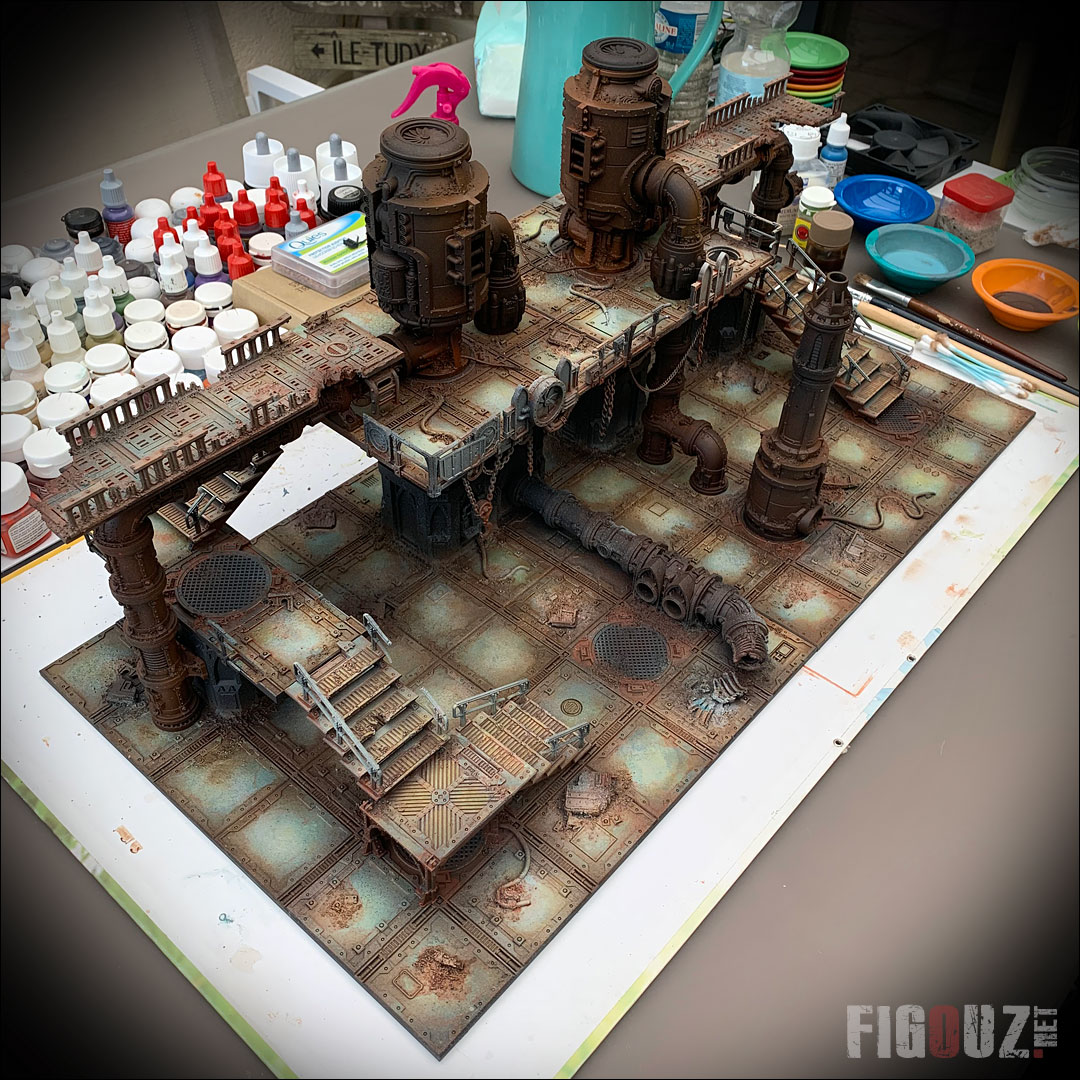
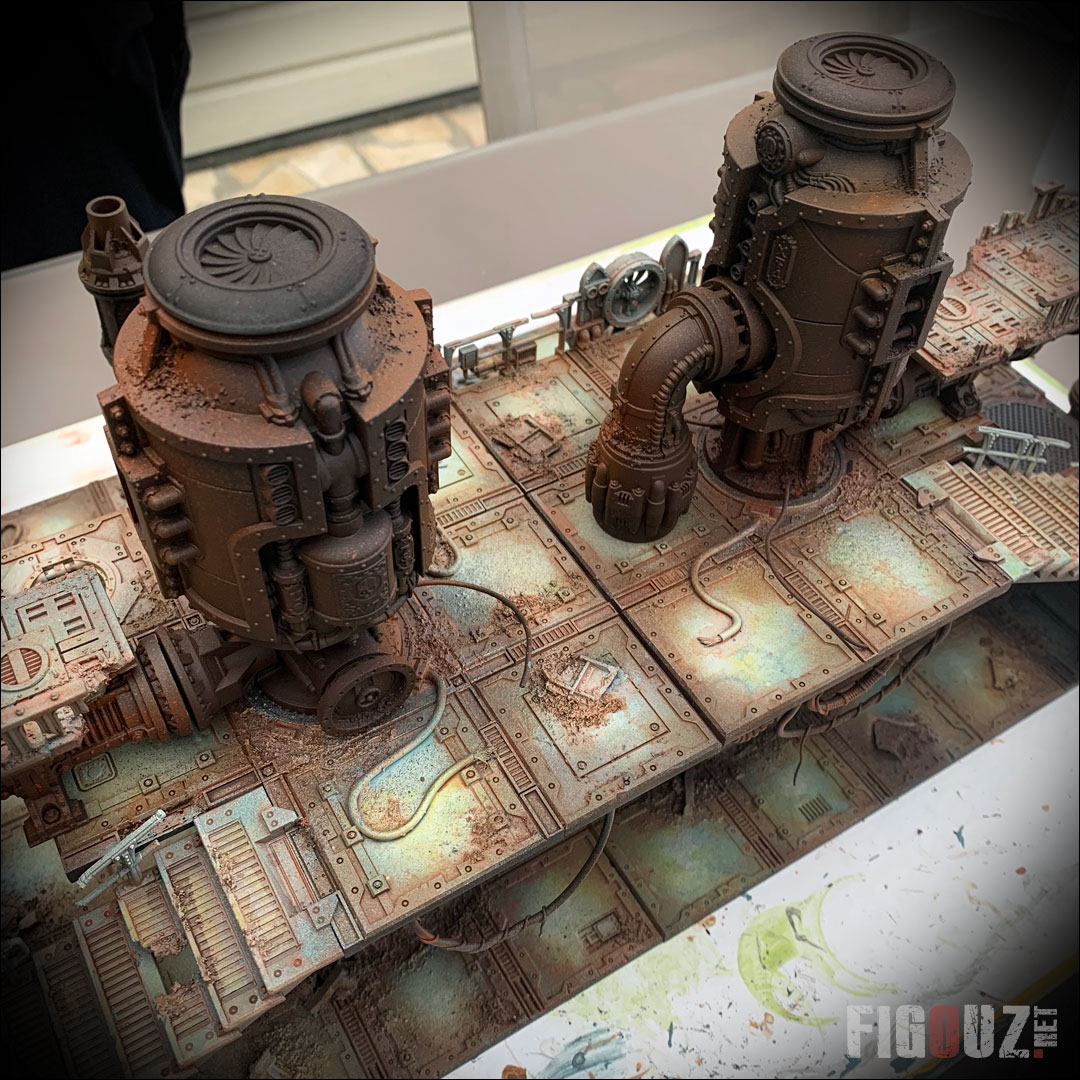
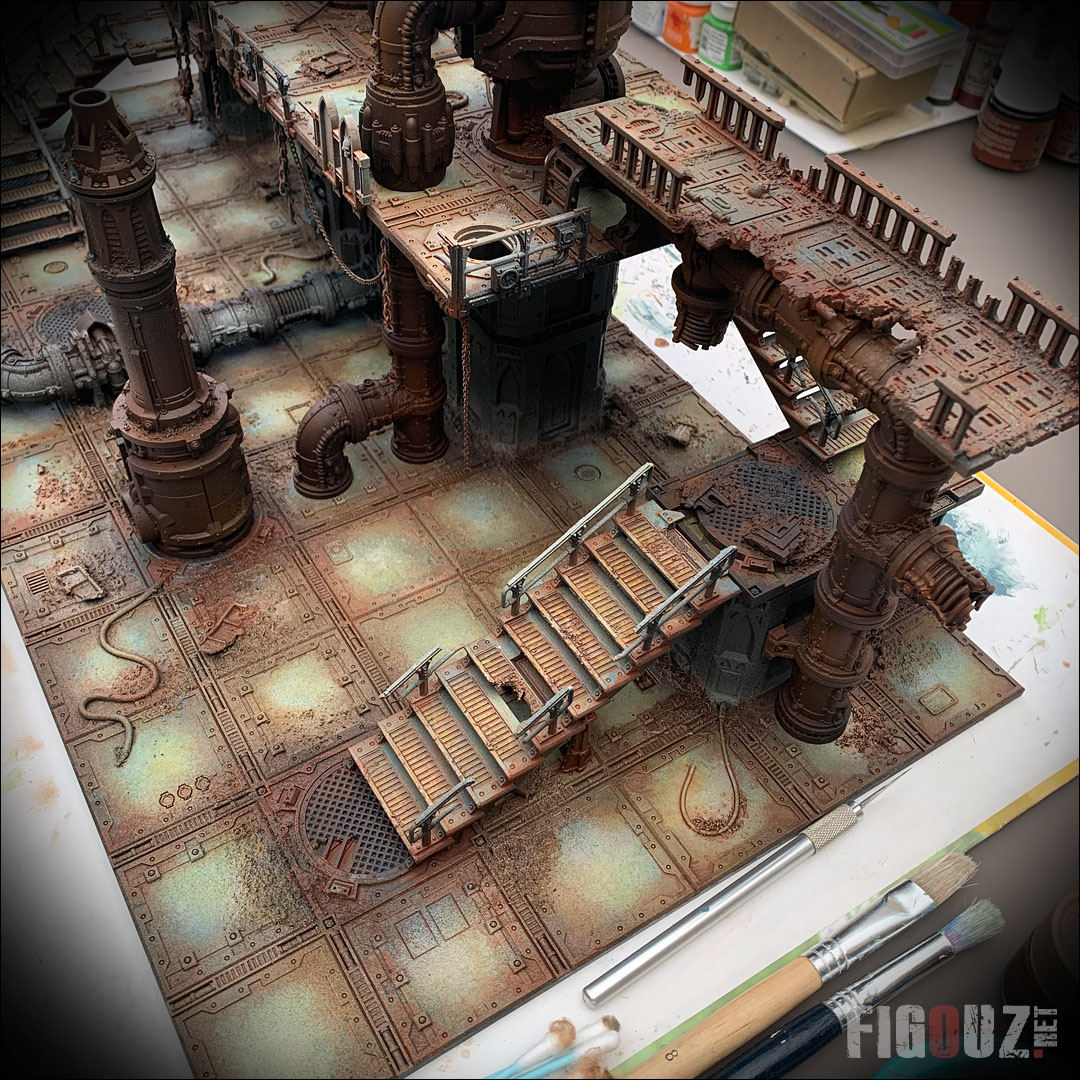
Here is a new really good big project that will undoubtedly be long and laborious, but which does not scare me. I'm used to working over time without giving up. Take a look at my Epic Armageddon armies such as the Death Korps of Krieg or the Death Guard 30K Horus Heresy to realise what the obstinacy of the Big Z is all about. :)

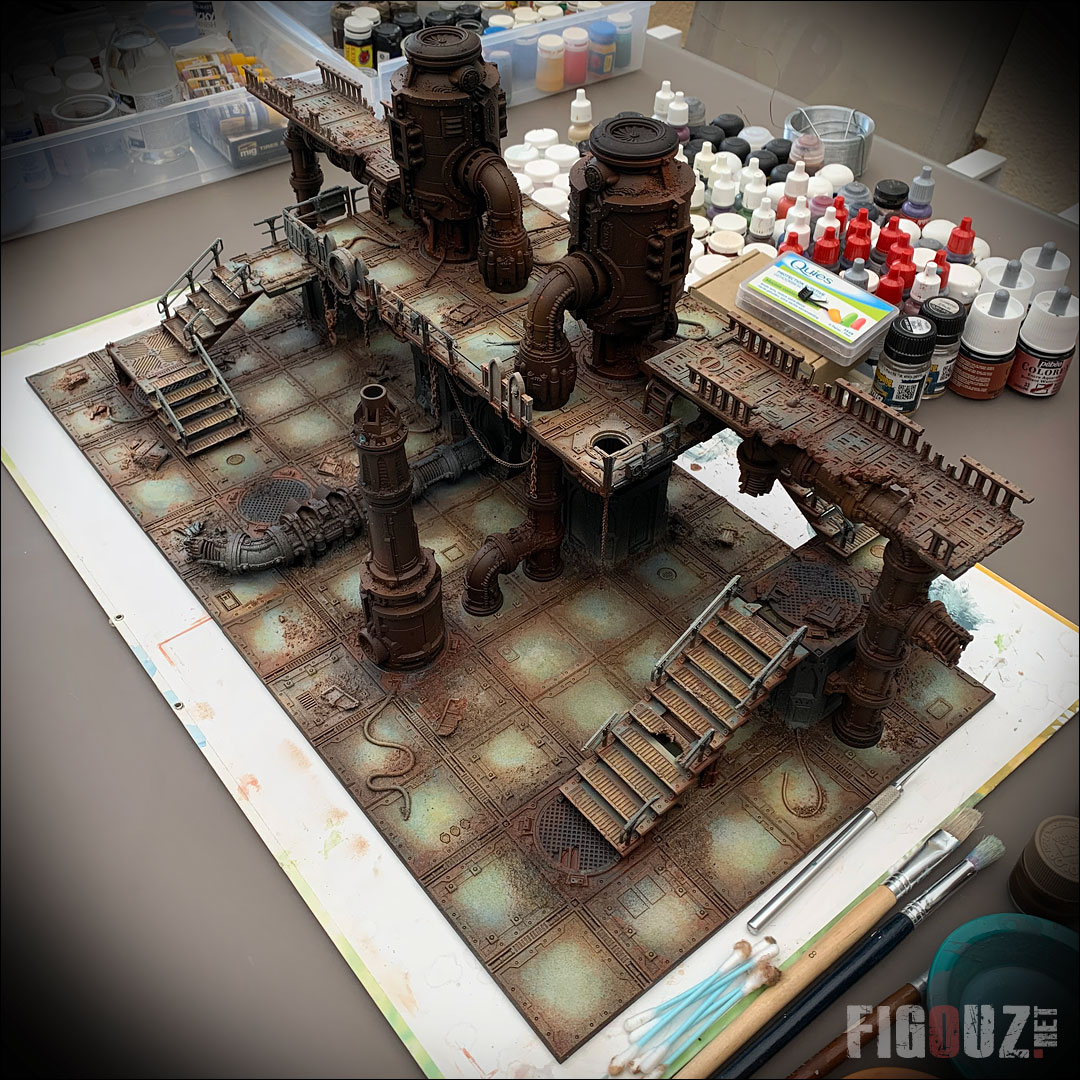
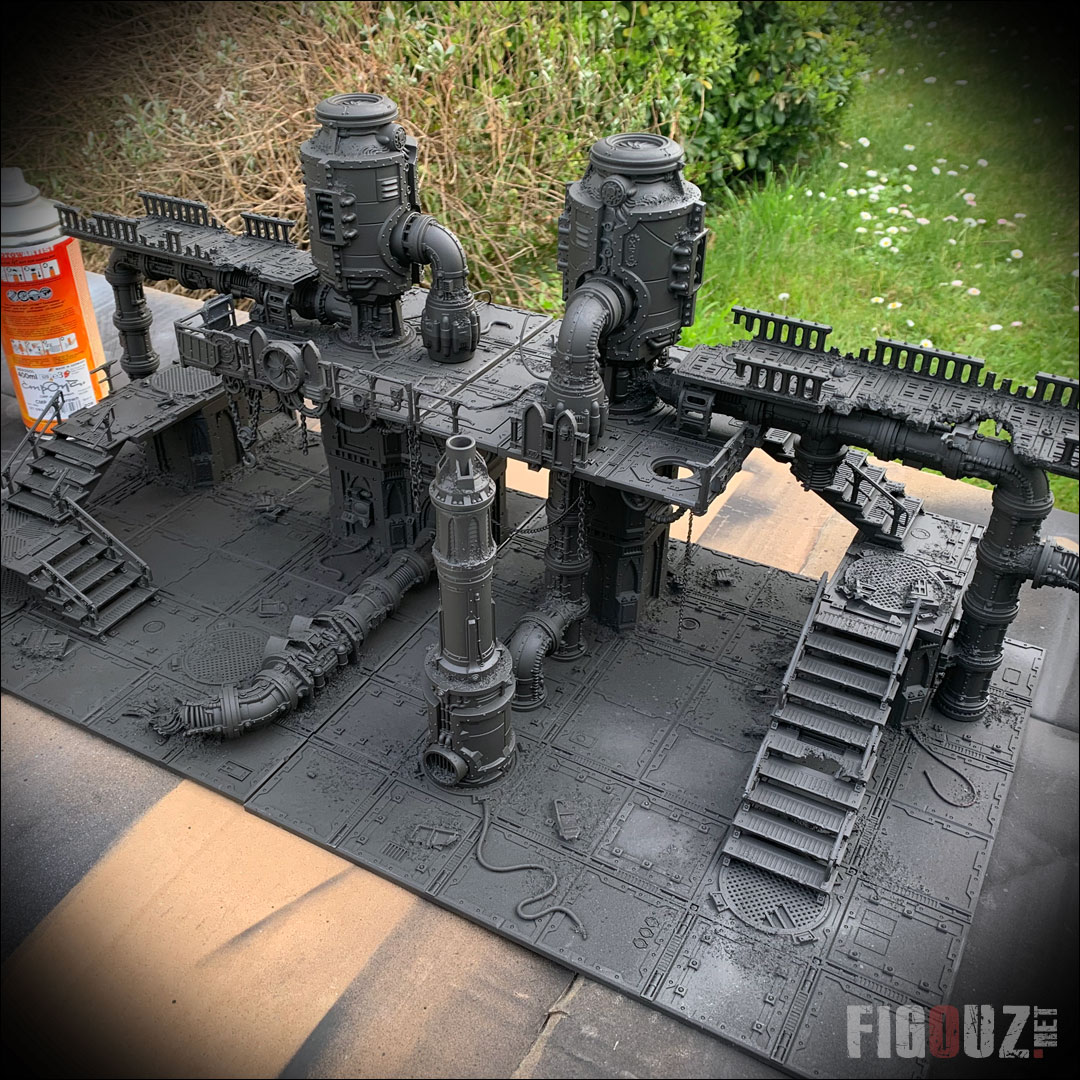
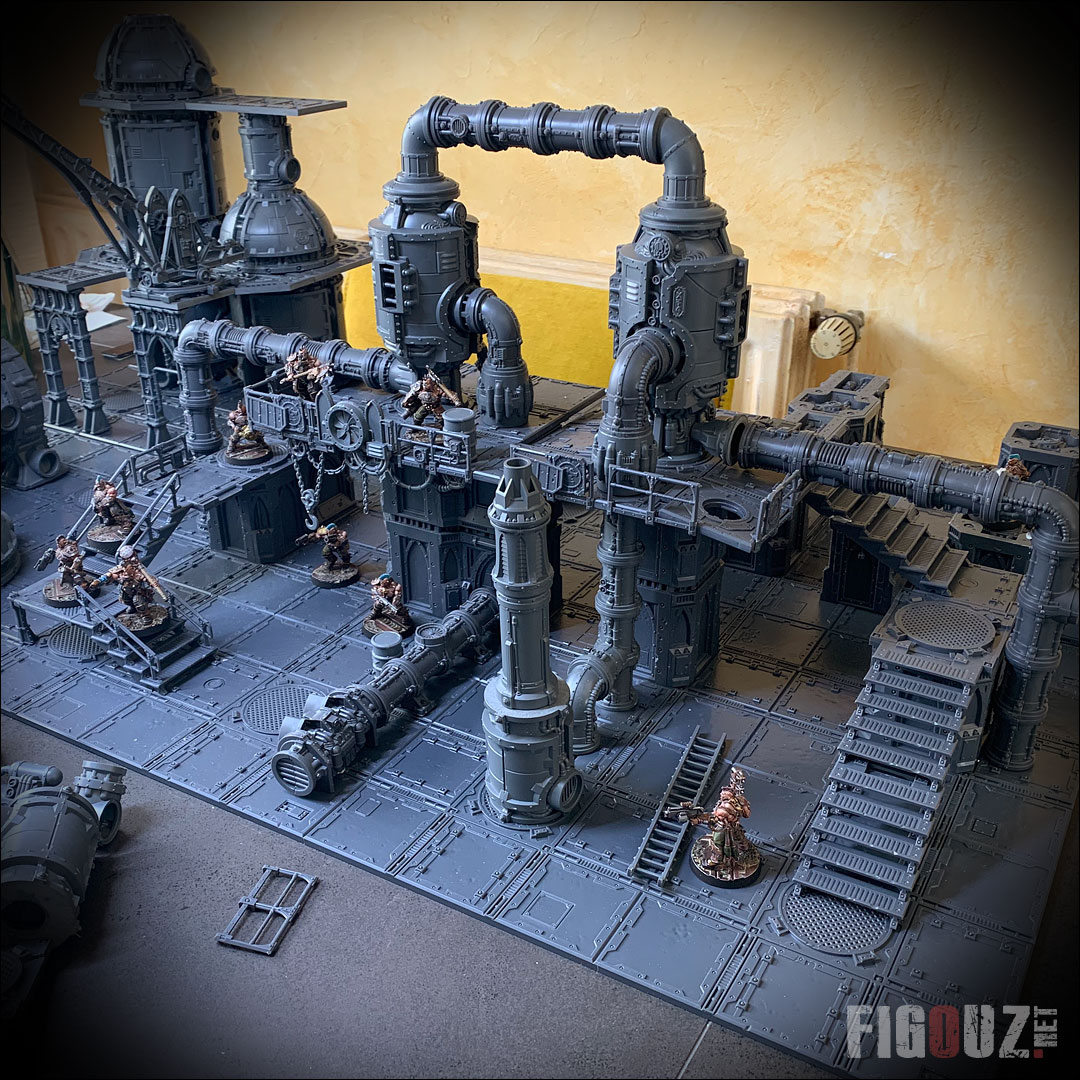
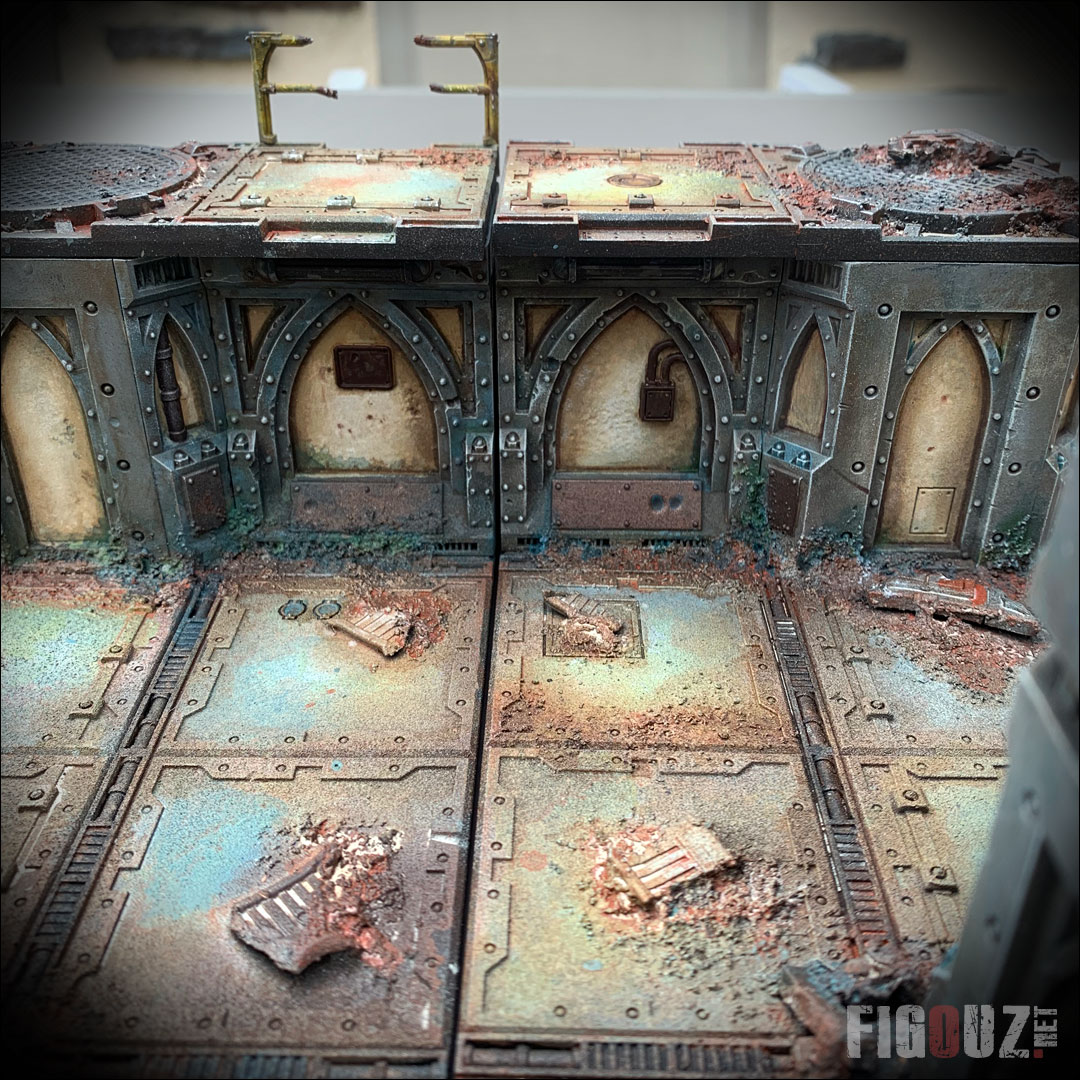
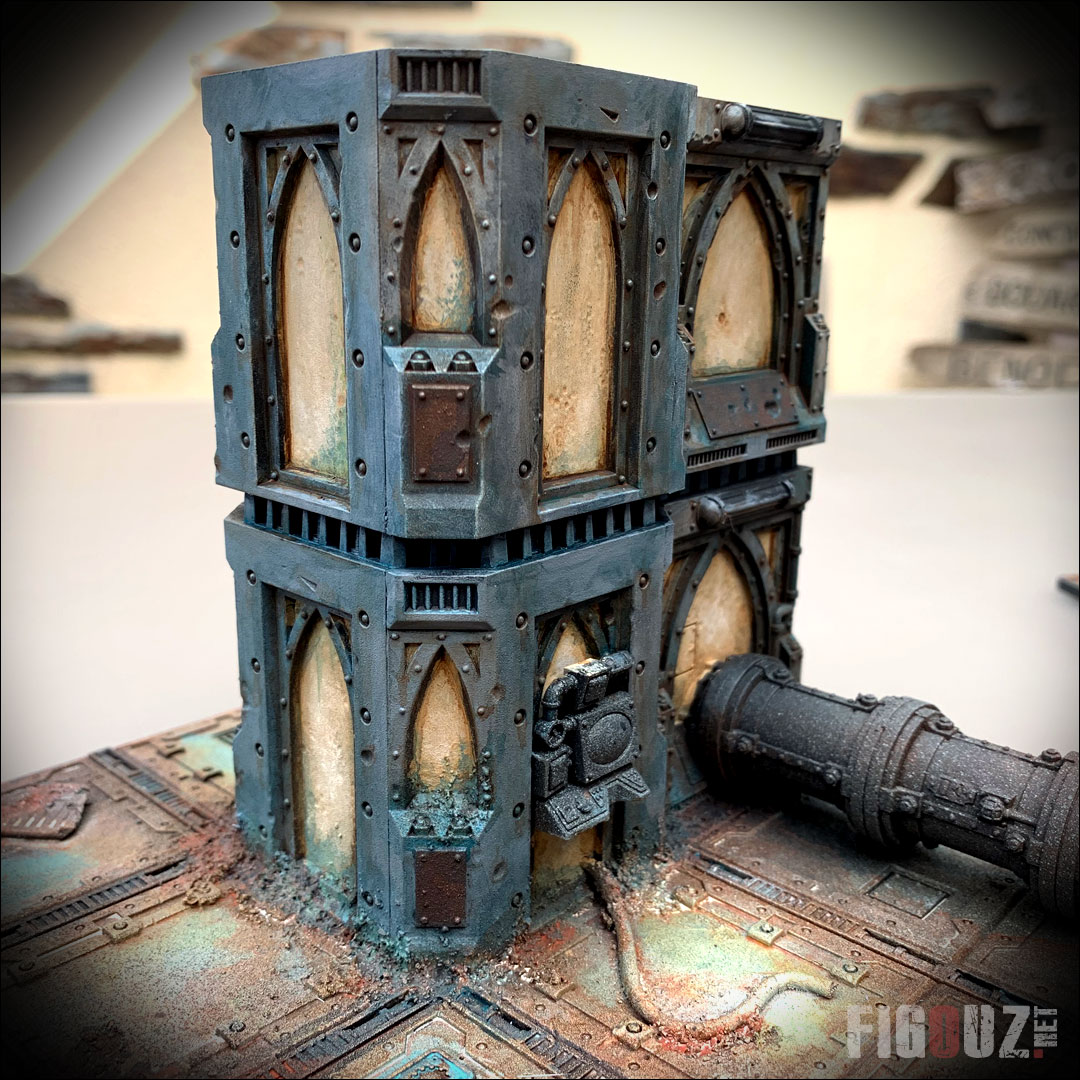
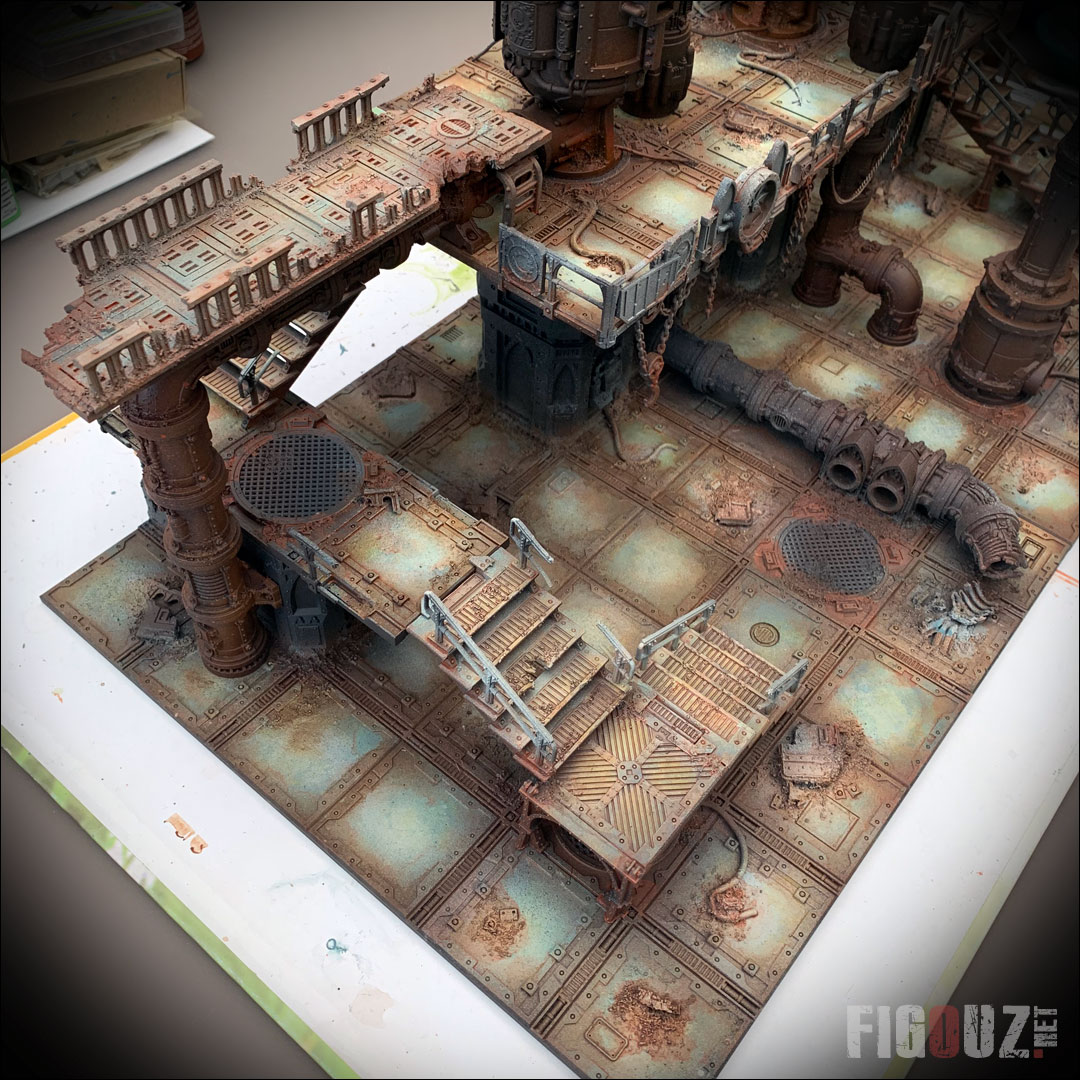
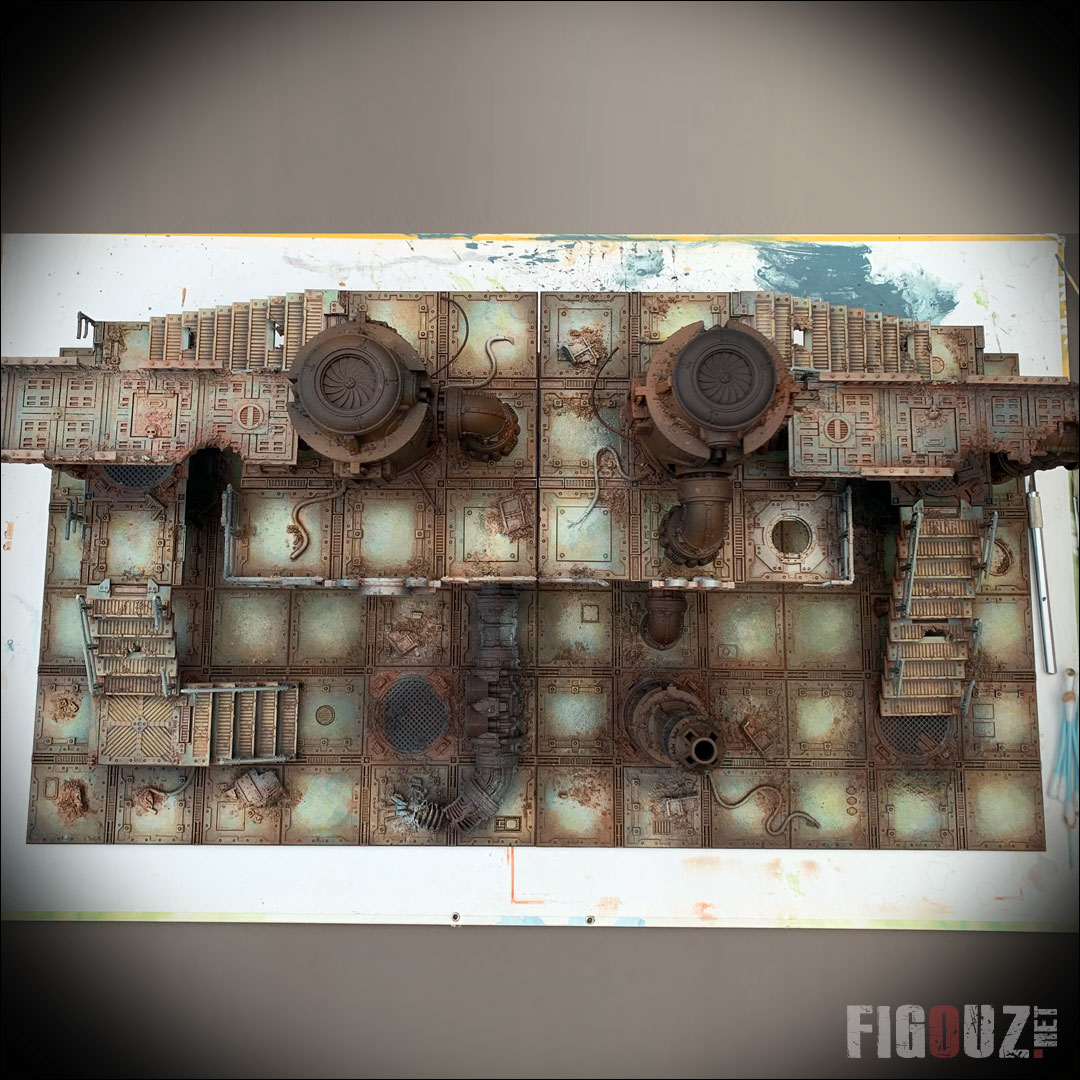
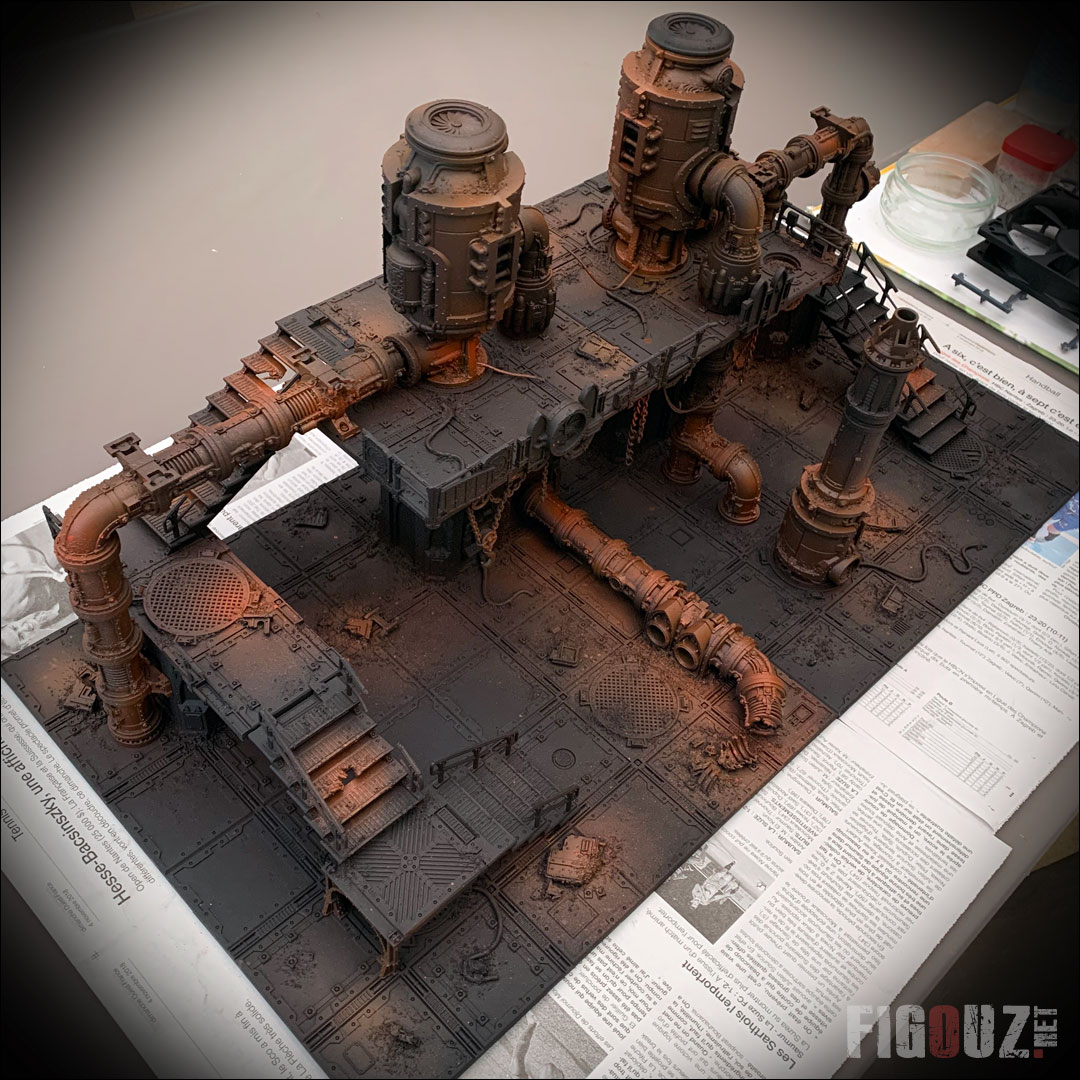
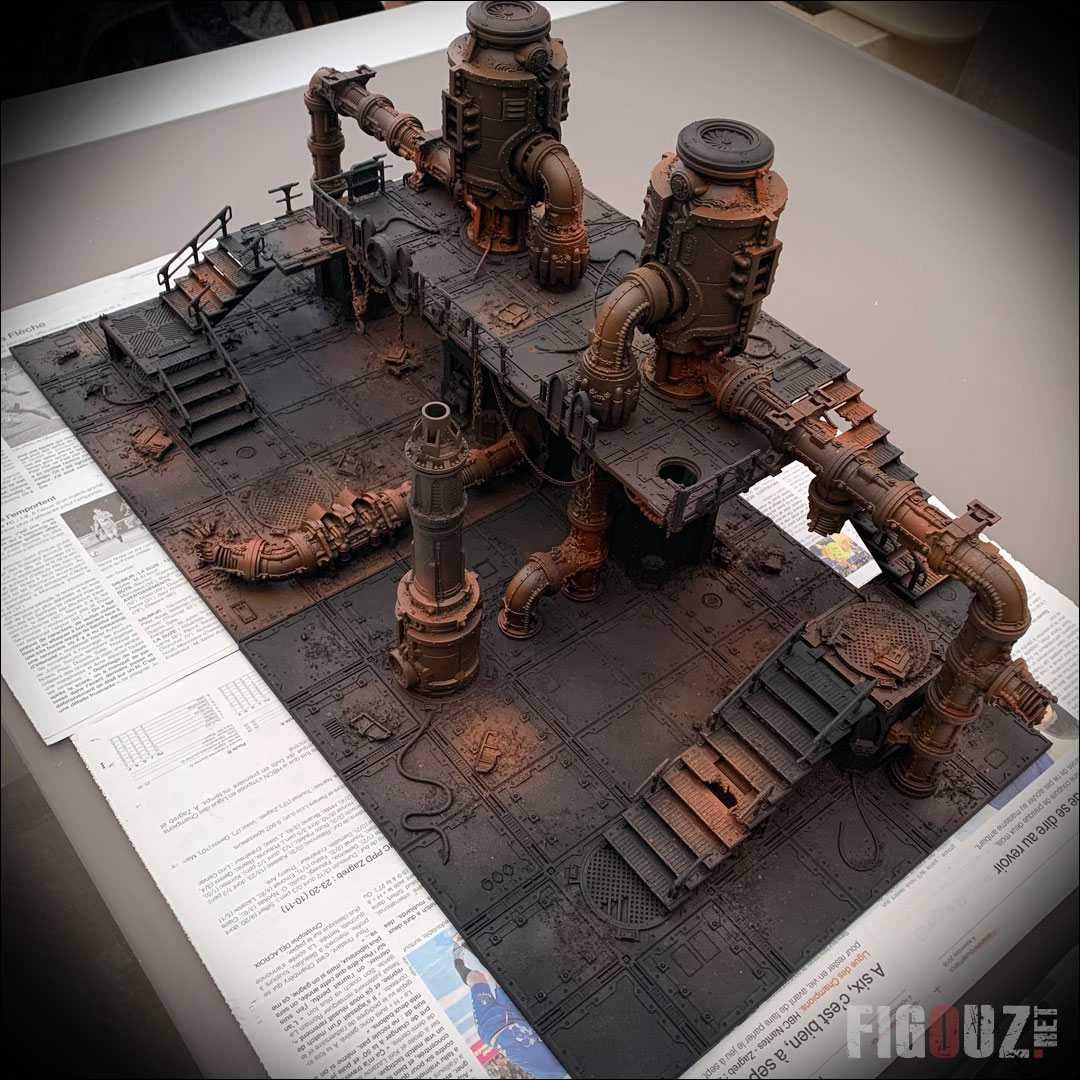
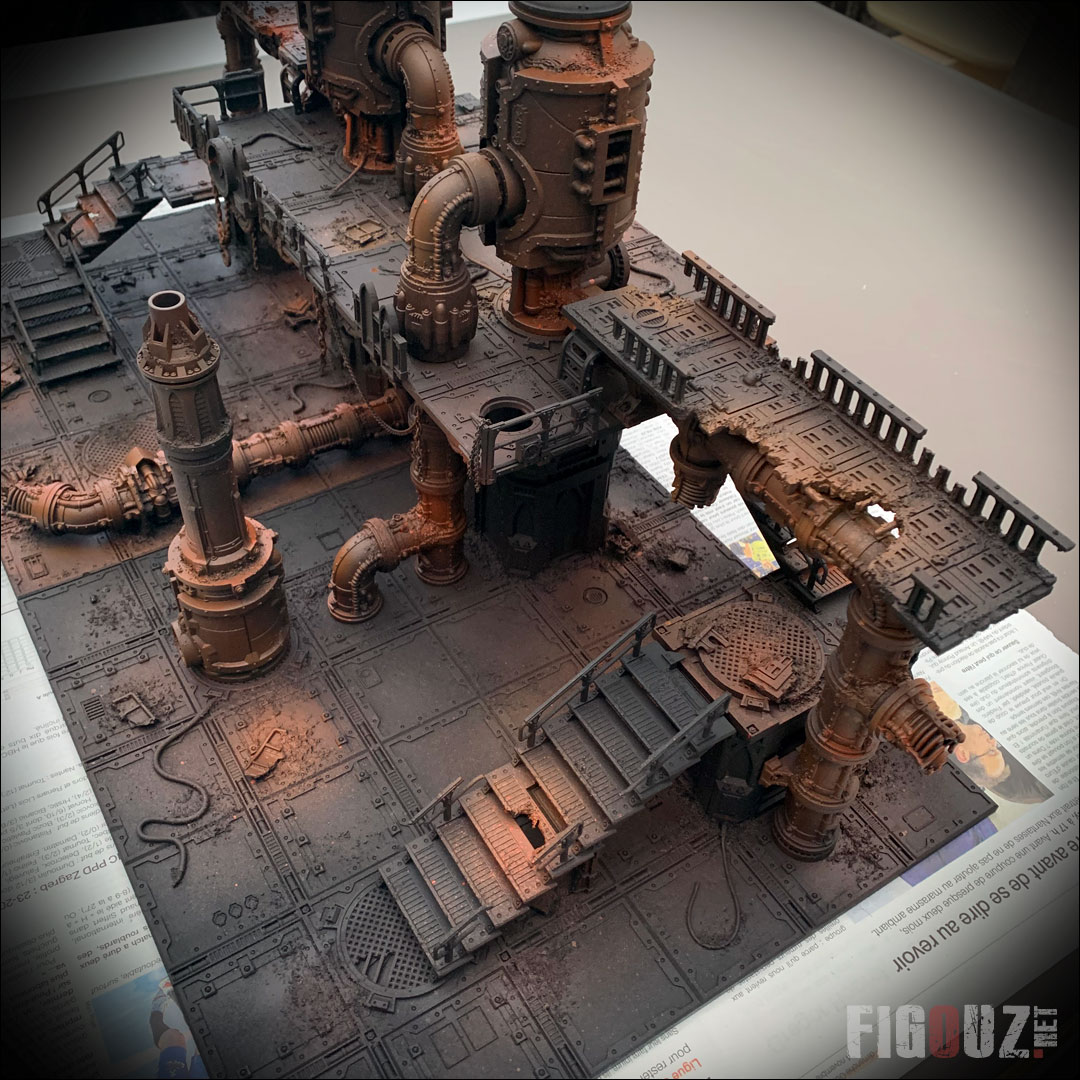
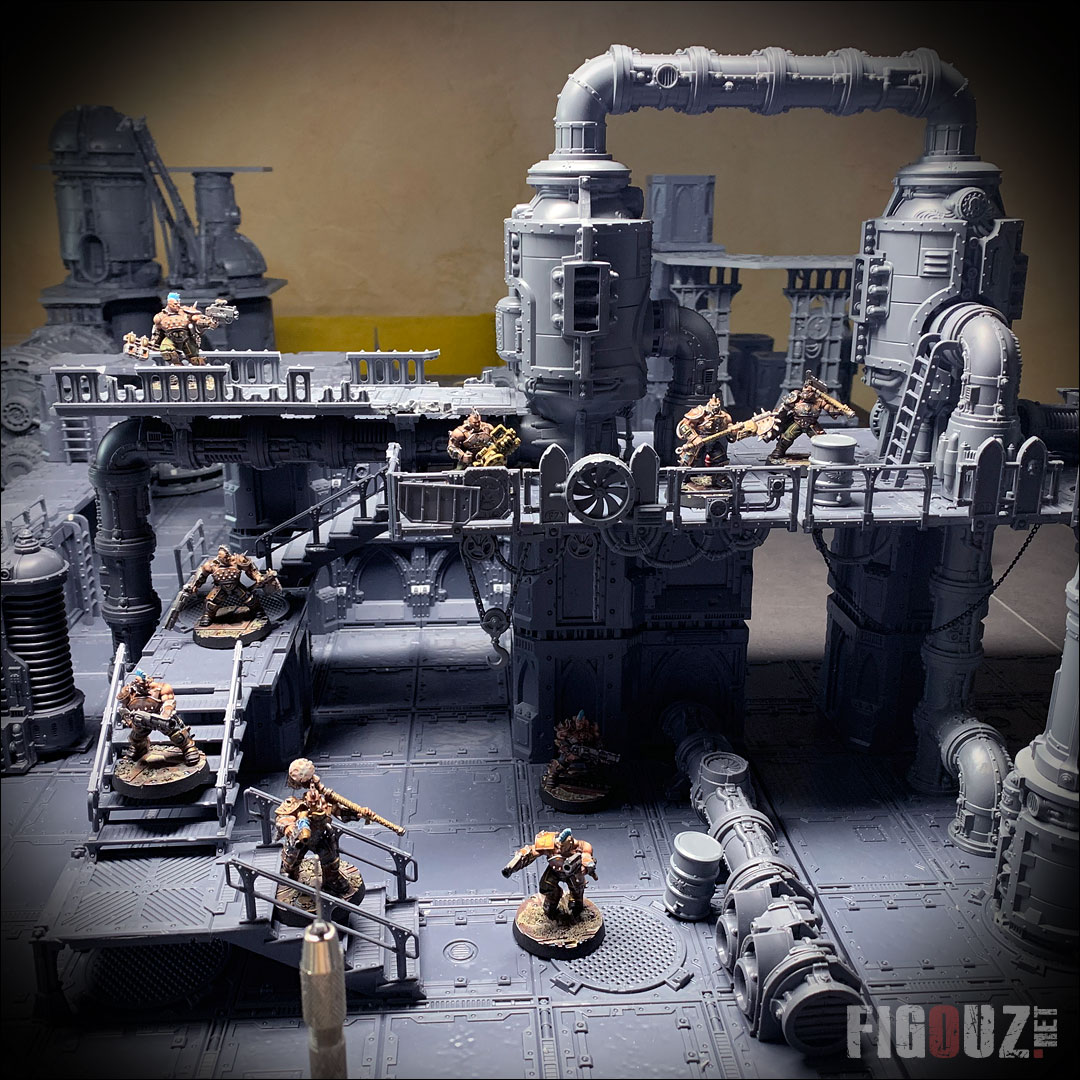
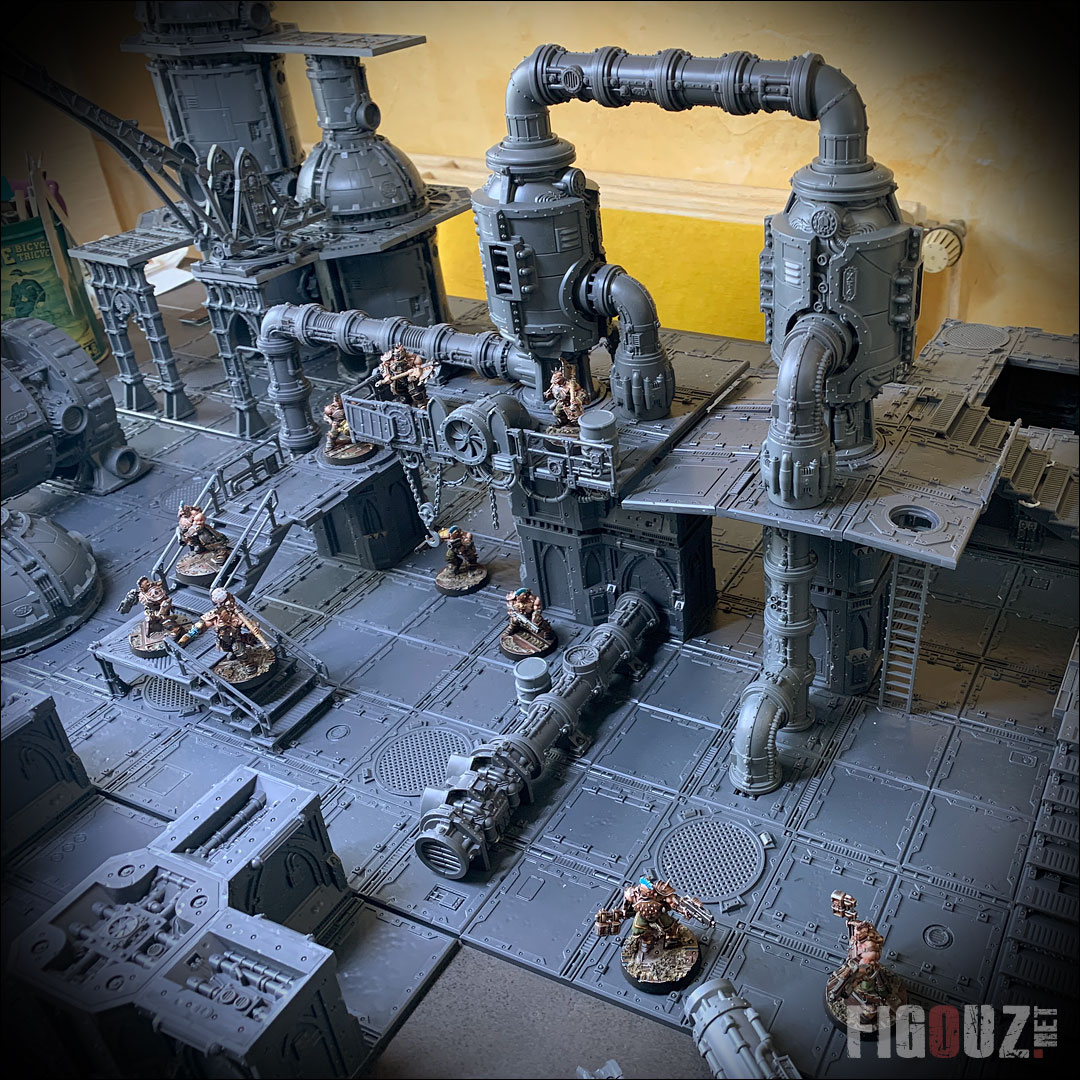
Painting details of the tiles - The return !
::: 15 November 2020 ::
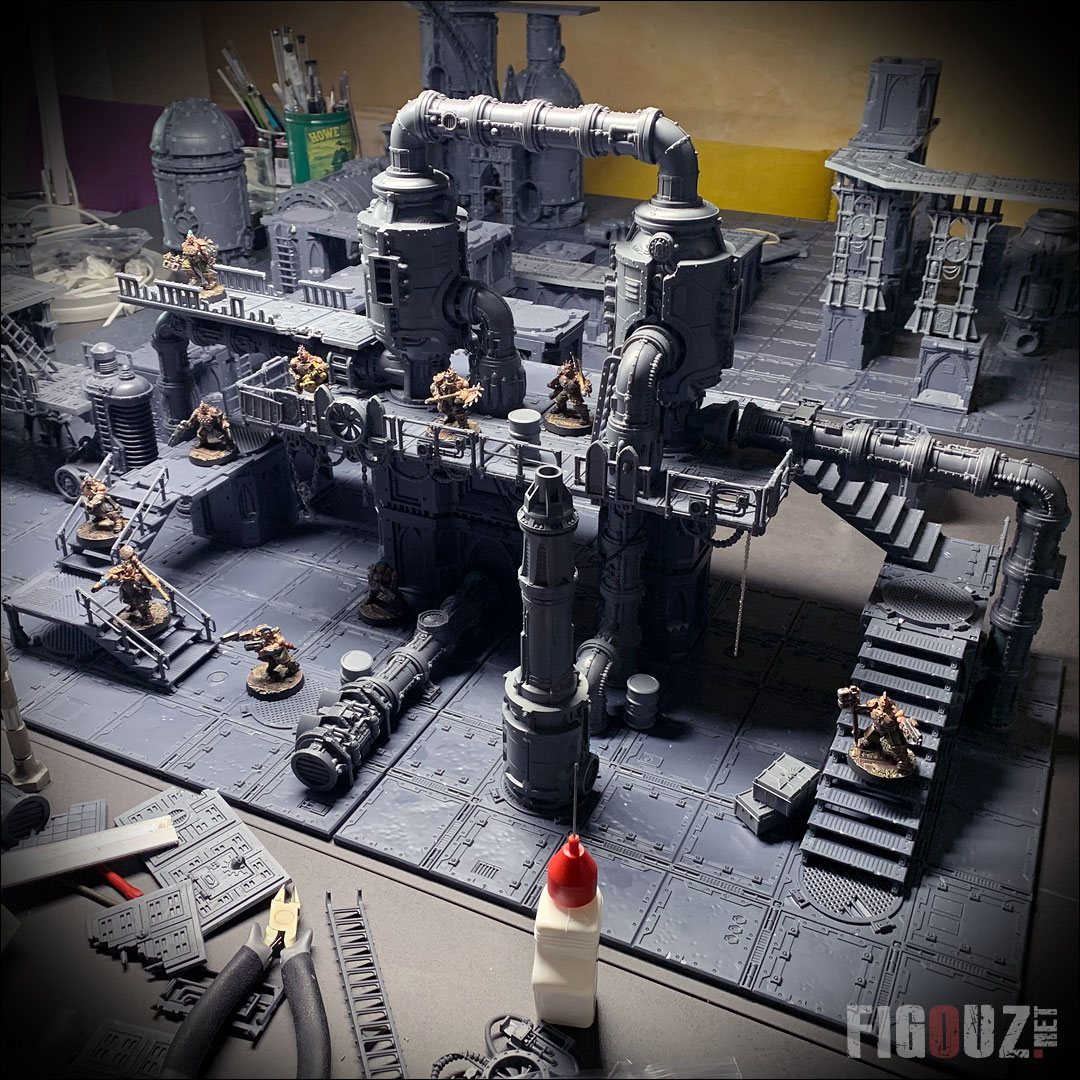
I hadn't touched my beautiful scenery since last April. Writing all the articles below and editing these hundreds of photos will have served at least one thing: they made me want to get out the brushes!!!!!
During a small Sunday session, I was able to paint a few more details on my two Necromunda modular tiles. Here are some pictures !
- Necromunda Zone Mortalis - Painting details of the tiles -
Click on this picture to open a high quality pictures gallery
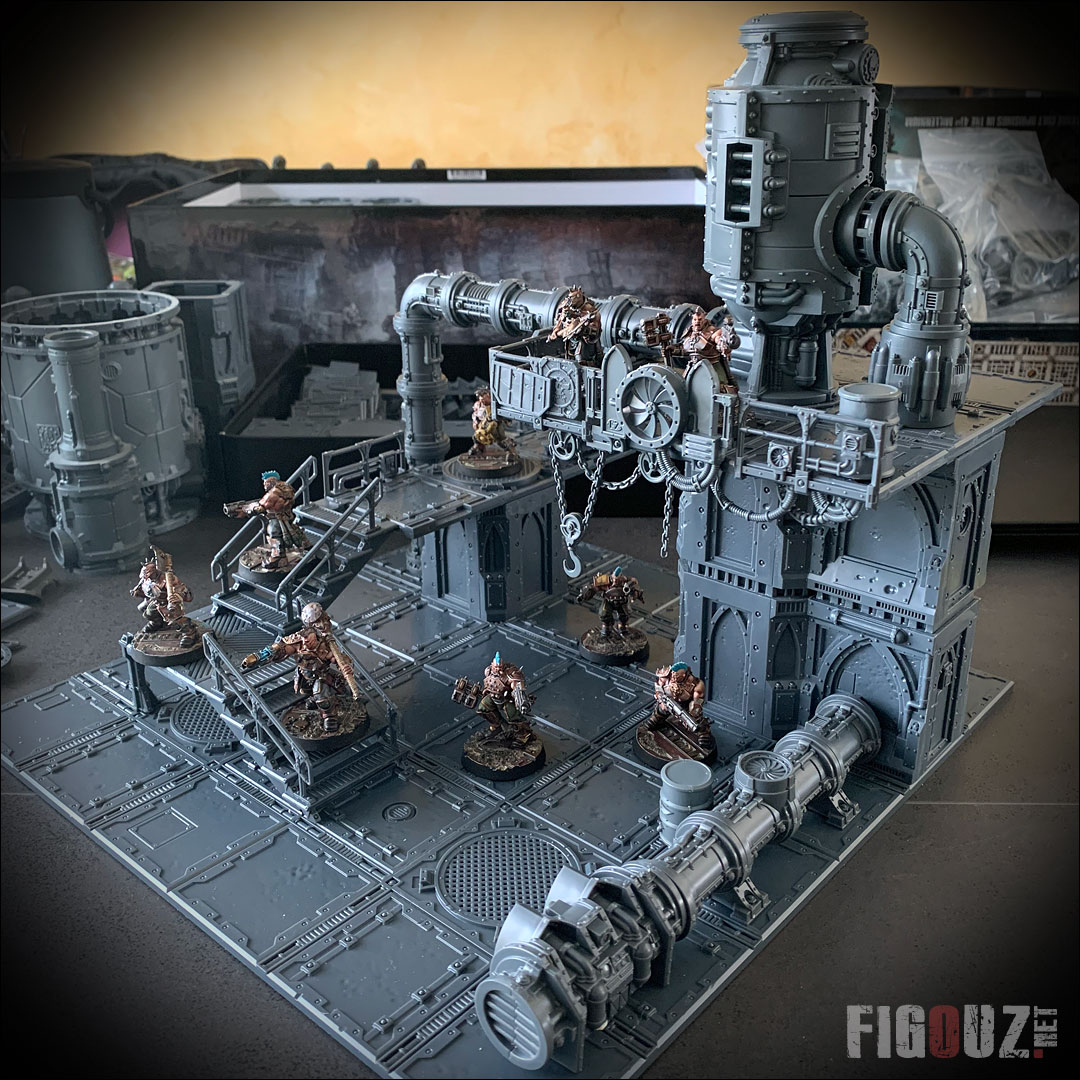
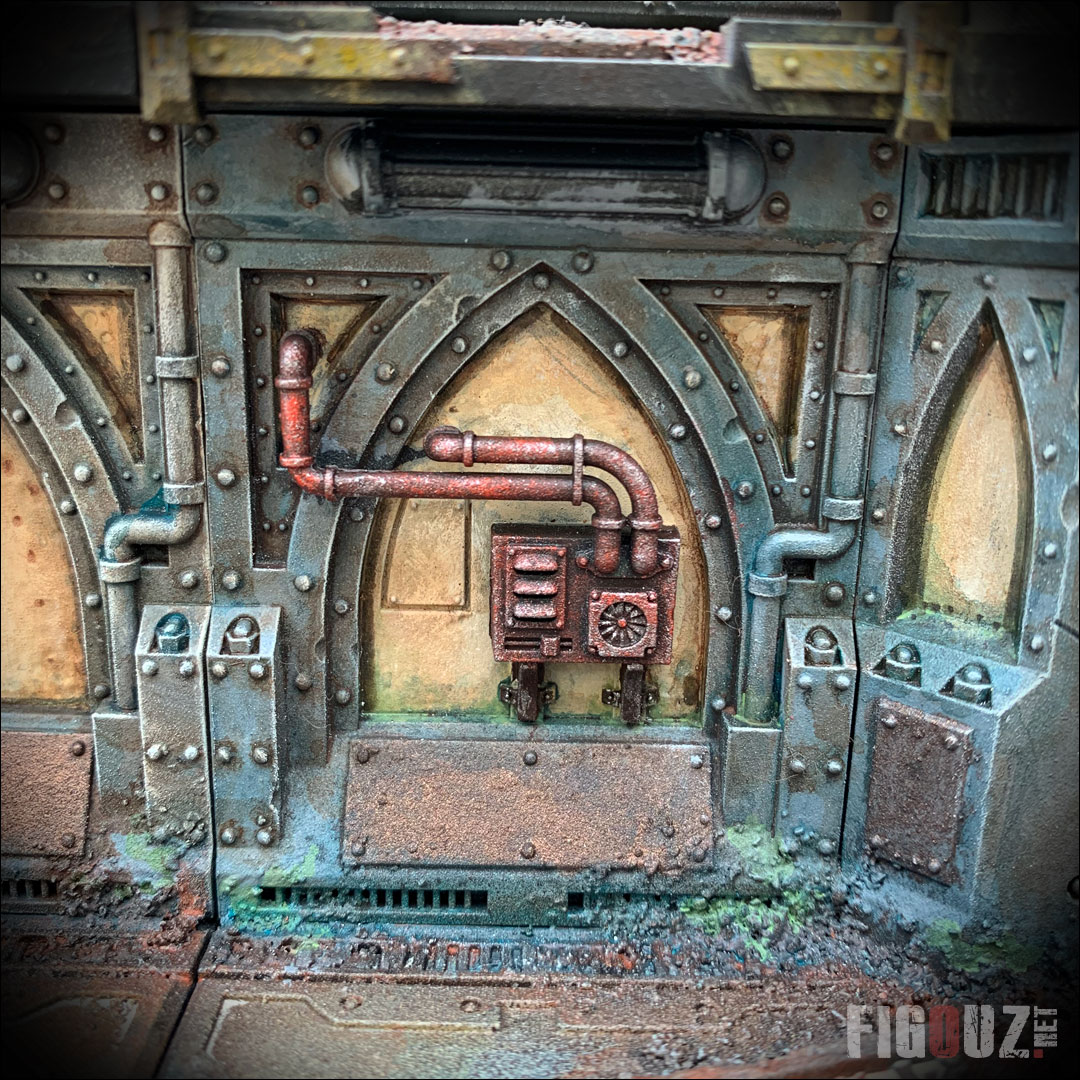
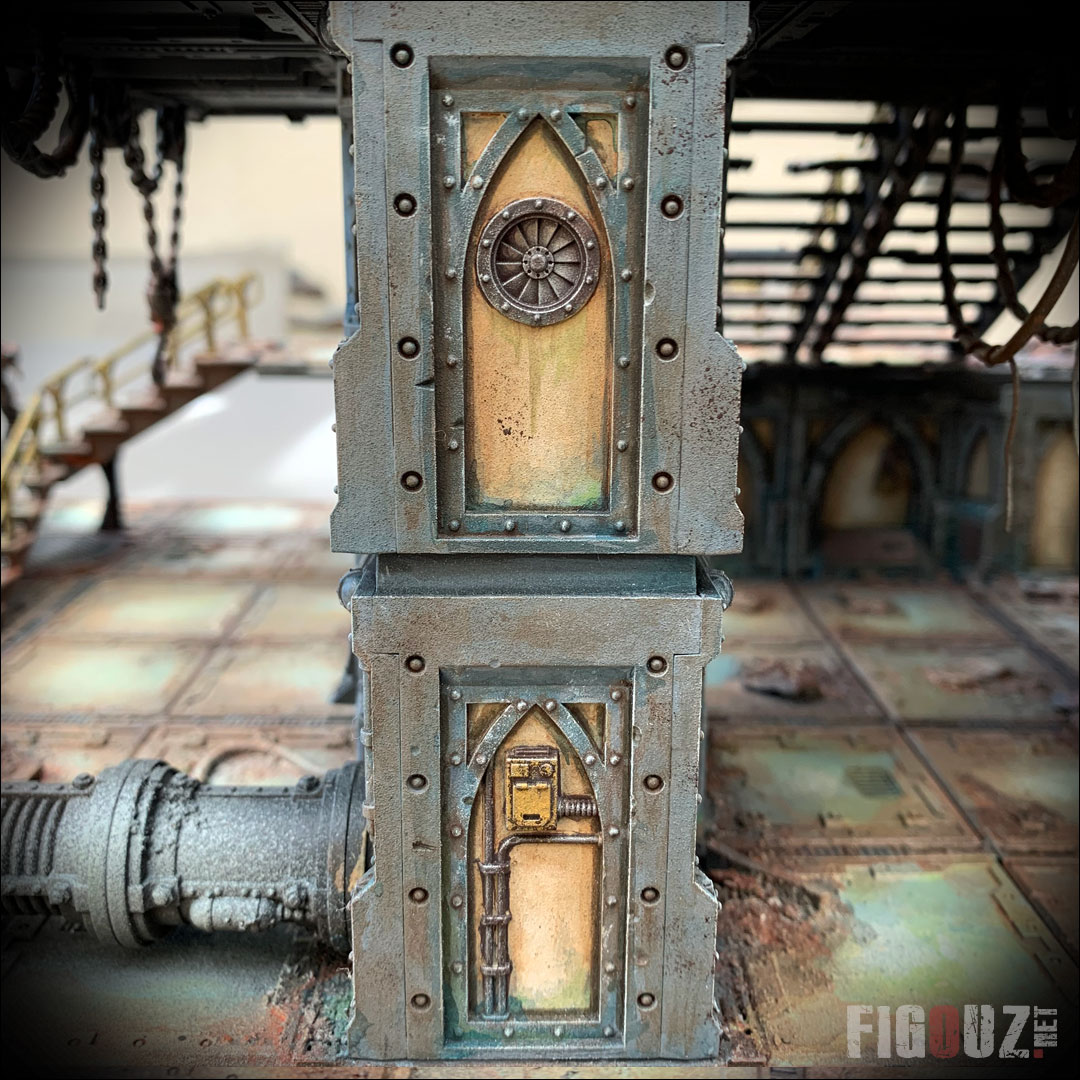
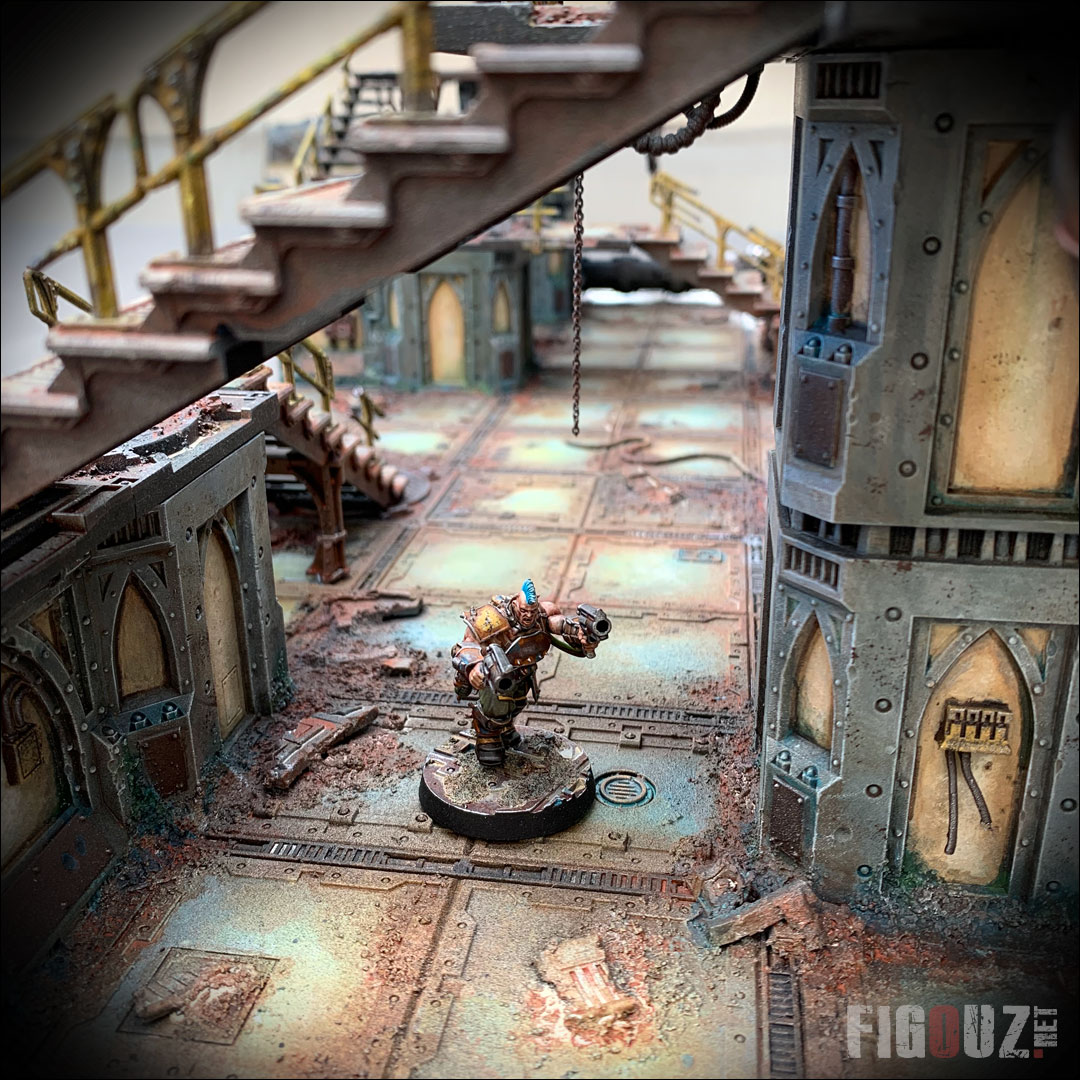
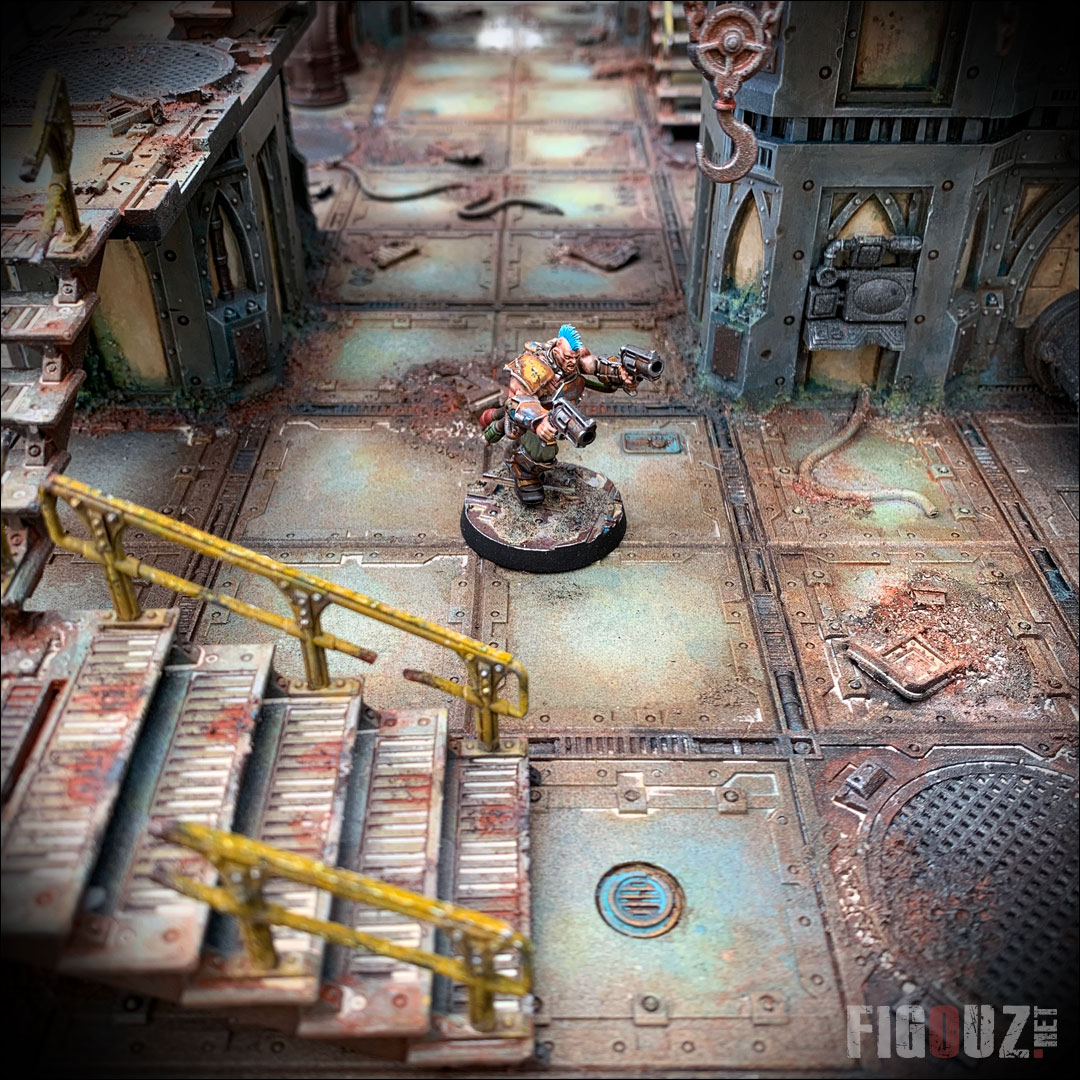
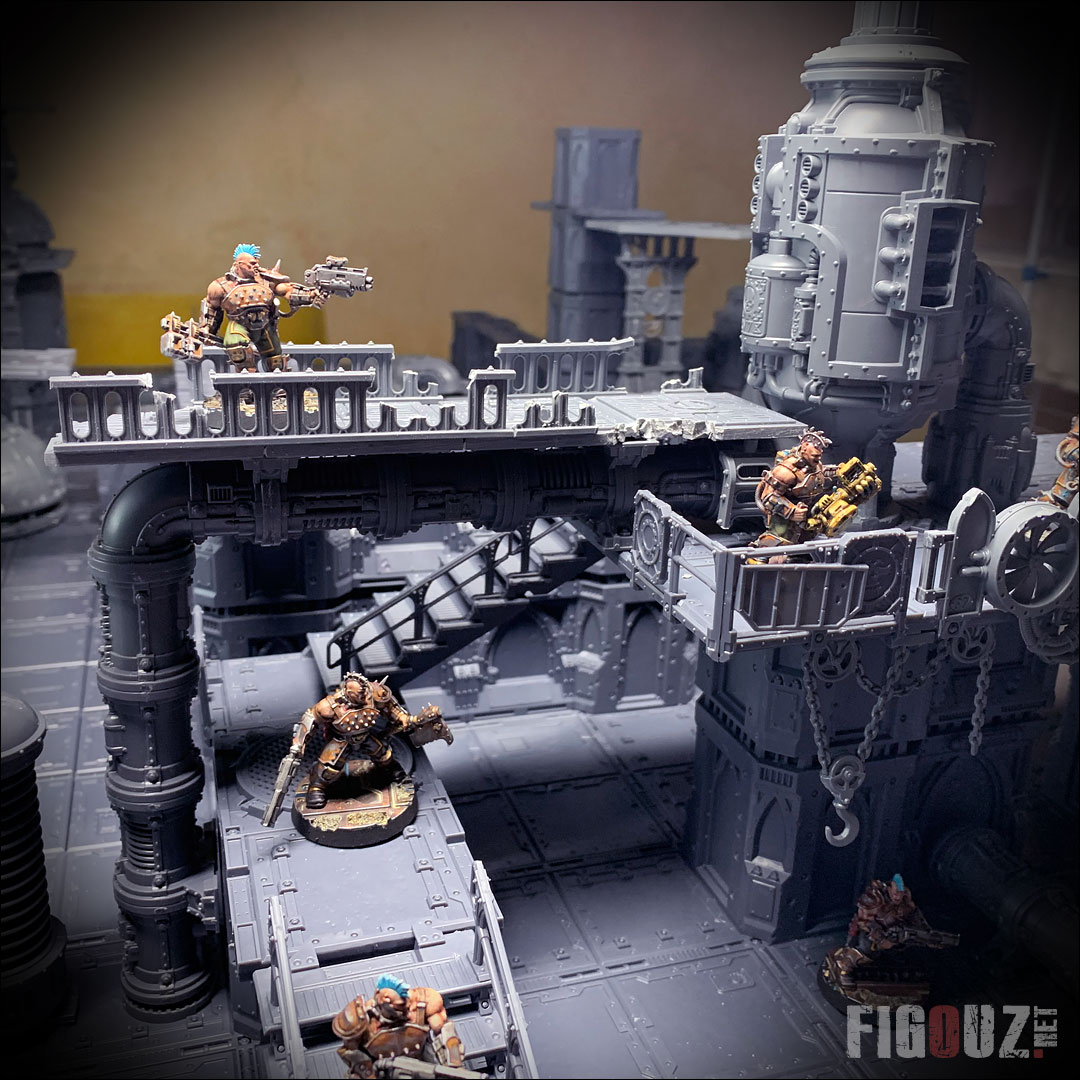
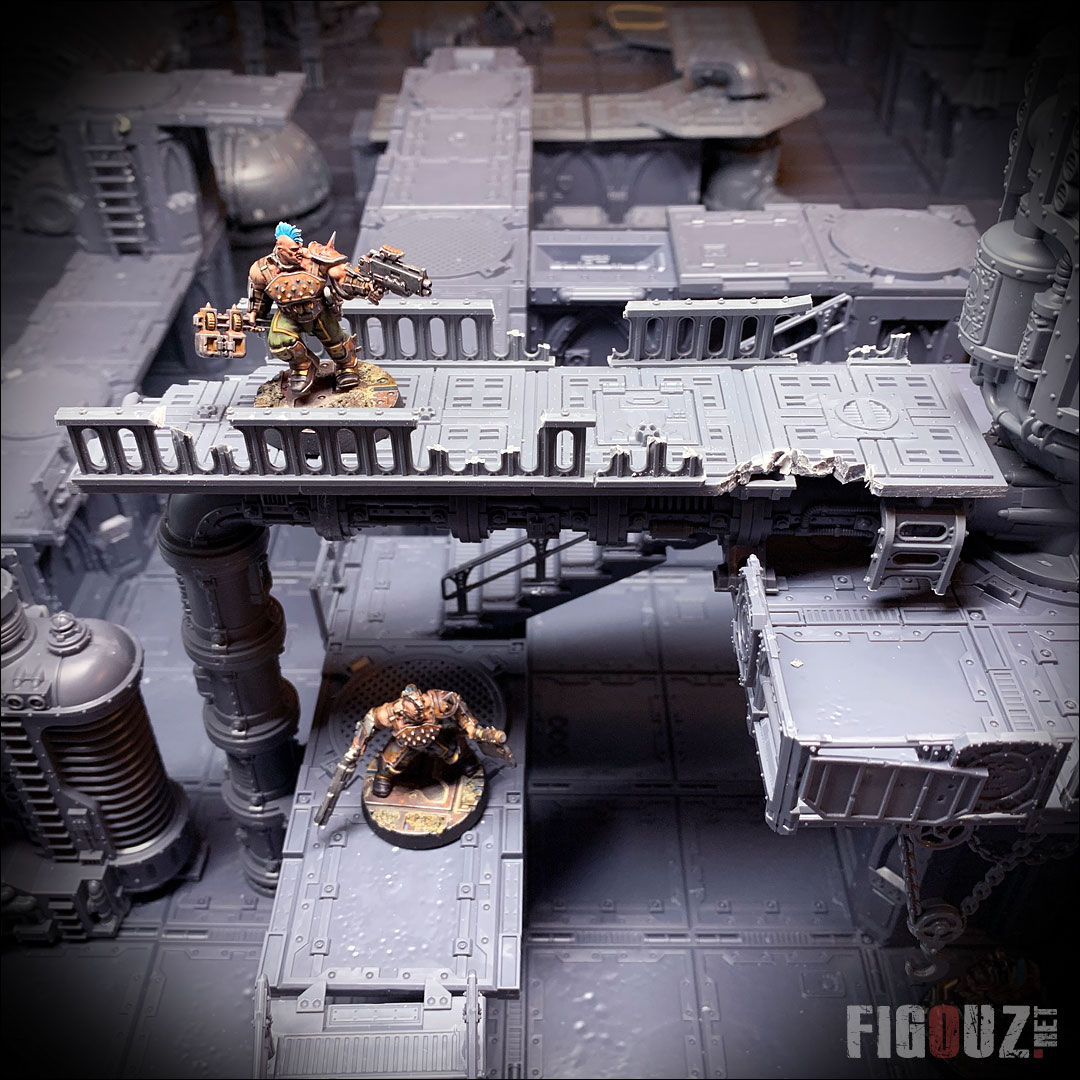
Painting details and staging of a miniature !
:: 18 April 2020 ::
It's Saturday morning, my week off is coming to an end soon and I decide to give myself a little morning kiff! I took advantage of the beautiful sunshine to take out the brush and quickly paint some details, such as electrical boxes, pipes, vents and other small elements that embellish walls and columns.
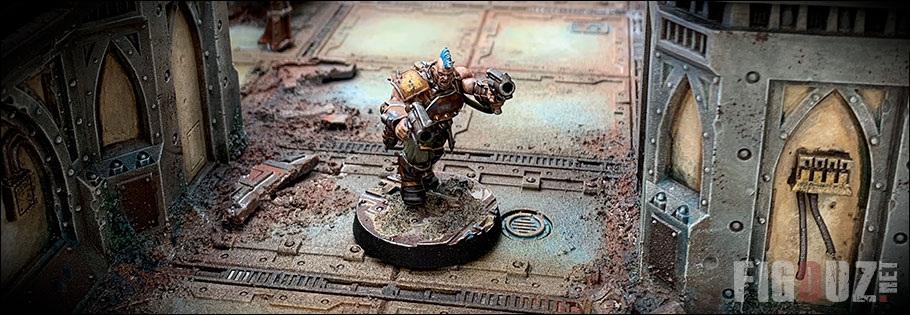
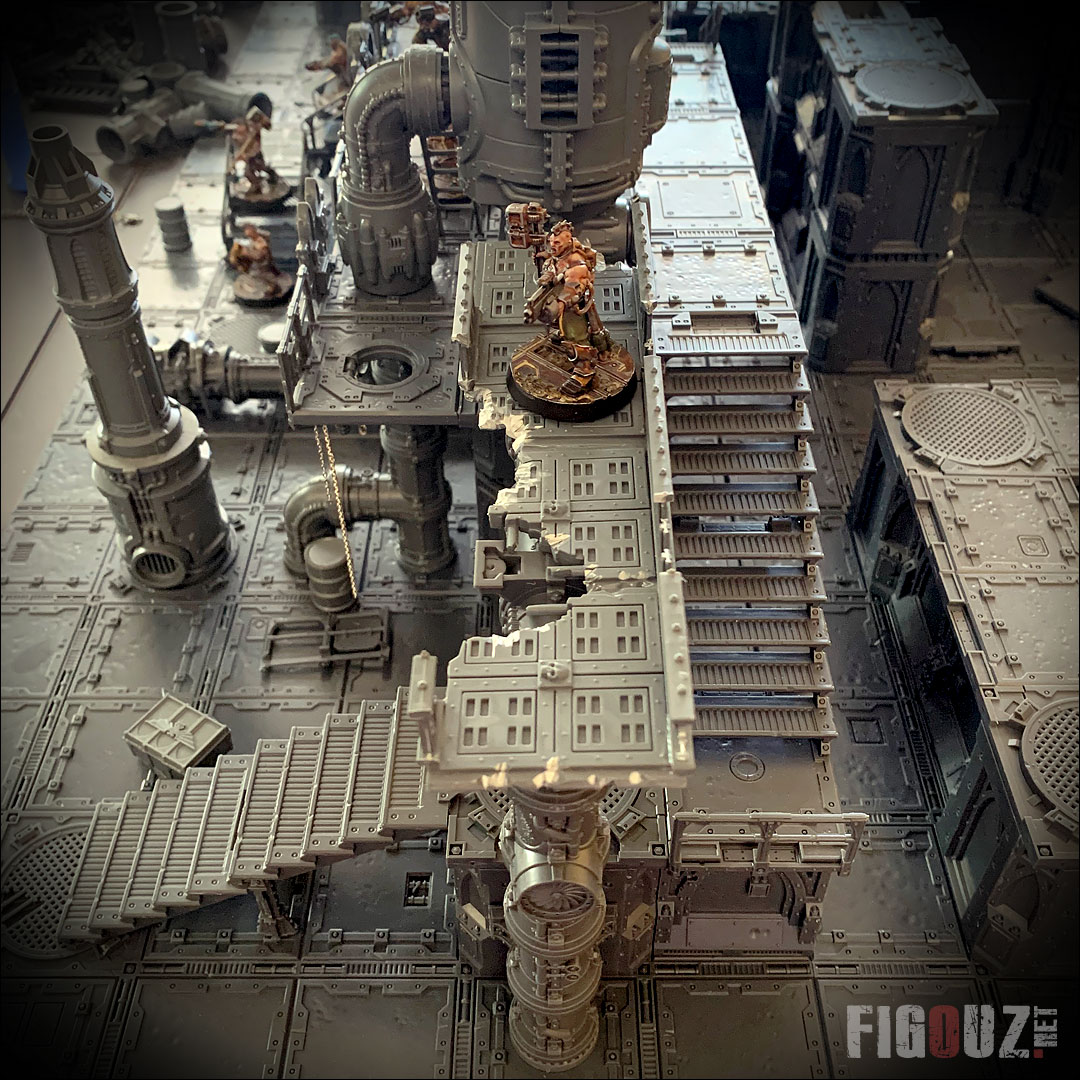
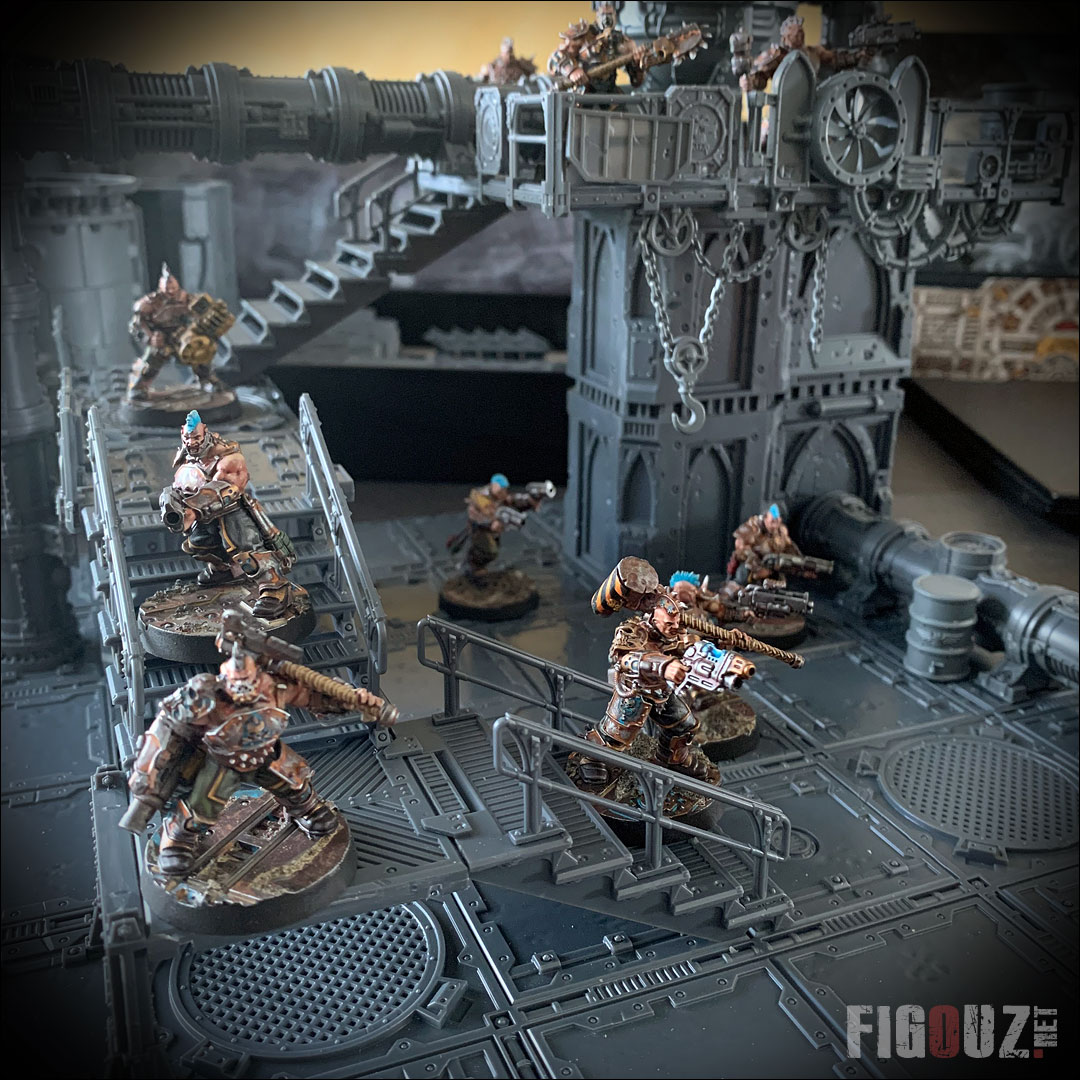
I also wanted to test the potentials of my freshly painted tiles as a picture background for the figurines. I took advantage of the beautiful natural luminosity to make 2 test pictures featuring Brag, member of the Goliath Gang of the Steel Brotherhood.
Is he fleeing from danger? Or running towards it in the dark corridors of sector 44 # 240? We will never know... I love it! These little pleasures make it easy to forget the long and laborious work of the previous days and really makes me want to add more details to these settings... But it's not at all reasonable ! ^^

- Necromunda Zone Mortalis - Painting of details and staging of a miniature -
Click on this picture to open a high resolution picture gallery
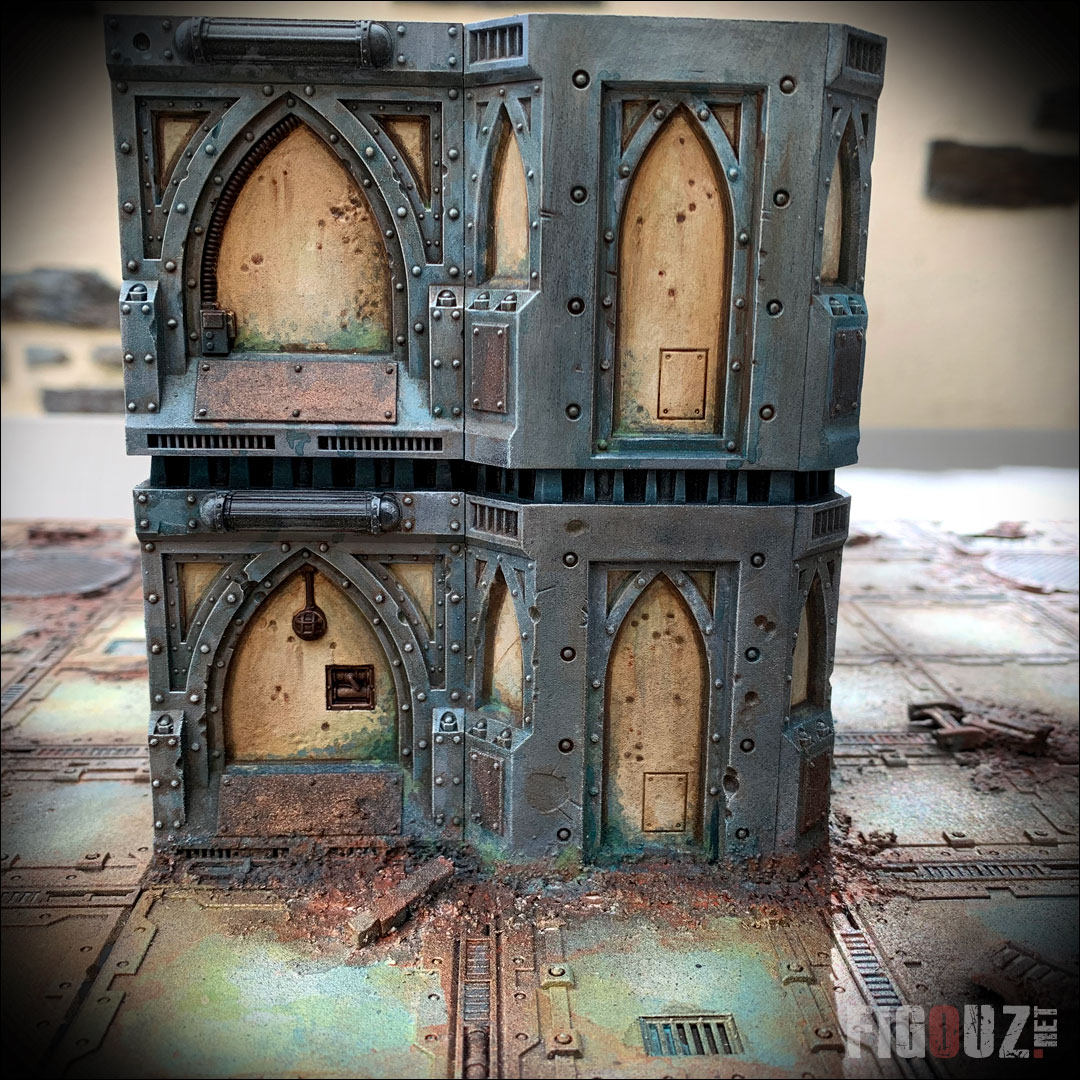
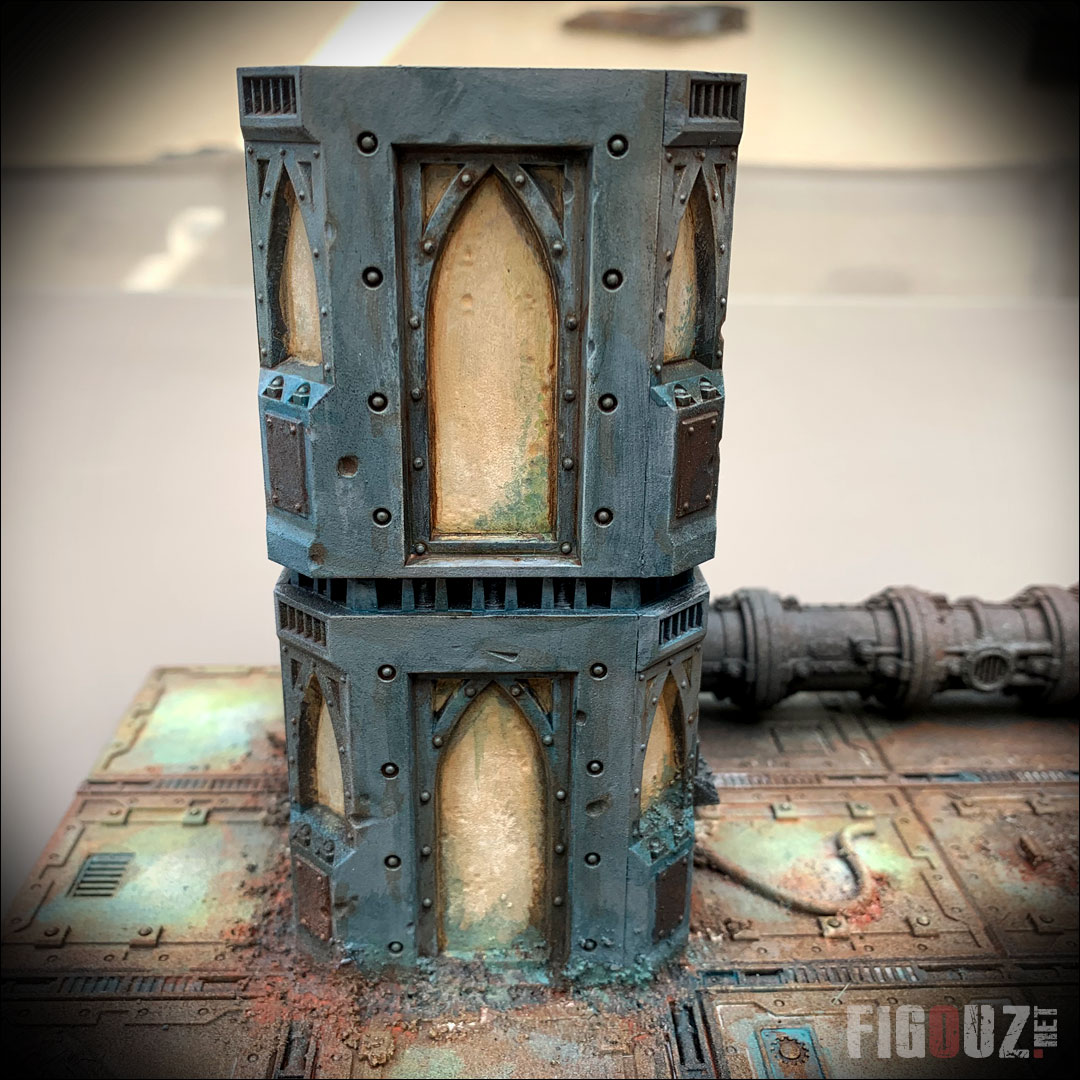
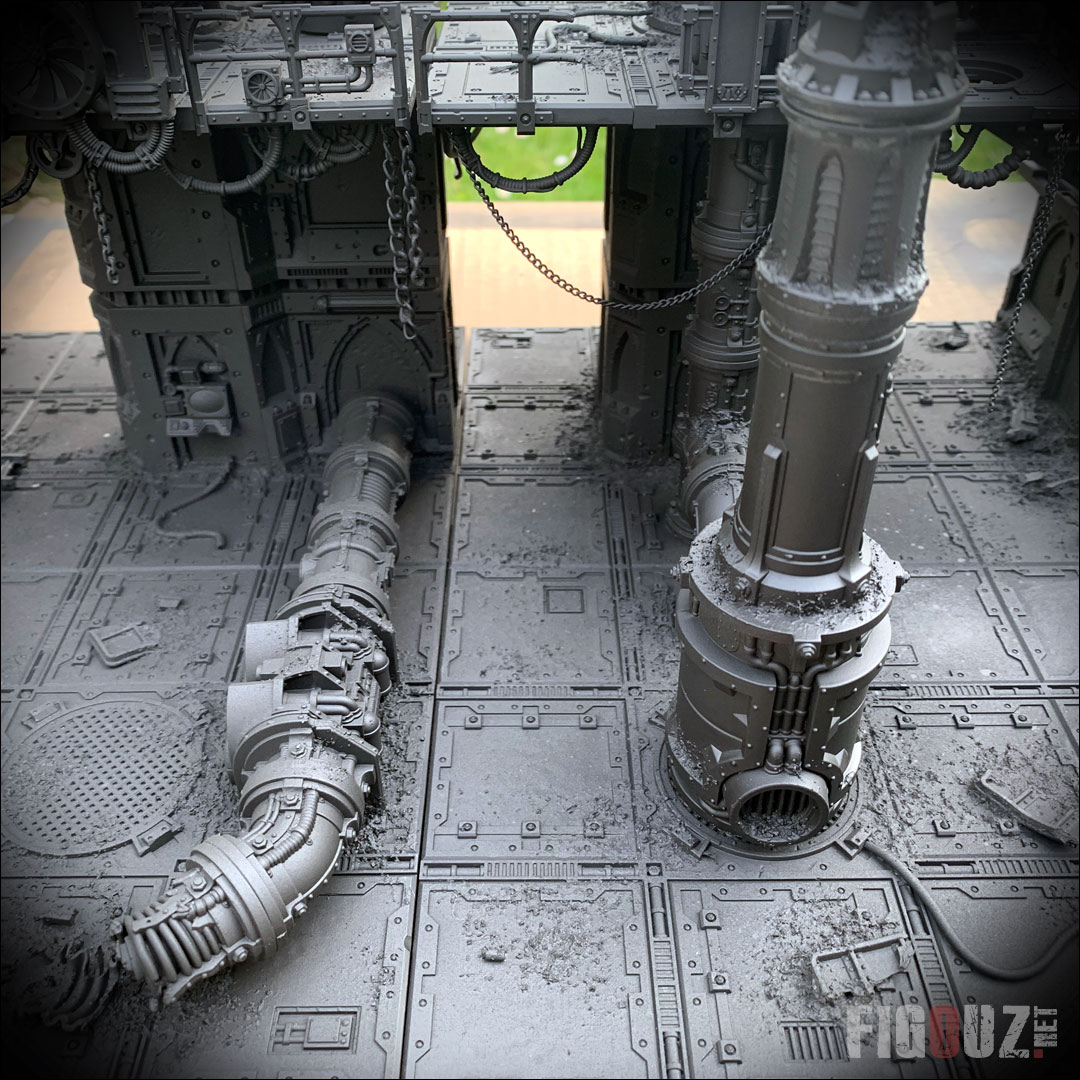
Painting columns, walls and their alcoves - Act II
.::: 17 April 2020 ::
Victory! Except for a few details, I'm done with these @%#$! of Zone Mortalis walls and columns ! \o/
Bwarf! They took me a lot longer to achieve than I had estimated... I must have spent about twenty hours there... All that for only a few wall sections and some columns. But I am rather happy with the result and this is the main thing in our zhobby (See how to paint the alcoves in the previous article). :)
I played again with colours and textures with moisture and saltpeter to bring those little details that give life to the decors and make them more realistic. Note that I pushed the vice to do lining on the edges of the alcoves, a little extra that, from my point of view, makes all the difference. ^^
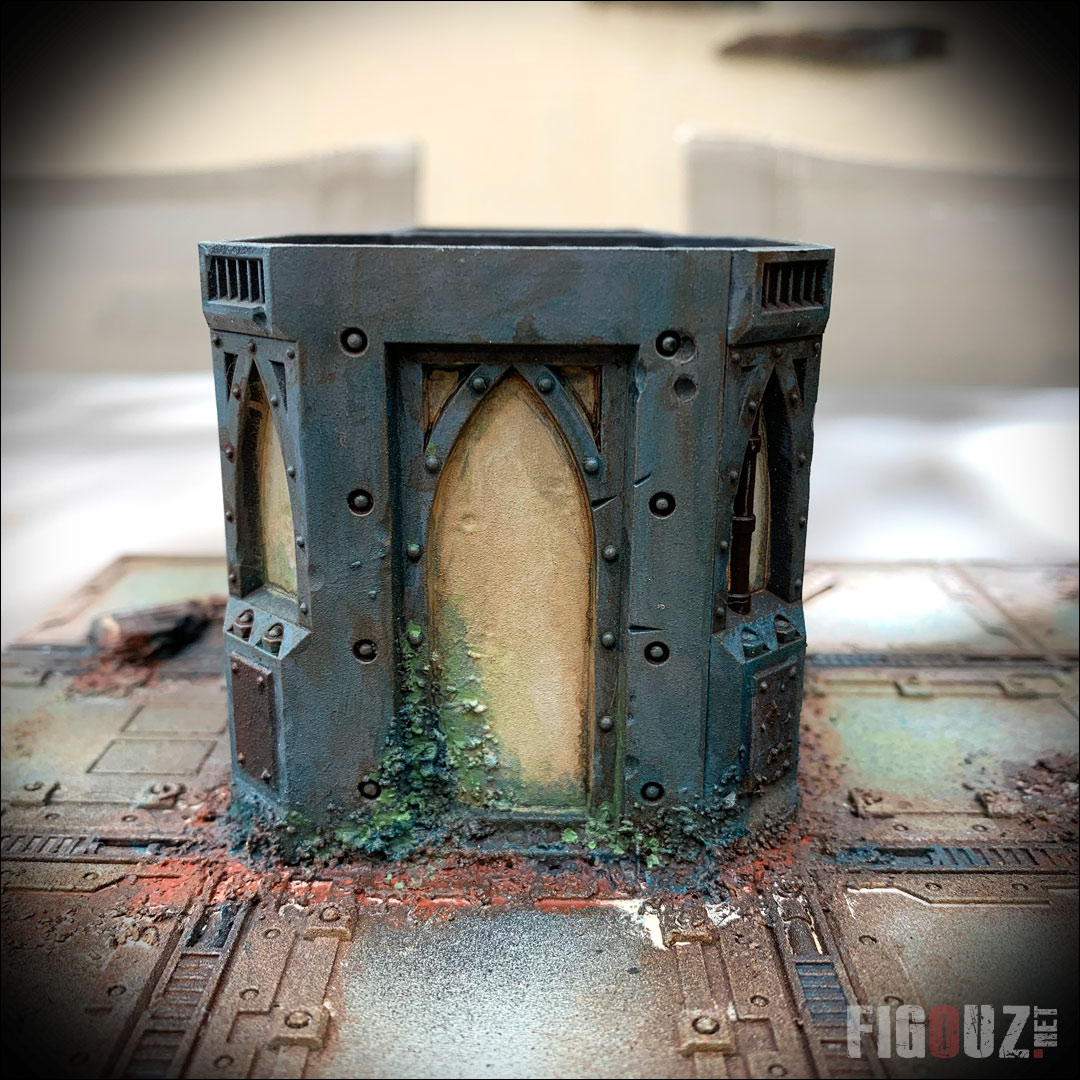
- Necromunda Zone Mortalis - Painting columns and walls: Act II -
Click on this picture to open a high resolution picture gallery
Painting of the columns, walls and their alcoves
::: 15 April 2020 ::
Hi fellow readers ! It's been 2 days that I've been working non stop on the @%#$! of walls and columns of my first two Zone Mortalis Necromunda / Killteam tiles.
But what fly stung me when I made the decision to go on two-coloured walls with these plastered coloured alcoves???? Huh? Tell me? Ôo
How to paint the plaster of the alcoves :
- Basic Colour: PA819 - 124 -Iraqi Sand
- Lighter drybrush in the centre : PA819 - 124 - Iraqi Sand + White
- Oil juices on the edges : Burnt umber diluted with turpentine. This oil juice is blended and melted with a dry wide brush and a dry cloth (dark on the edges and blended towards the centre of the alcove).
- Interior lining : I used a brown felt pencil to come and mark and darken more precisely the interior contours of each alcove. The use of a pencil is much easier than doing everything with a brush, especially when you want to improve your productivity ;)
- To finish, I applied colour filters of dark blue, green, etc. to represent the work of time and humidity by simulating moss and saltpeter.
That's it for the painting steps... It's endless and laborious as possible! Even if it's very nice visually, it's a very bad choice from a performance point of view, you've been warned! I'm close to becoming mad... ^^
- Necromunda Zone Mortalis - Painting columns and walls -
Click on this picture to open a high resolution picture gallery
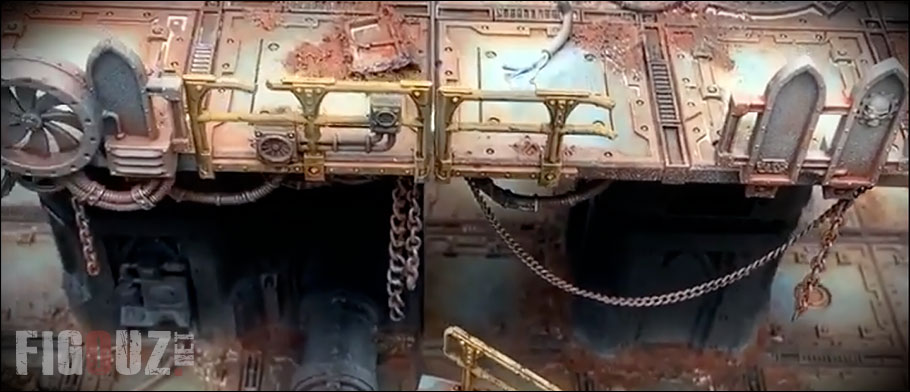
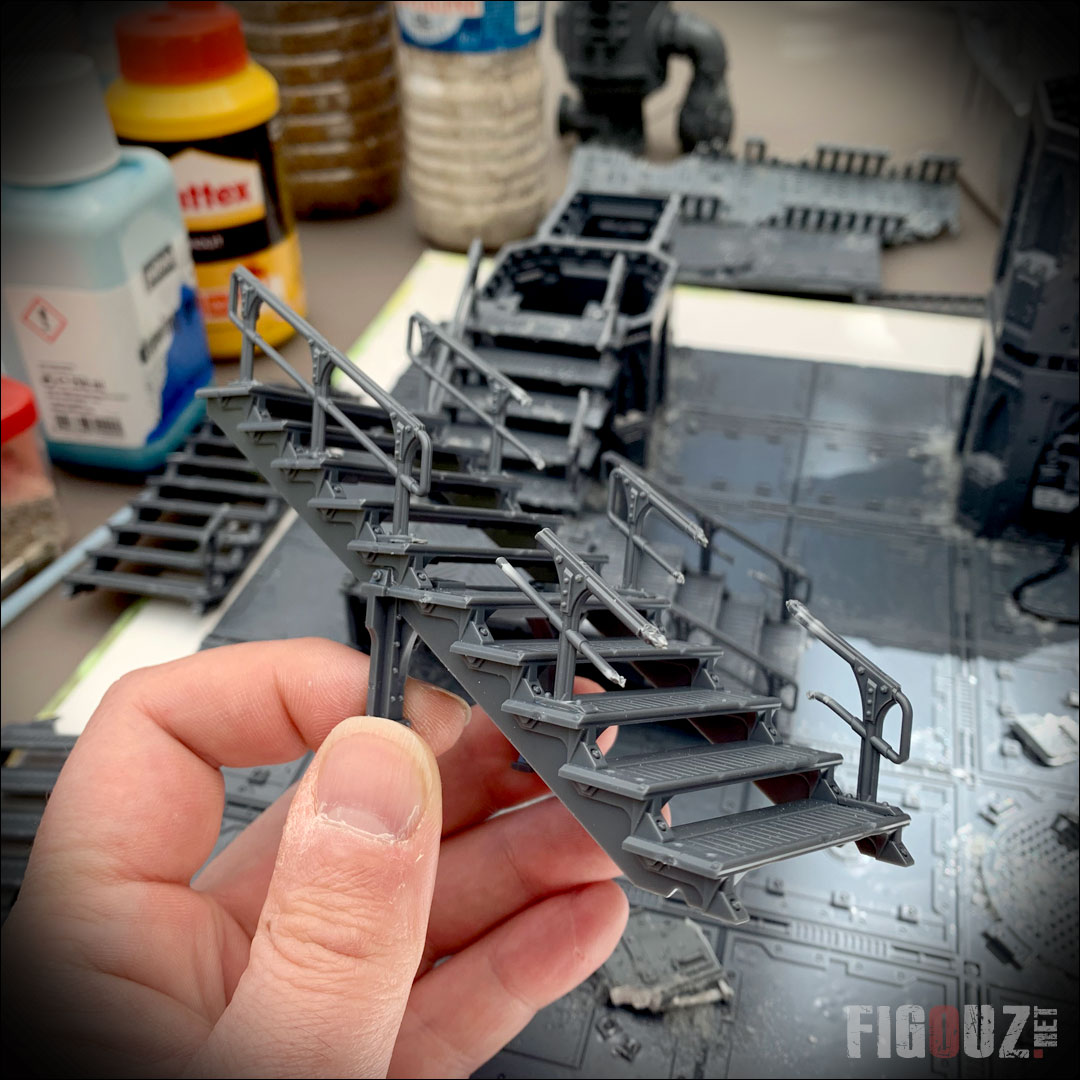
Painting stairs, railings and handrails !
::: 13 February 2020 ::
The devil hides in the details says the adage!
Here is a video that shows you my painting and weathering work on the stairs, railings and handrails of the first two tiles of my modular game table for Necromunda. I wished to paint them yellow to bring an industrial touch to these scenery kits which did not receive any rafters.
You will also discover the treatment of the time that passes on the other modular elements, such as the bridges. I mixed acrylic paint, oil paint juice and pigments to achieve this result. There is no fixed process, only testing and constant learning and a good dose of common sense and curiosity. :)
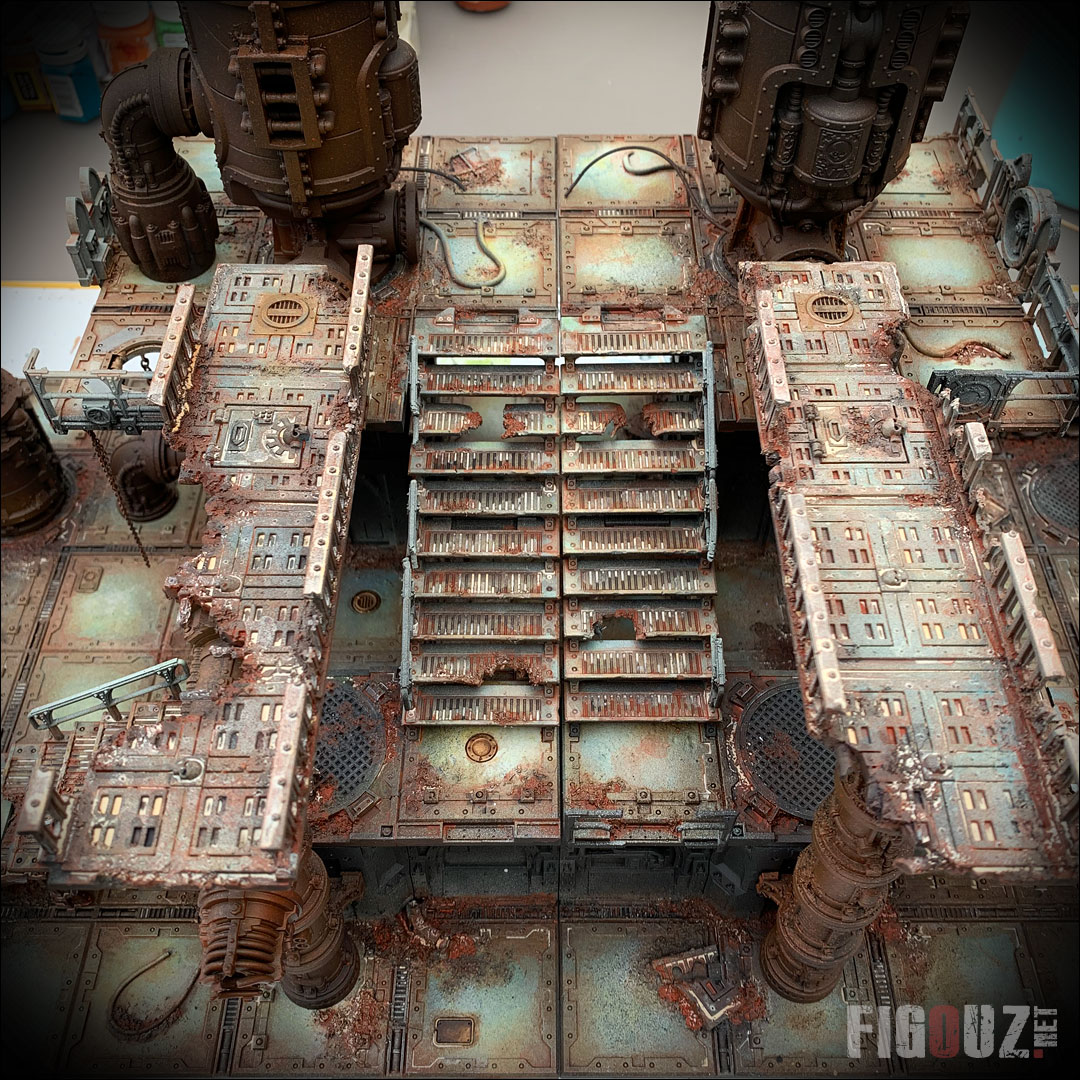
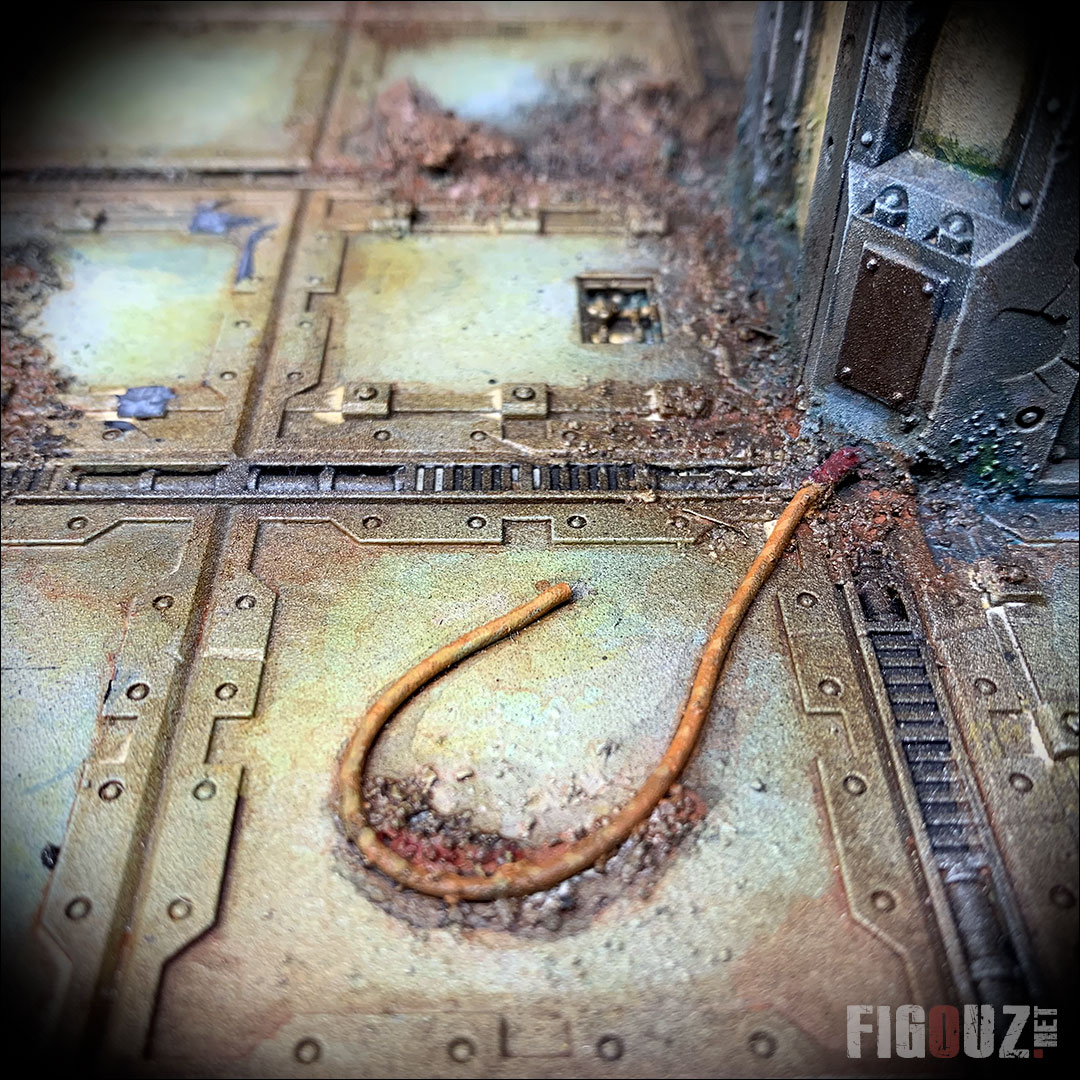
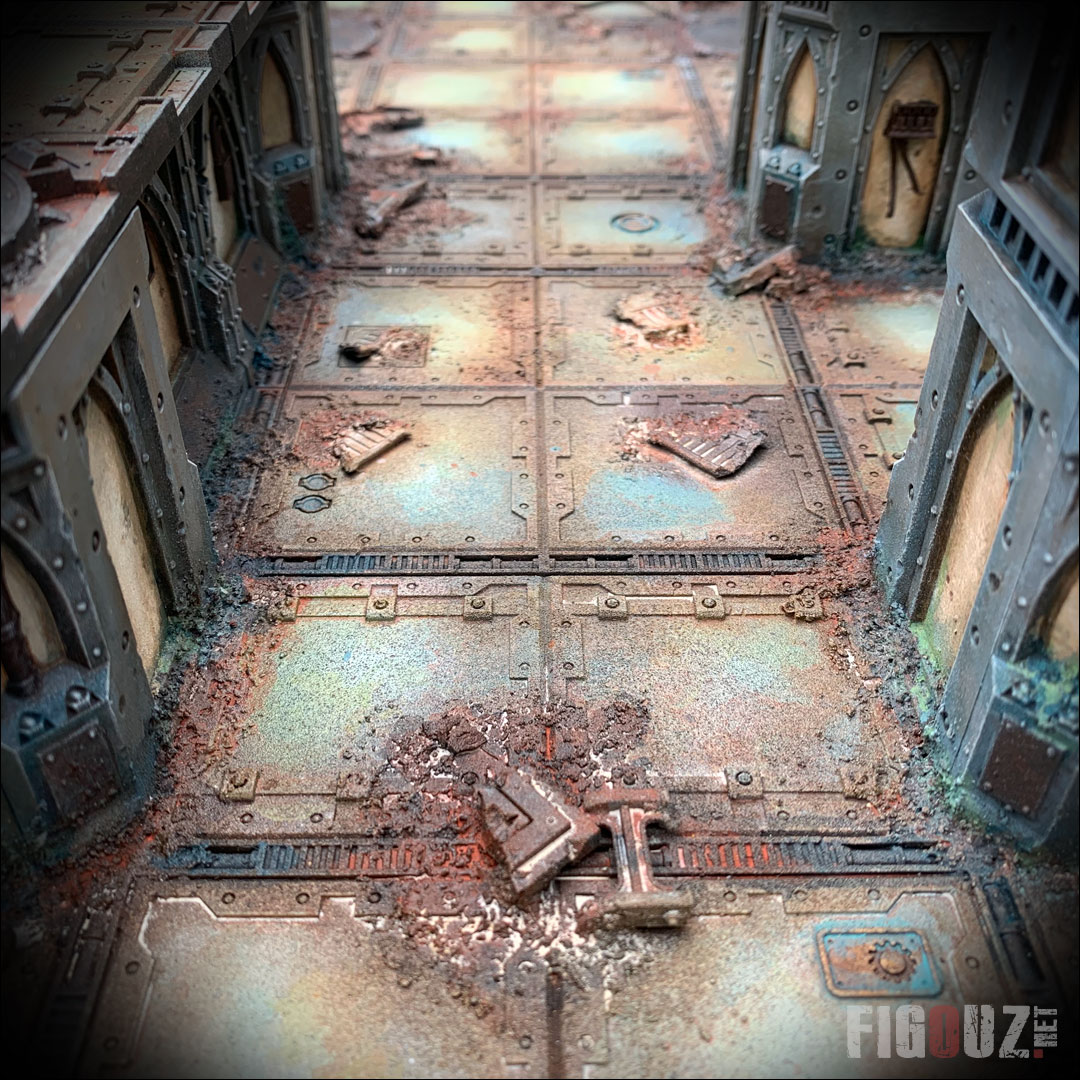
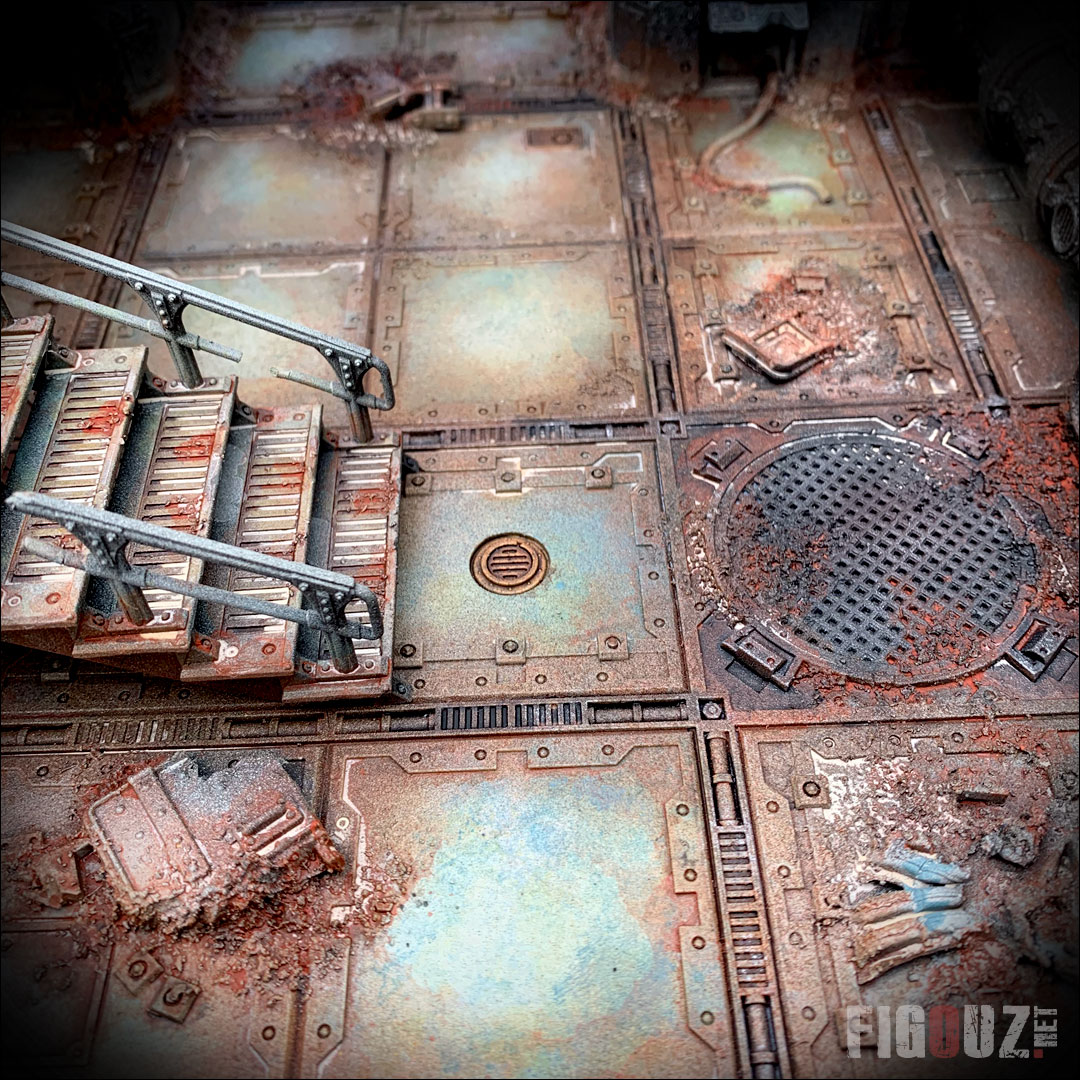
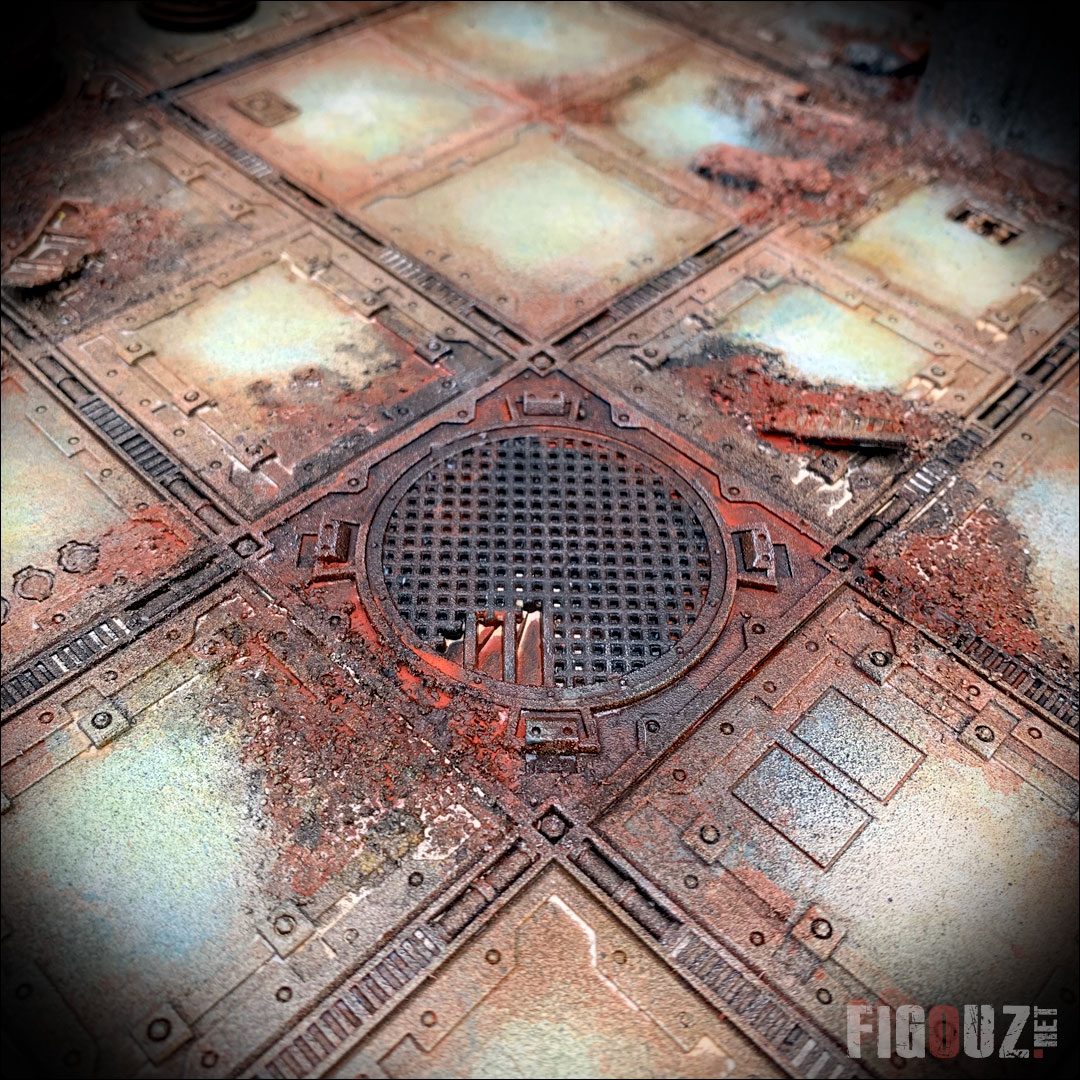
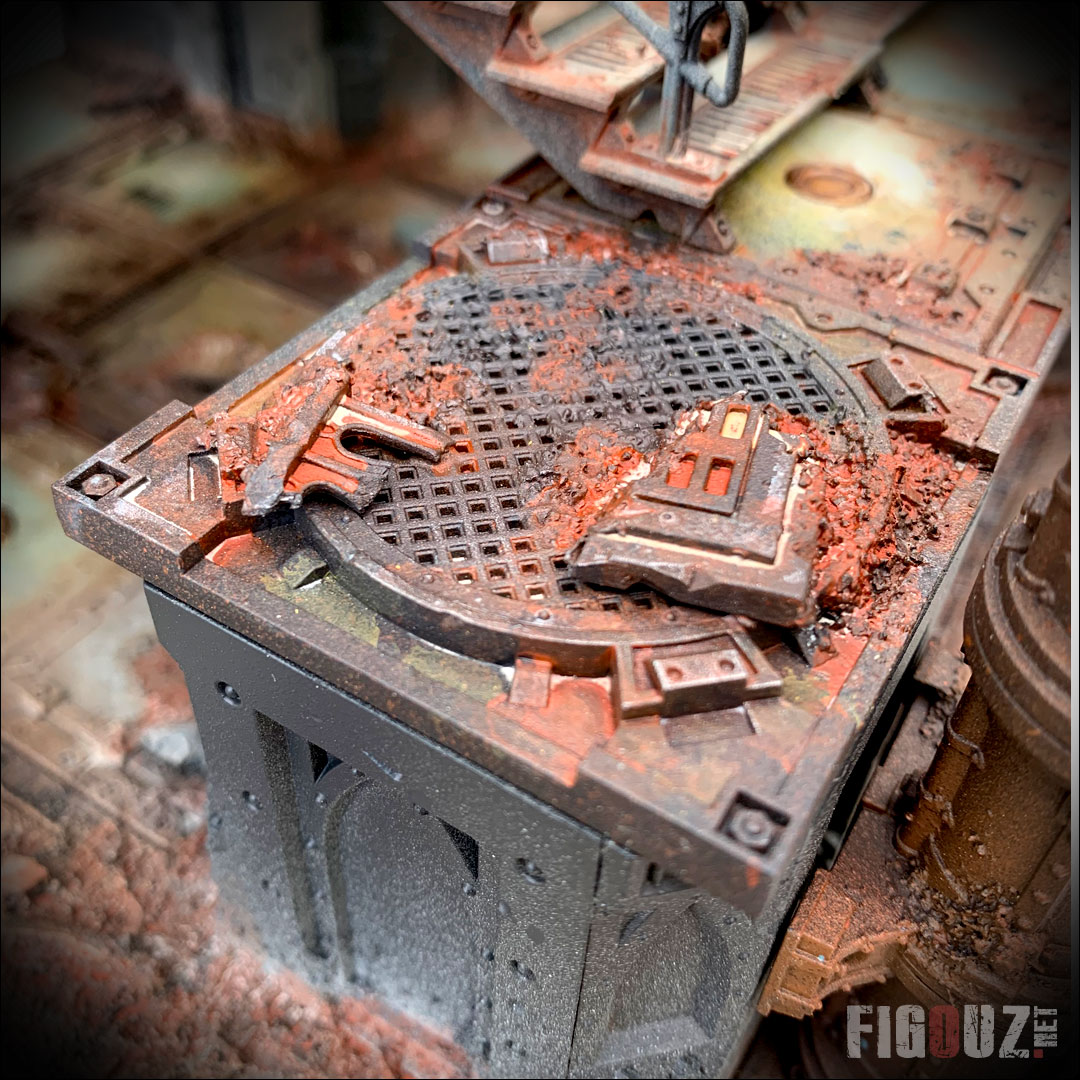
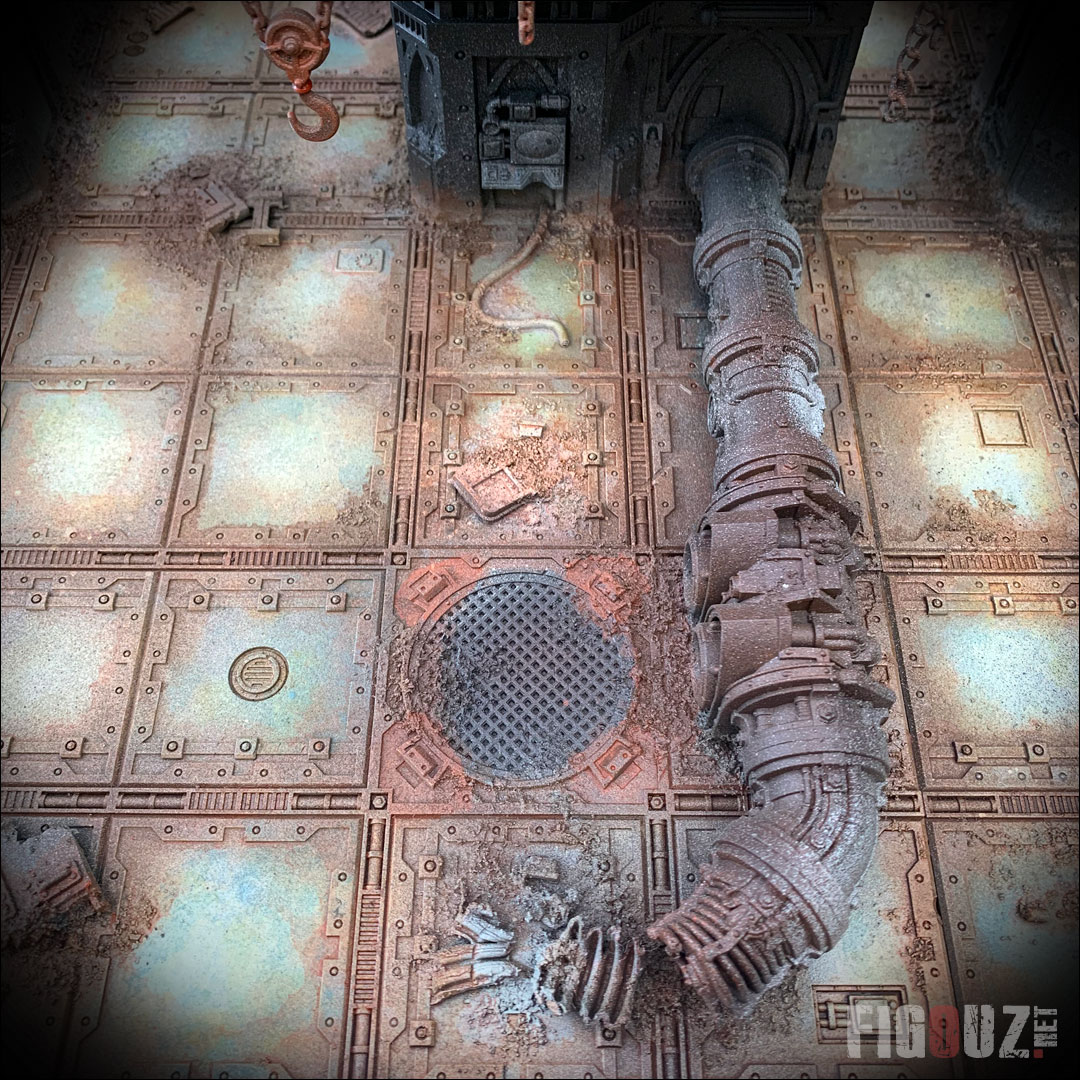
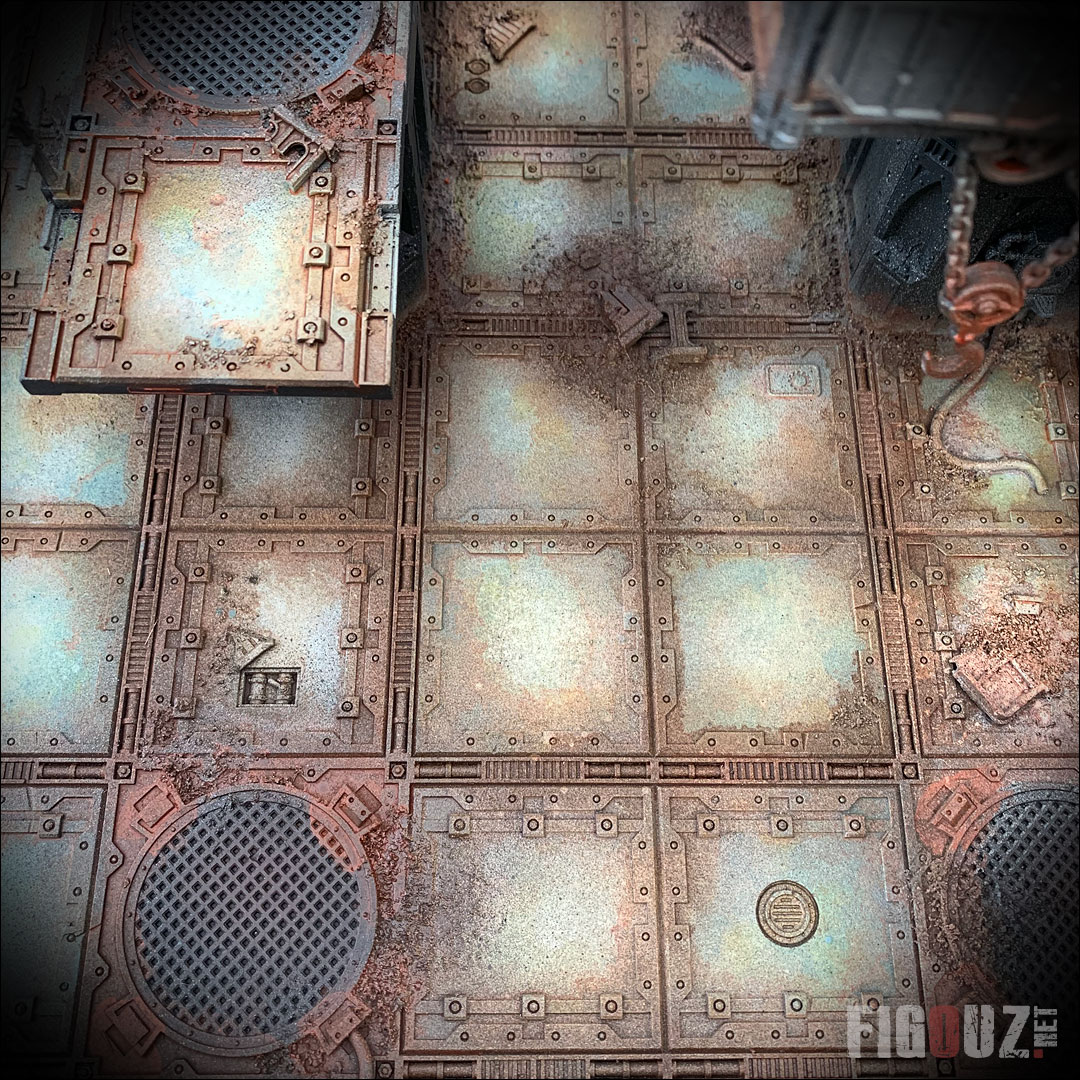
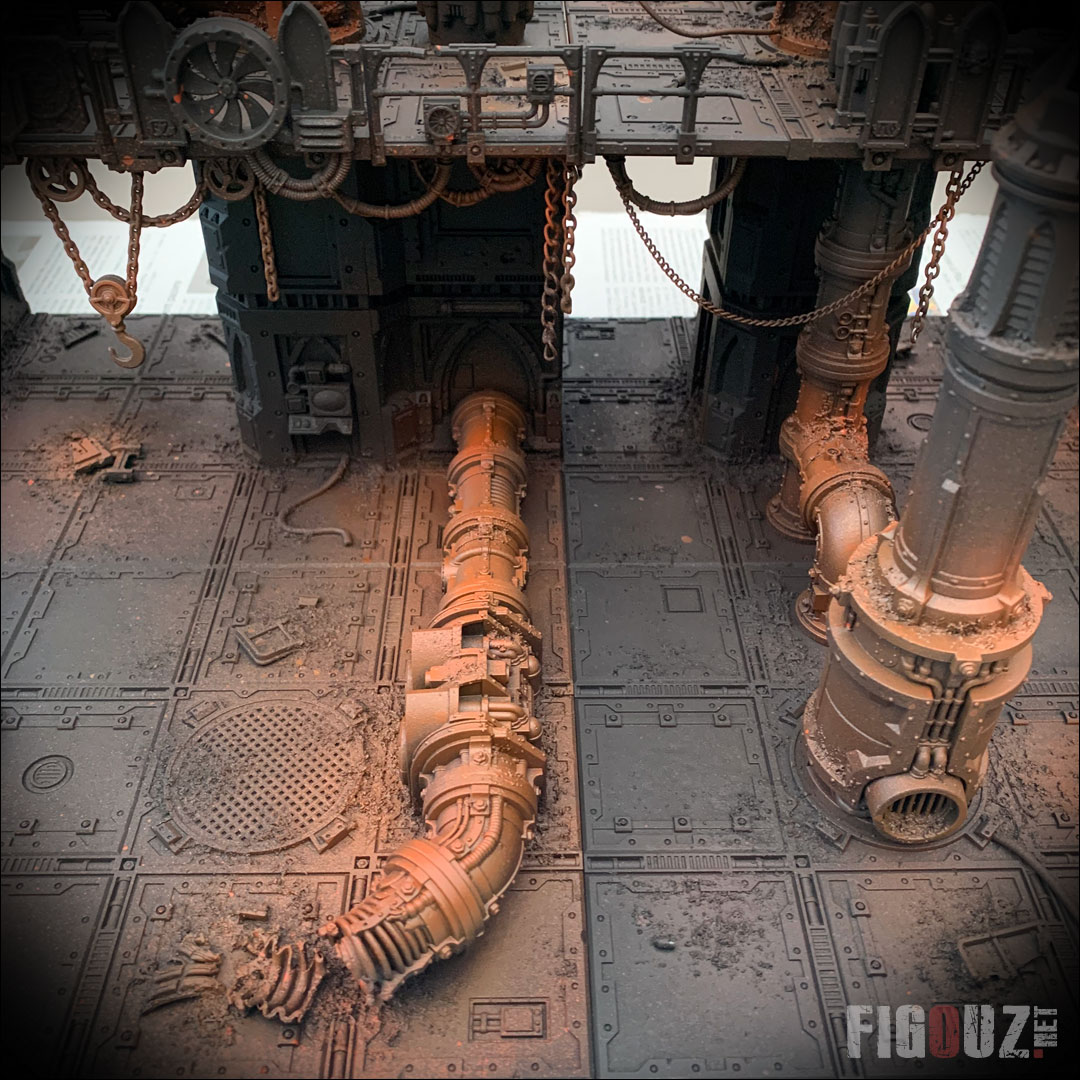
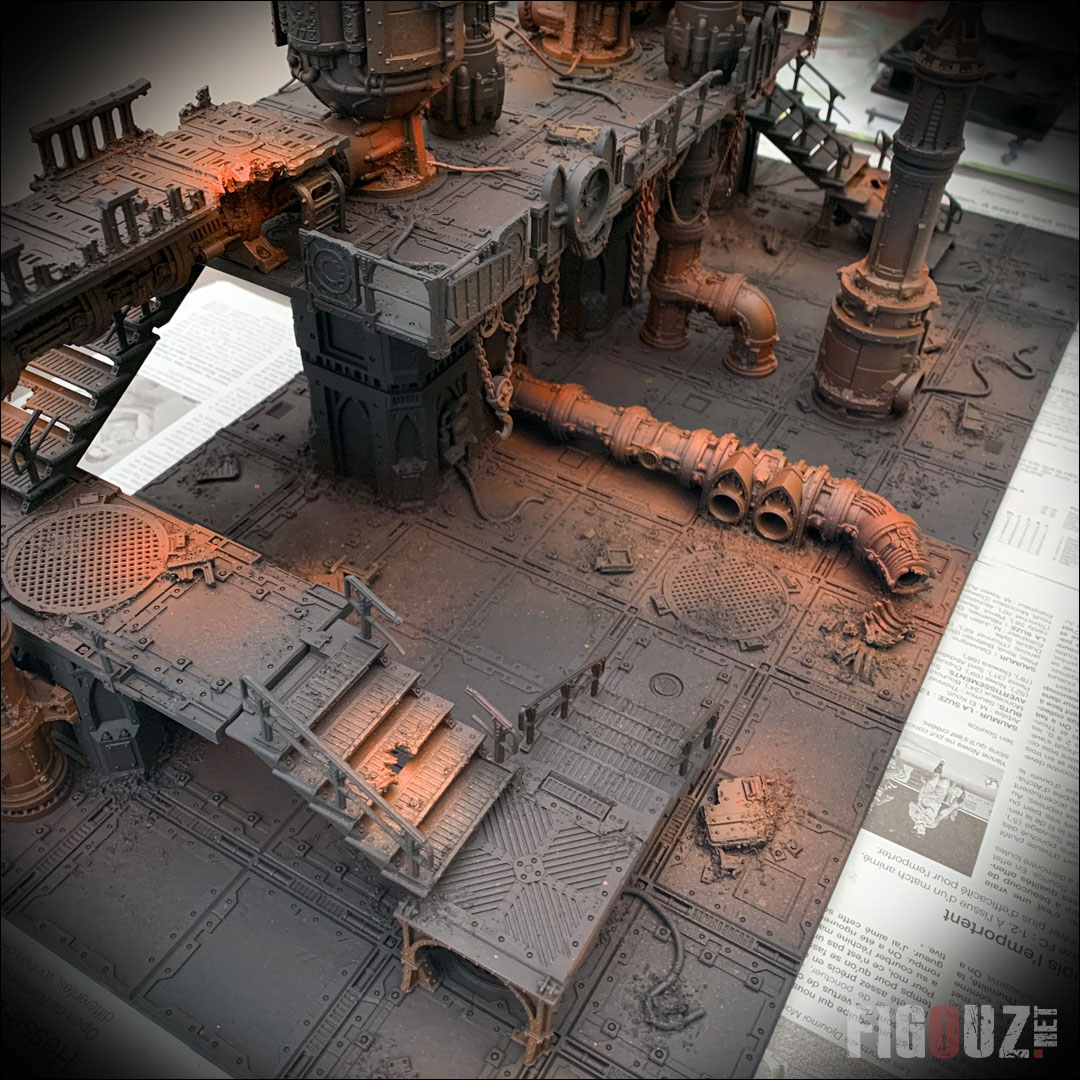
Debris, rubble, rust and weathering !
::: 11 April 2020 ::
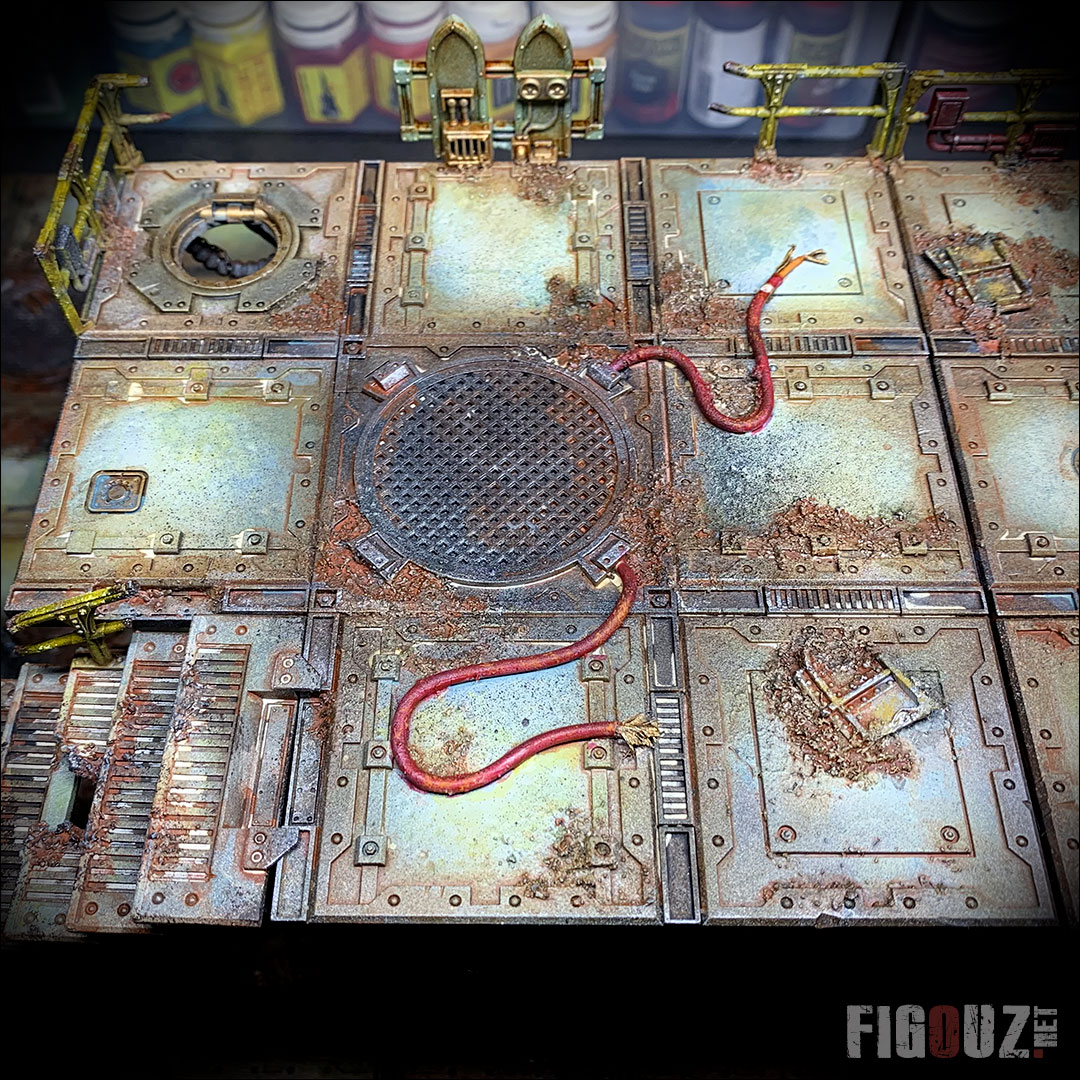
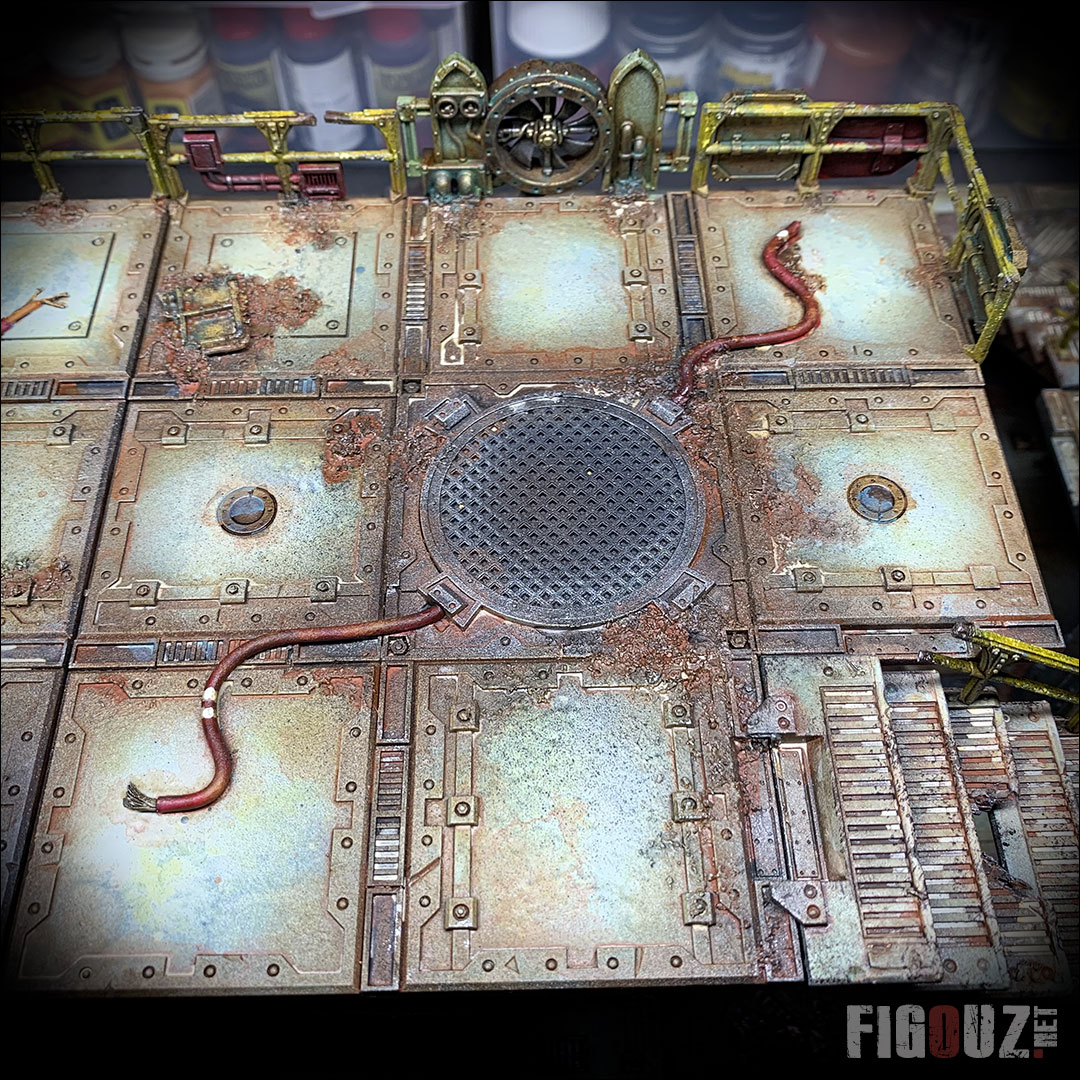
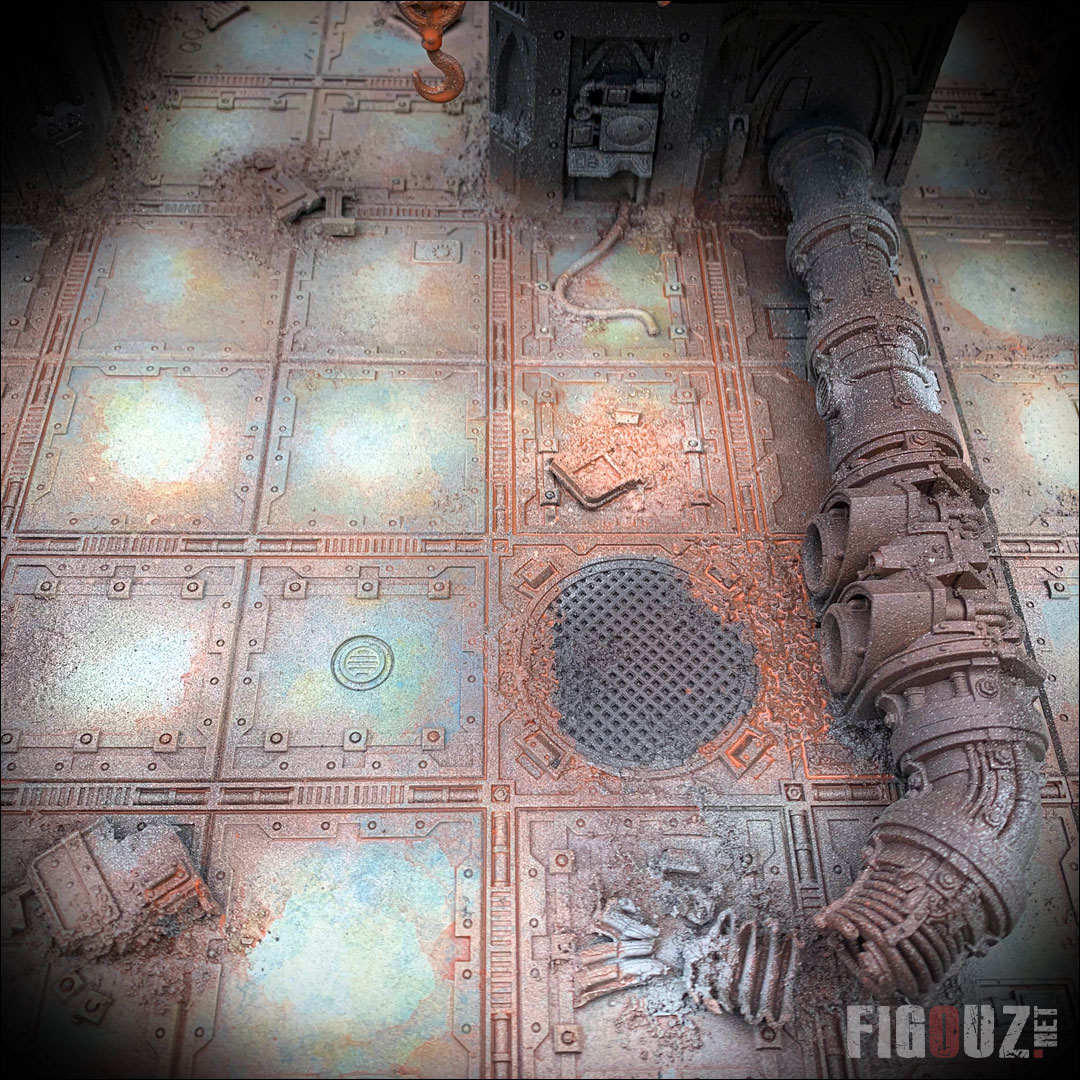
Hear ye! The most attentive among you may have noticed the improvements made on my Necromunda tiles in the picture posted yesterday? I indeed spent a second afternoon enriching the weathering with a lot of lavis and pigments.
I worked on the metal parts framing each square, tiles and all that is debris, rubble and dust.
To do this, I used Delvan Mud juices (Be careful, it consumes too much product) followed by two Juices of Vallejo pigments : one of rust (73.120 Old Rust) and the other of Desert Dust (73.121 Desert Dust).
For these juices, I used a mix of 1/1/1/1 of wood glue, matt varnish, water, pigments.
Go with very small quantities so as not to waste any product and be careful when applying and be aware of what you are doing, it does not move once dry.
Here are the pictures of the result of this new session of "laquo" painting, which brings a beautiful realism to the tiles.
- Necromunda Zone Mortalis - Rubble, debris and Weathering ! -
Click on this picture to open a high resolution picture gallery
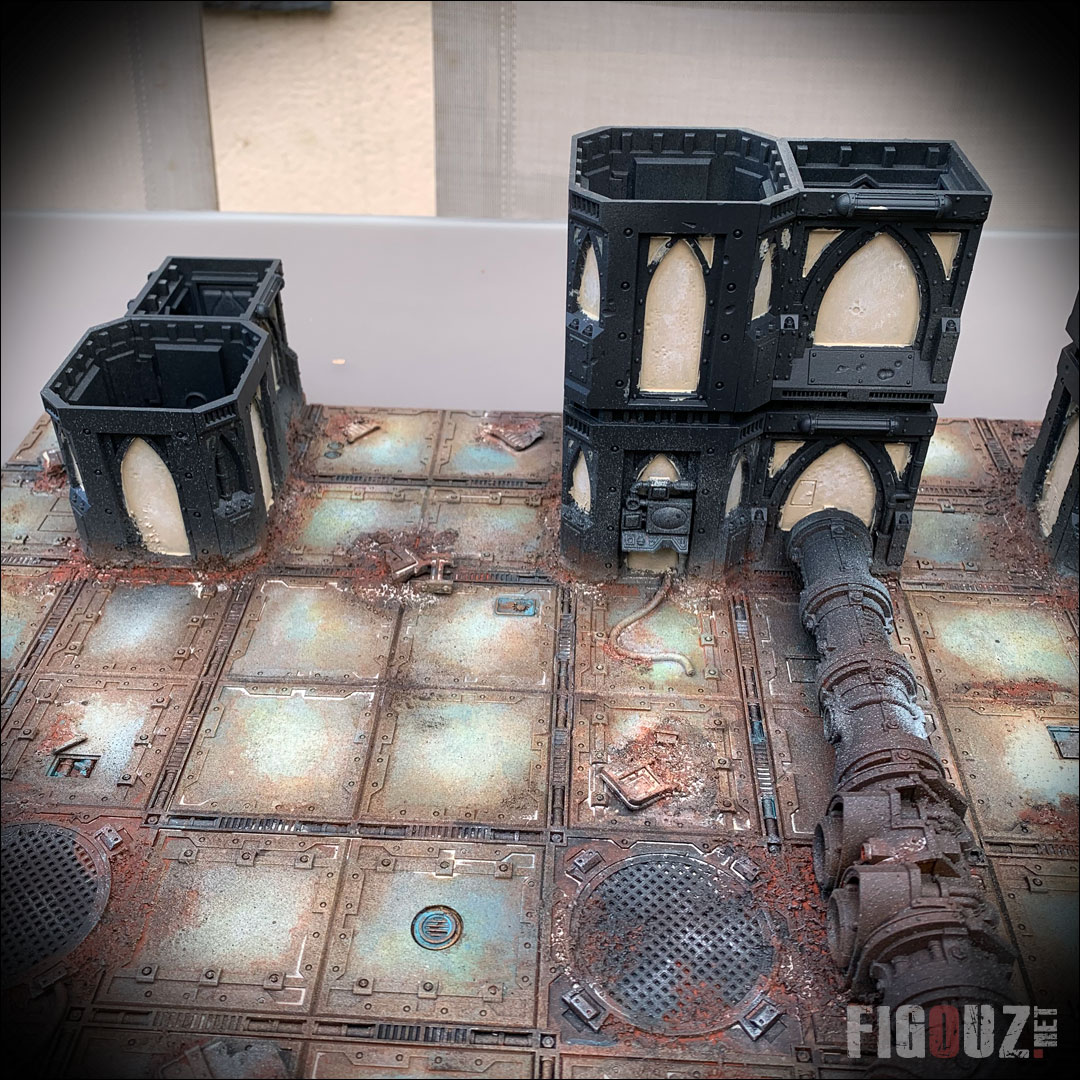
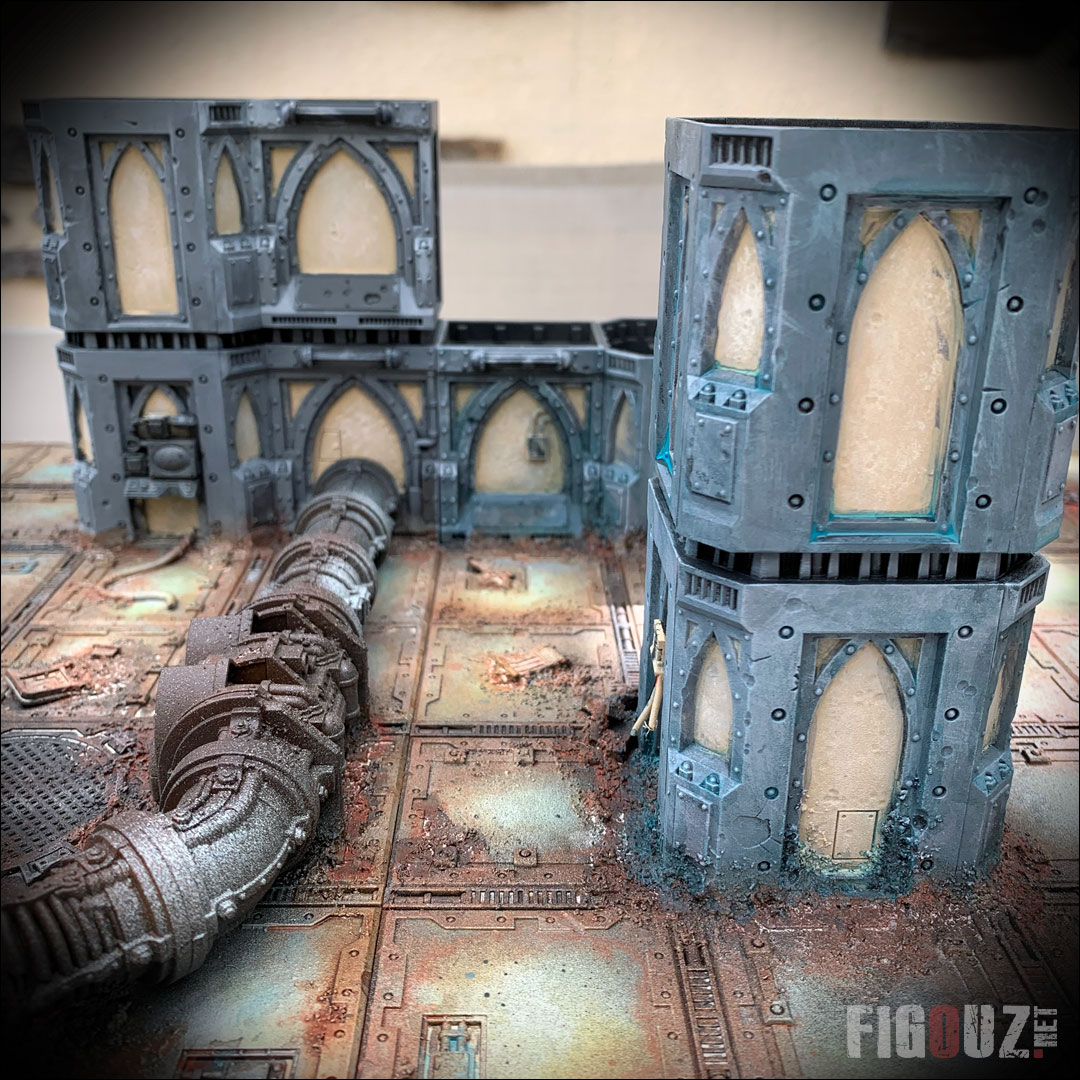
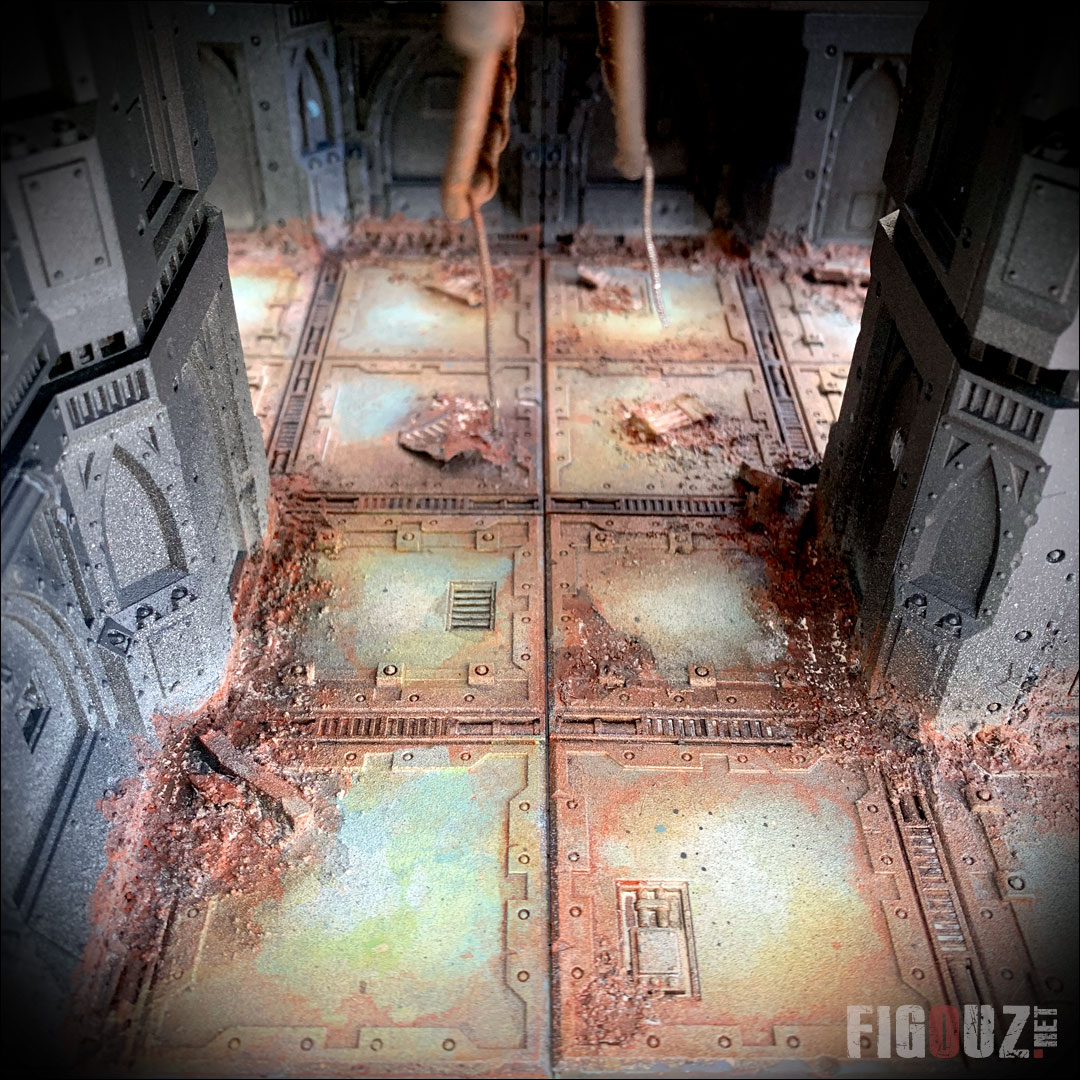
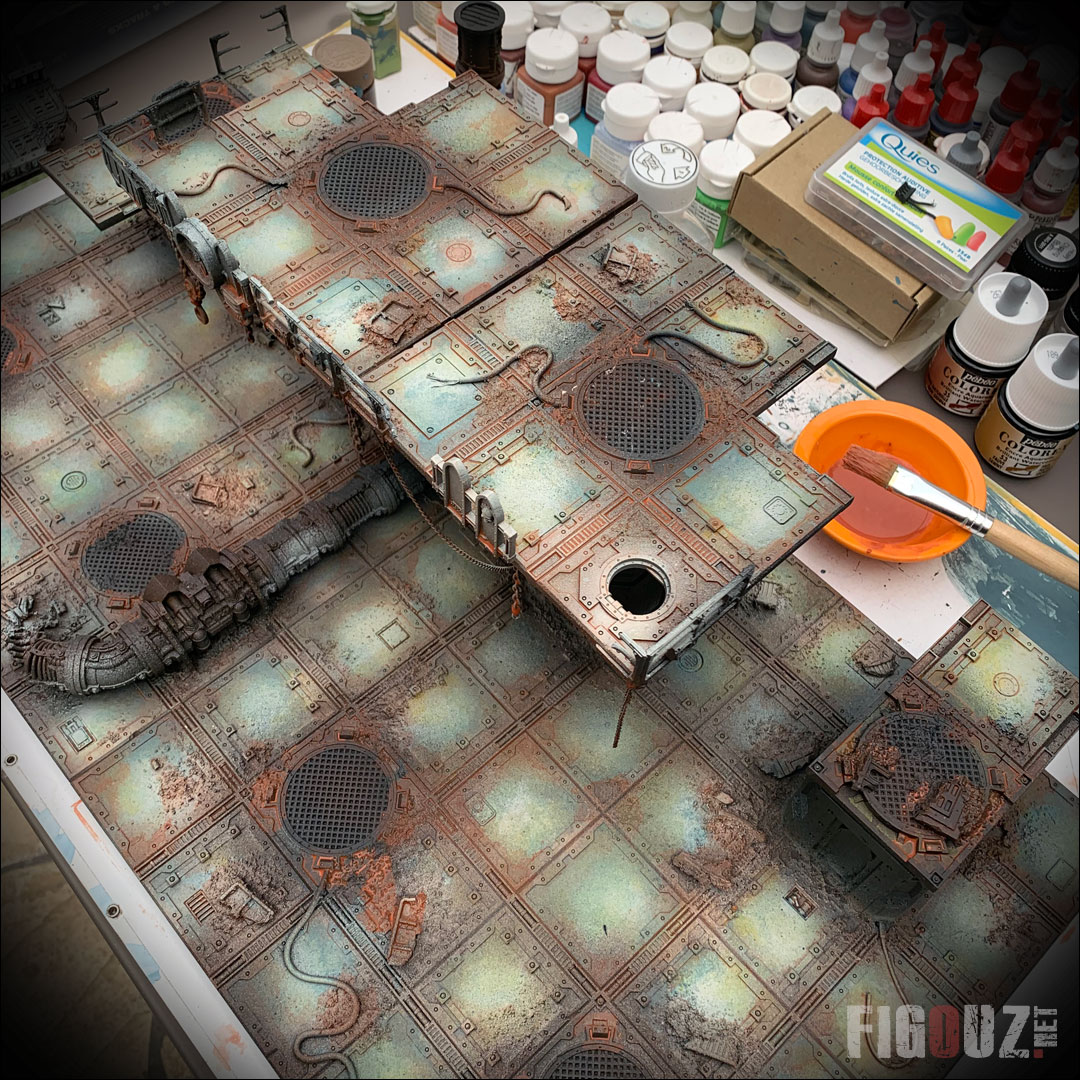
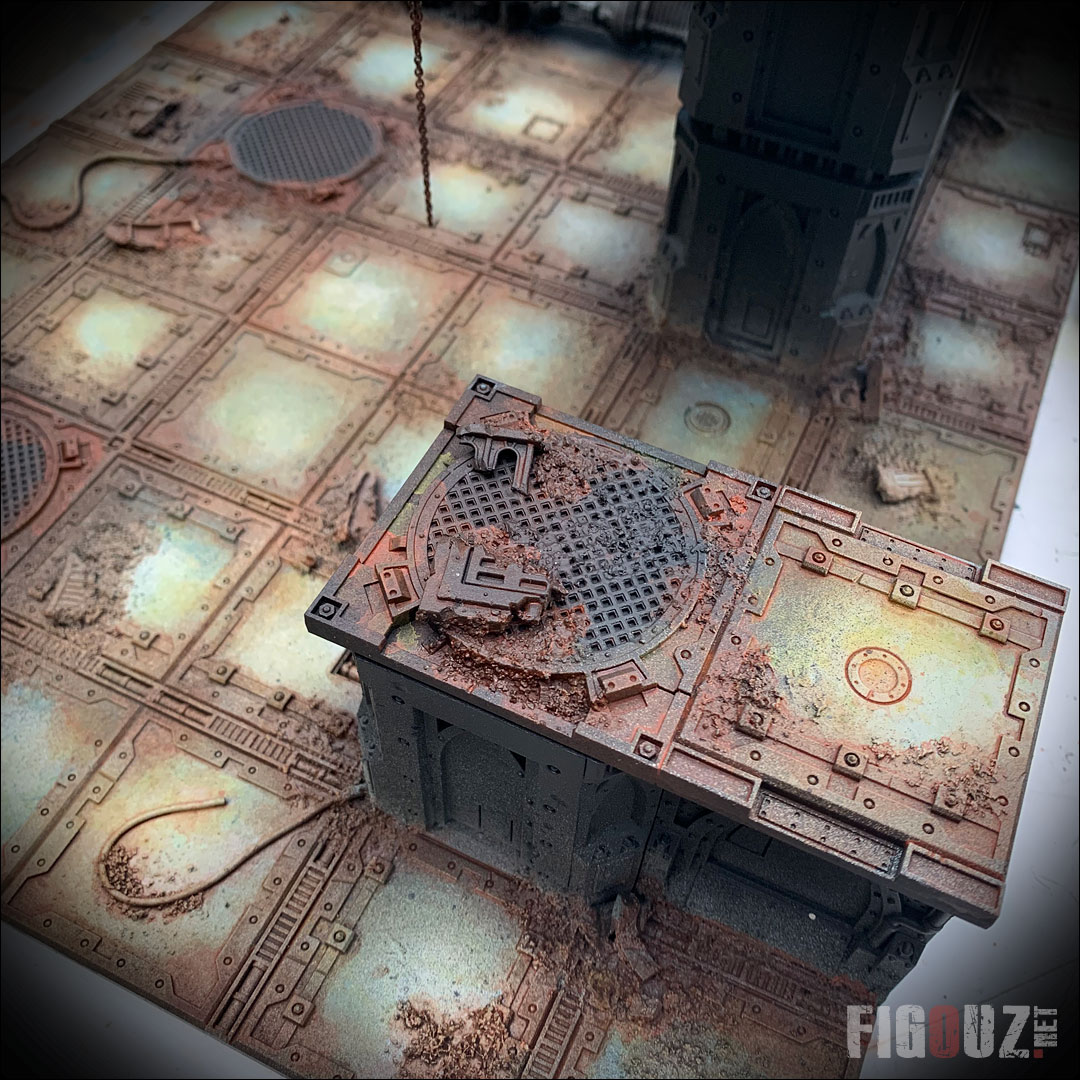
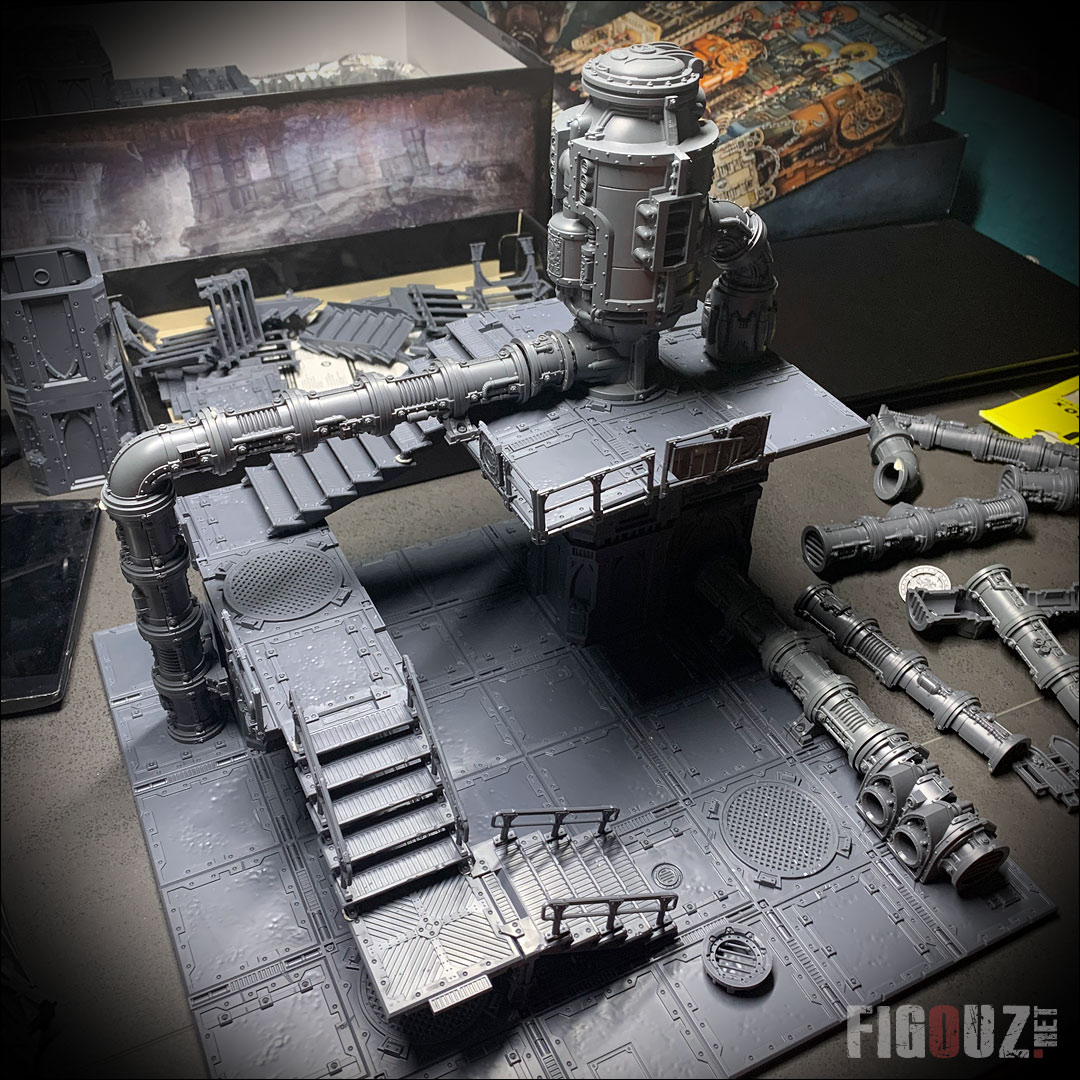
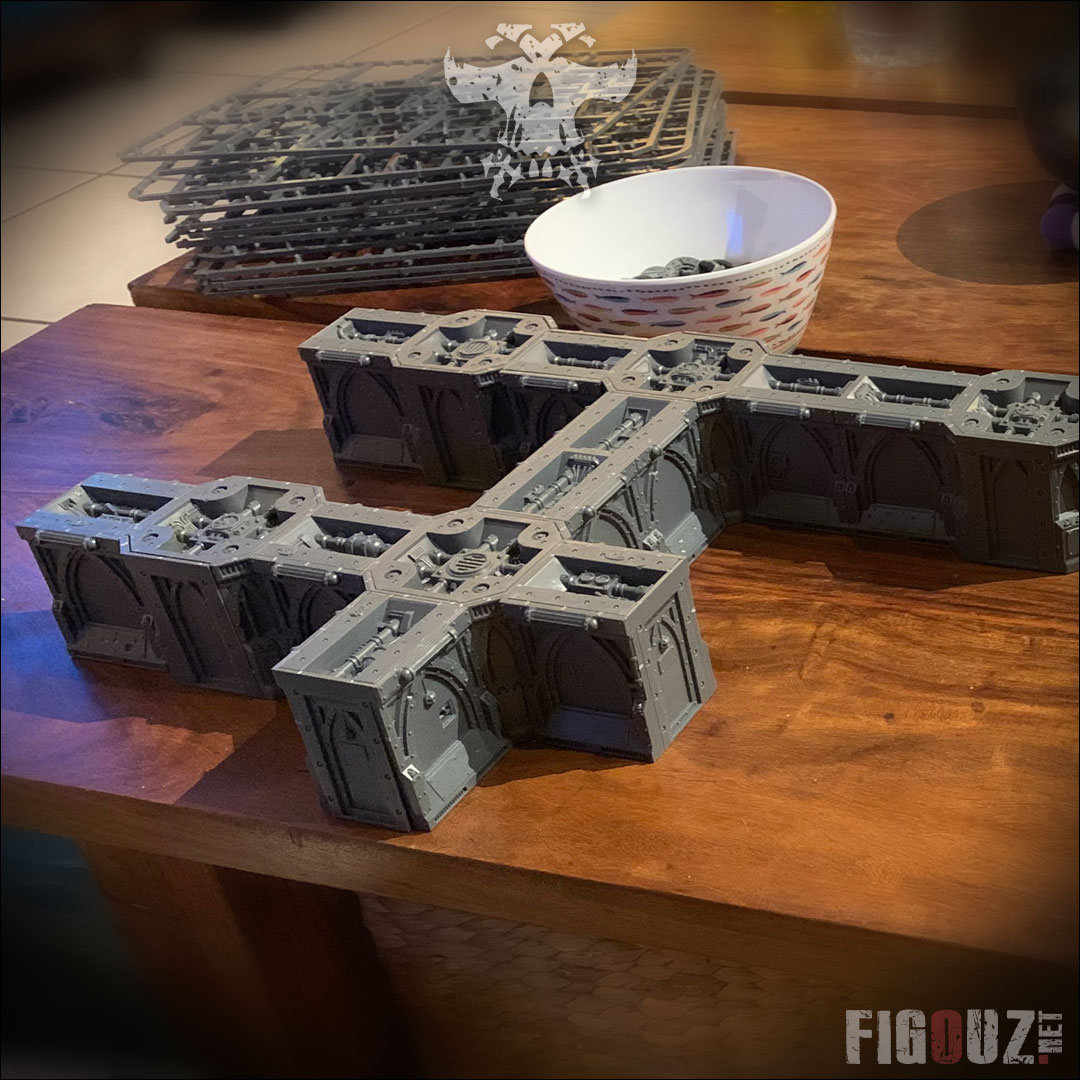
Tiles design - Sub-assemblies!
::: 12 April 2020 ::
Either on Facebook or on Instagram, many people have asked me if I have pasted all the elements of the two Necromunda / Kill Team tiles I am currently working on.
Here is my answer in a picture that shows you all the Sub-assembly sets that I have created and that allow me to paint each element with an easy access to all areas, including under the stairs and platforms. Picture which has had a great success on social networks and is one of my favourites among all those recently posted.
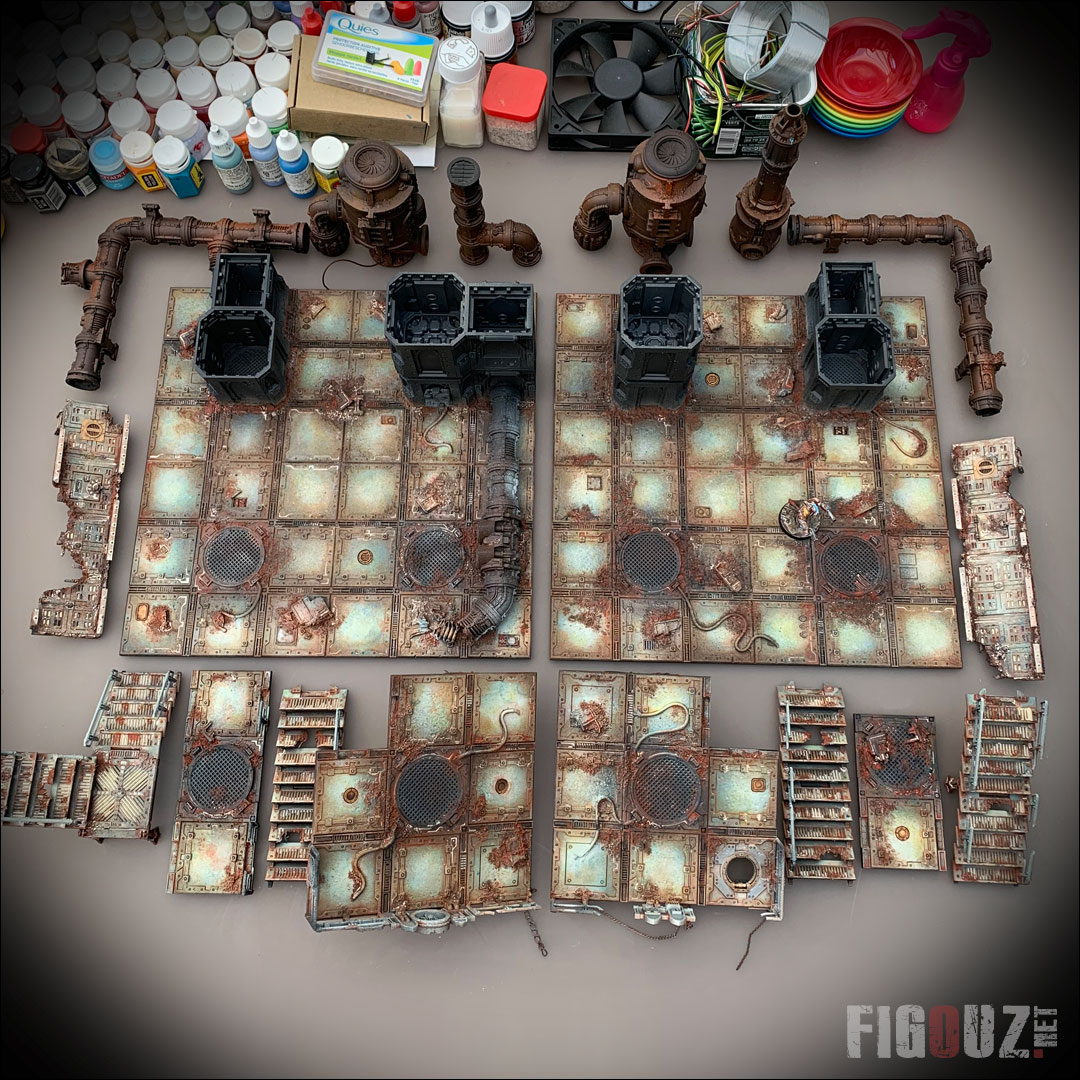
- Necromunda Zone Mortalis - Painting of the tiles ! -
Click on this picture to open a high resolution picture
Only walls and a pipe have been glued to the floor tiles for the moment, as I have added texture and debris at their feet.
The fact of preserving sub-assemblies makes it possible in particular to paint the underside of the elements (stairs, platforms) which have thus been properly underlaid. Painting is also much easier because you can manipulate these decorative elements correctly.
Besides, I was thinking of gluing these elements definitively in place and I am very seriously trying to like some of them to keep the additional modularity brought by these sub-assemblies.
I hope that this will help you in the preparation of your own work as an architect !
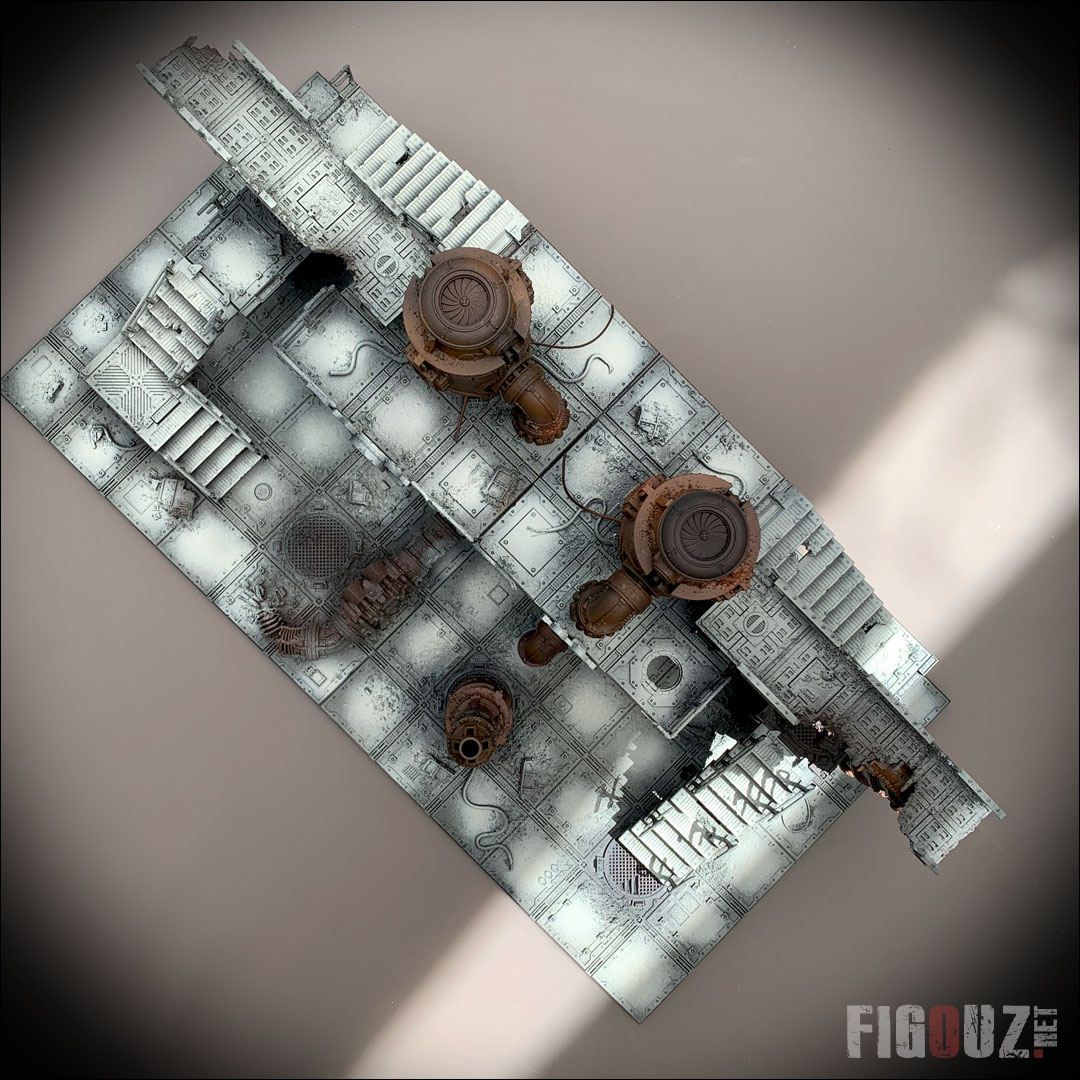
Painting the Zone Mortalis tiles : the result !
::: 11 April 2020 ::
Watchaaaaaa! I'm REALLY HAPPY with the result obtained on the painting of the floors and platforms of the first two Mortalis Zone tiles on which I have been working hard for weeks. Knowing that I went there a little bit in freestyle mode with my filters and especially my oil juices, the final result is top !
If you like this rendering and you are wondering how to paint the Zone Mortalis Necromunda Dark Uprising Zone tiles, I have concocted in the previous article a step-by-step video tutorial allowing you to reproduce the steps of painting in the form of very short video tutorials.
Here are some pictures with an overview of the two tiles, benefiting from beautiful natural light.
If you like this rendering, I give you an appointment on the Instagram @figouz or the page Facebook @figouz.net to chat and leave a comment! :)
- Necromunda Zone Mortalis - Painting the tiles: Result of this awesome painting session -
Click on this picture to open a high resolution pictures gallery
How to paint zone mortalis tiles ? Quick & easy video tutorial
:: 11 avril 2020 ::

You know What ? I'm Happy ! I'm off for a week and I'm starting this weekend with a very nice afternoon spent on my terrace to paint my Necomunda / Kill Team tiles. What a kick! The weather is nice, I've put on the music, I've spread my painting equipment everywhere and my daughters are going to help me! I went there in freestyle mode, trusting my instinct and the result is up to my expectations.
I took advantage of this very nice moment (and it's a first) to make some videos rush, without any editing, that I published on my Instagram profile @figouz.net, then later on my facebook @figouz.net. And for a first try, what a success! One of these videos reach the incredible score of more than 13 700 views on Instagram! My young daughters, who helped me to film, are very happy. ^^
But later, i've spend a lot of time on Adobe Premiere Pro in editing all these video rush (sadly in 720x720) to create a full video tutorial published on the Figouz.net Youtube Channel.
In this video tutorial, you will discover simple, quick and very effective methods for painting your zone mortalis tiles in a colourful grimdark style.
To paint the Zone Mortalis Titles, I'm playing with 2 very simple techniques : I'm using acrylic paint colour filters followed by the application of oil paint juice diluted with turpentine.
1. Applying GREEN, BLUE, YELLOW AND DARK RUST COLOR FILTERS :
- These colour filters are a very diluted mixture of paint + matt medium + water.
- A few drops of paint are sufficient. The filter should just tint the undercoat and be almost transparent.
- Before starting the painting, I moisten the tiles with a water sprayer. This will allow the paint to melt and mix for a realistic rendering.
- The filters are blended with a cloth and a dry brush.
- Green filter : Citadel Goblin Green
- Blue filter : PA 904 Dark Blue Grey + PA 963 Middle Blue (PA=Prince August)
- Yellow filter : AK706 Light rust
- Dark Rust filter : AK708 Dark rust (AK = AK Interactive)
The Dark rust is very orange when applied, but it becomes darker once dry. I applied this rust on the edges of each square of the tiles. As for other filters, I've moistened the tile with a water sprayer.
2. Applying Burnt Umber Oil Juice :
To complete this nice painting session, it's time to apply an oil juice on all the parts that surround each « square » of the tiles.
I used a Winsor & Newton Burnt Umber oil diluted with turpentine.
I reduced the dispersion of the product and softened the shades with a wide brush (dry), a cloth and some cotton swabs.
Here is the end of the 3 simple steps that allow you to color your dead zone tiles or any other scenery kits. Next comes the application of pigment juices and other products to simulate dust, rust, dirt, oil...
To conclude this nice tutorial article, here is a large pictures gallery of the various steps that made up this very nice painting session. You will be able to see some of the material used.

- Necromunda Zone Mortalis - Tiles paints: Colour filters and oil paint juices -
Click on this picture to open a high resolution pictures gallery
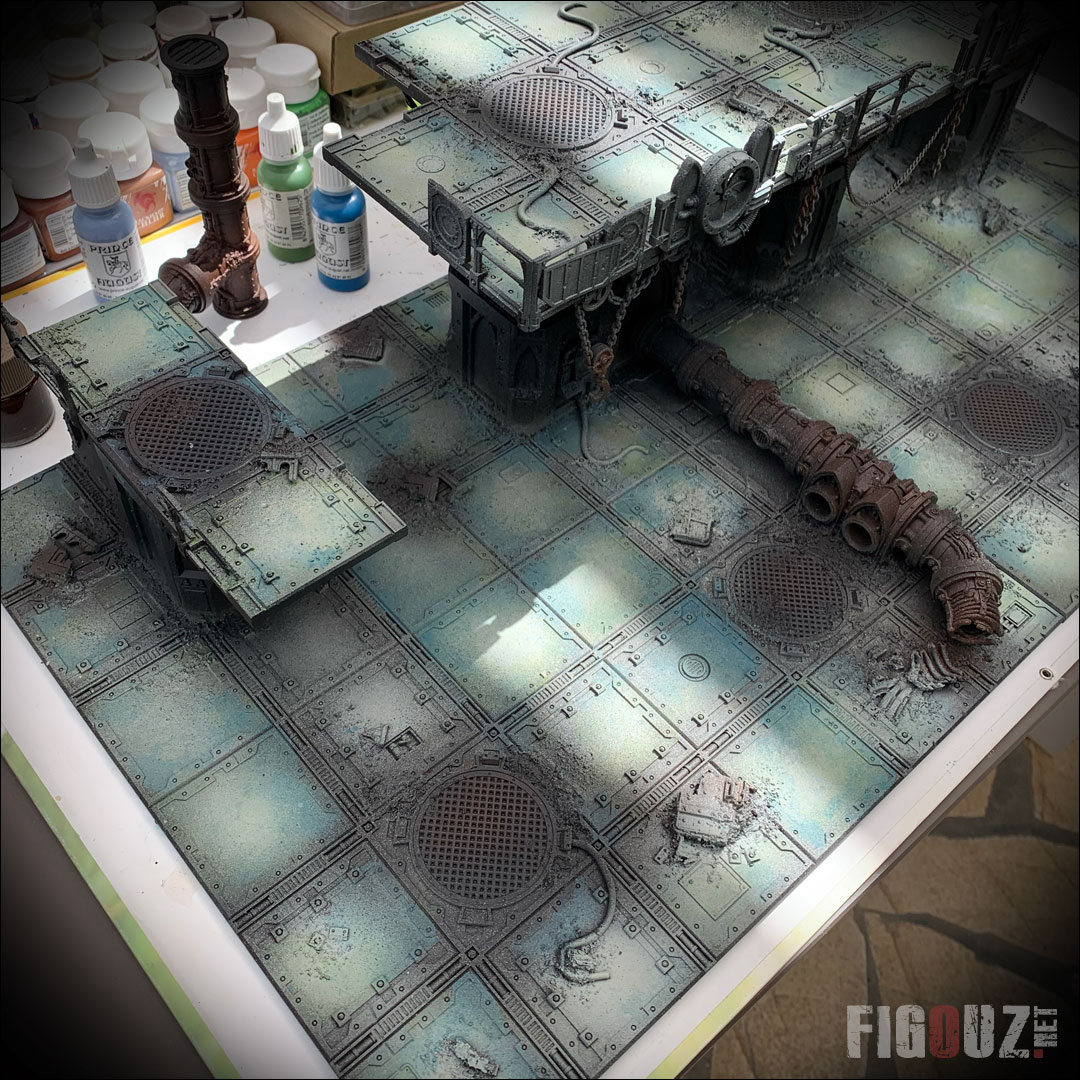
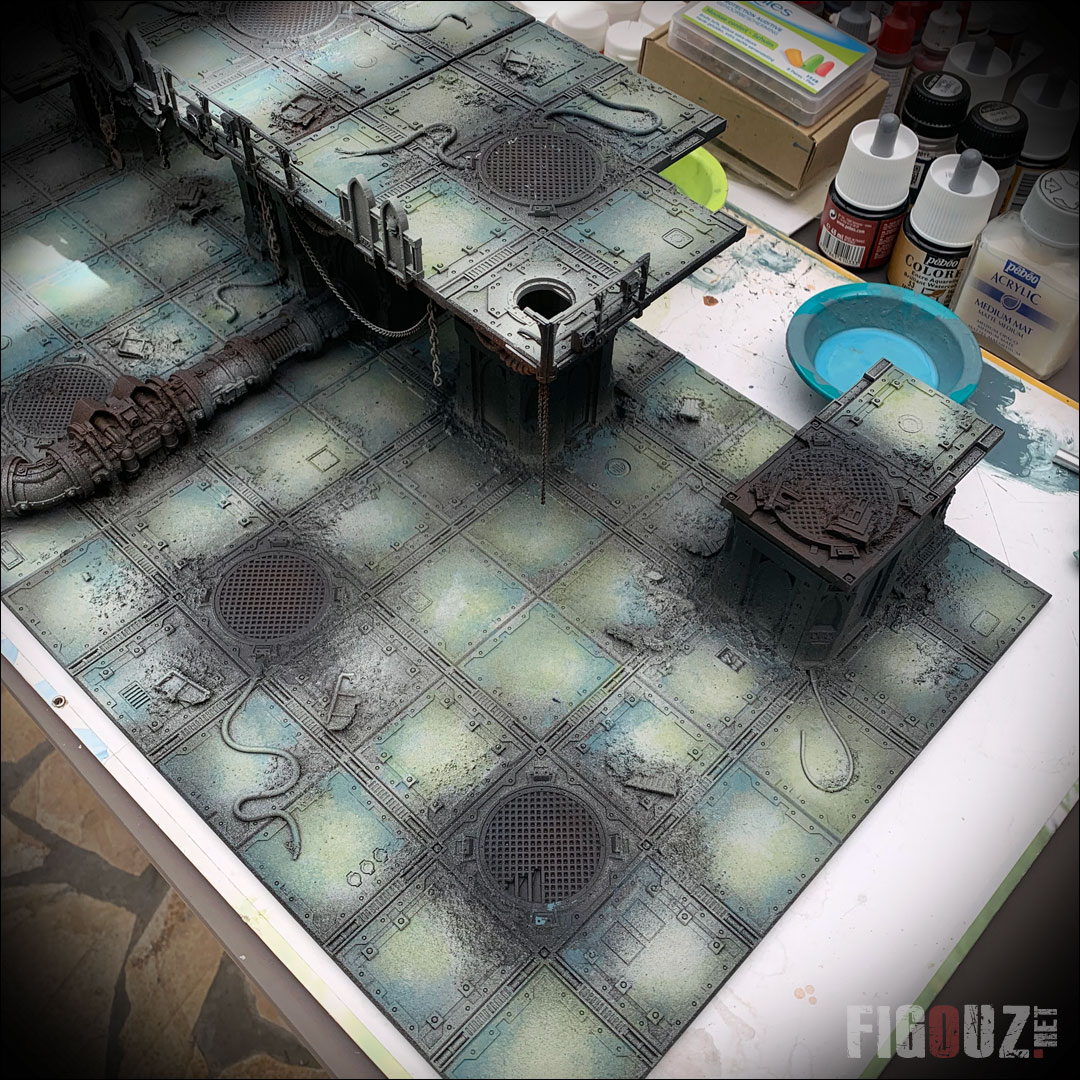
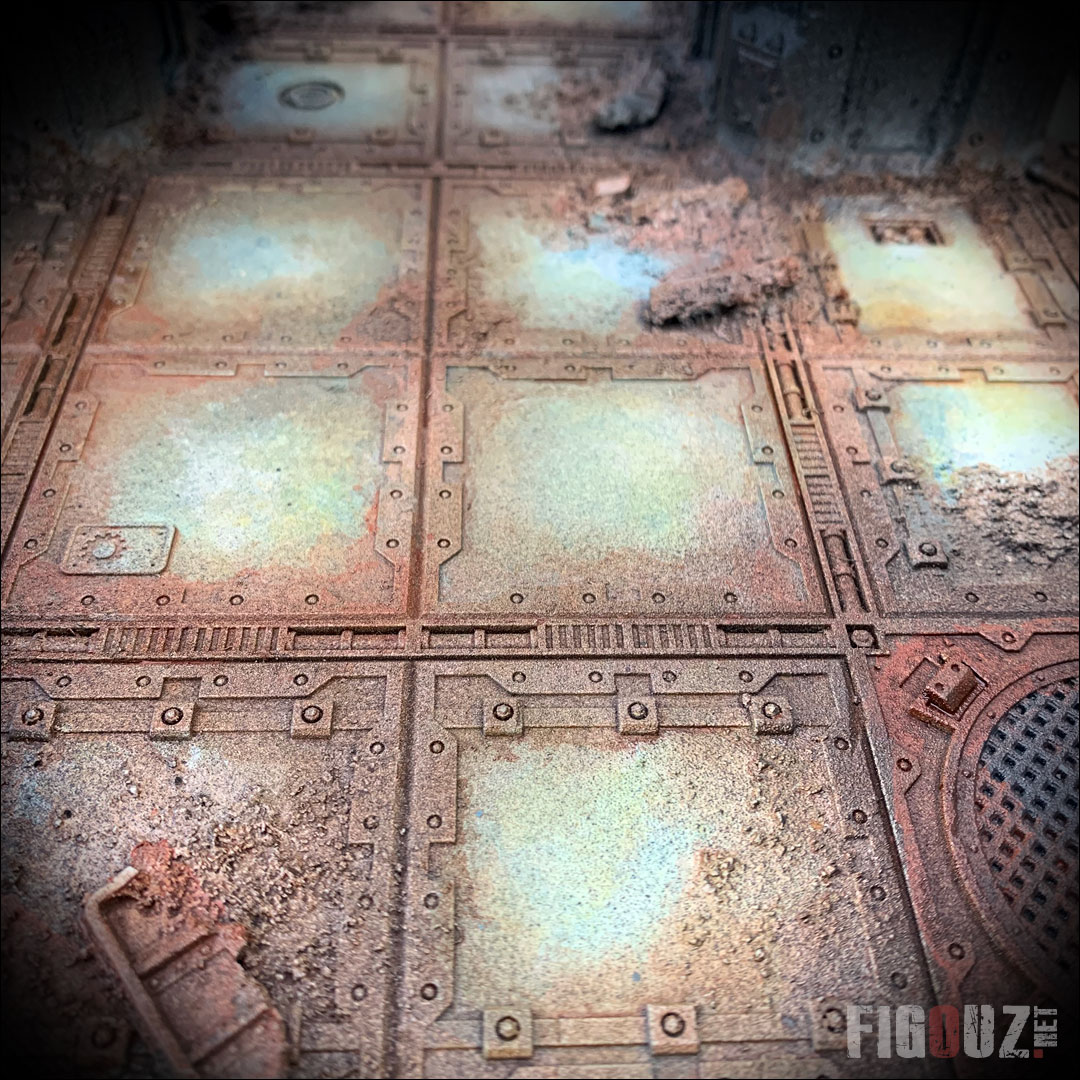
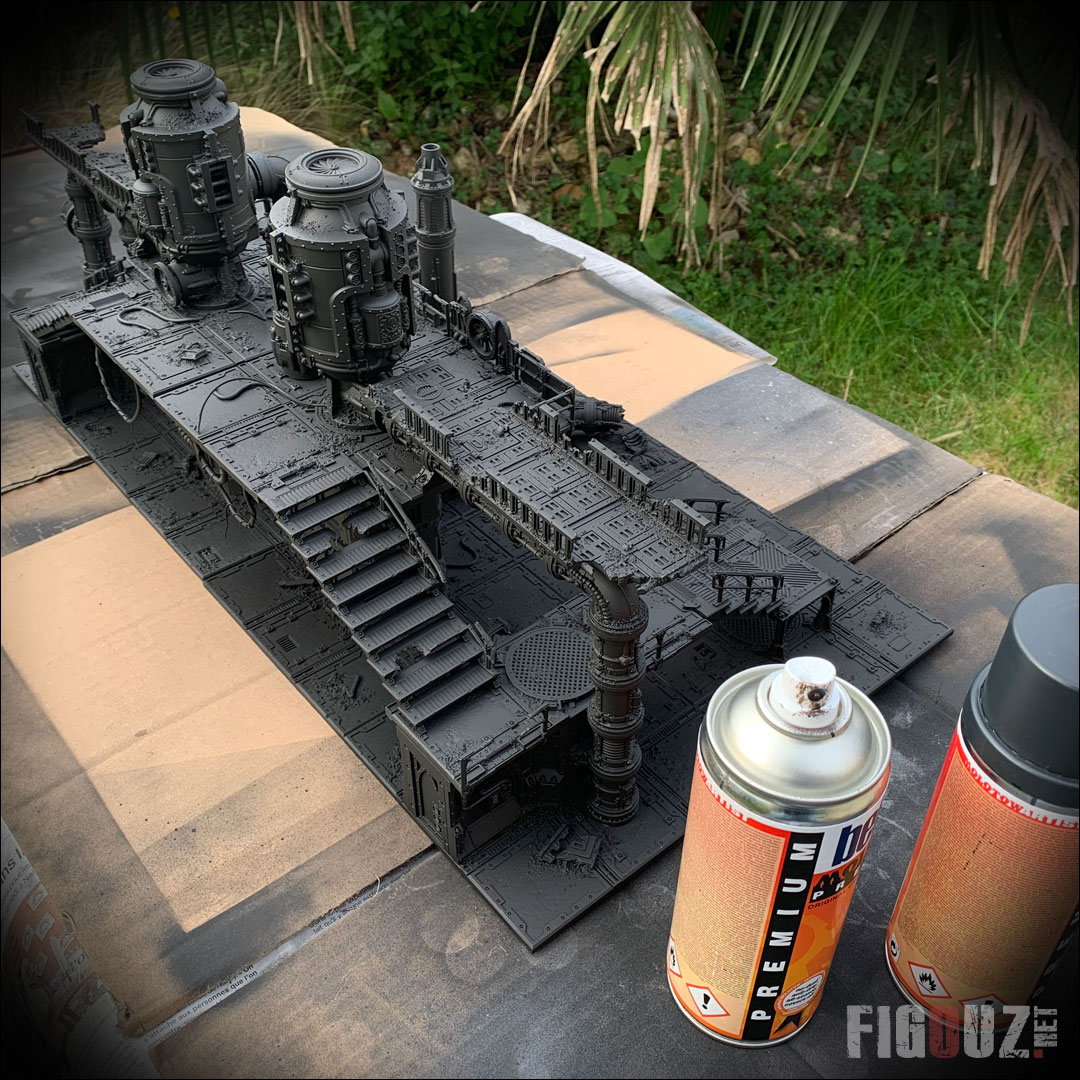
Applying shades of grey to floors !
::: 8 April 2020 ::
Pshiiiiiiiit... Pshiiiiiiiiiit... Pshiiit !
Quickly done during the lunch break, i've sprayed 3 shades of Grey on my first two Necromunda tiles. This requires dexterity and a certain mastery of the bomb, but I made sure to spray the lightest shade in the centre of each square composing the floor tiles and platforms. This in order to obtain a gradation going from the lightest in the centre to the darkest on the edges of each tile.
You will understand why in the next articles dedicated to the different stages of painting ;)
Another detail I should have expected: my rust effects have completely disappeared. This is a nice lesson that will save me from wasting paint cans and spending time on the next tiles. What remains are the ducts, alchomite stacks and other chimneys that remain rusted while waiting for their own paint, as they are removable elements for the moment.
These first colour settings make me impatient to start the really nice things: I'm really looking forward to the colour setting and the weathering !
- Necromunda Zone Mortalis - Undercoat of 3 shades of grey on tiles and stairs -
Click on this picture to open a high resolution pictures gallery
Undercoating of the tiles and first rust tints !
::: 7 April 2020 ::
And Hop! I took advantage of the lengthening days to start a first session of undercoating of my Necromunda decors with the help of paint sprays. I have to admit that it changes the look of the scenery right away and all the details and textures come out at last ! \o/
I have for the occasion used Molotow paint sprays, normally intended for graffers. My feedback concerning these paint bombs : compared to the Games bombs, they seriously lack propulsion power and powder a lot. But for scenery, they do very well. Especially since they cost me only 2€90 each against about 15€00 for a Citadel can and that the colour chart available is really important and very interesting. I invested in a good dozen of spray cans when I came across them in a fine art shop.
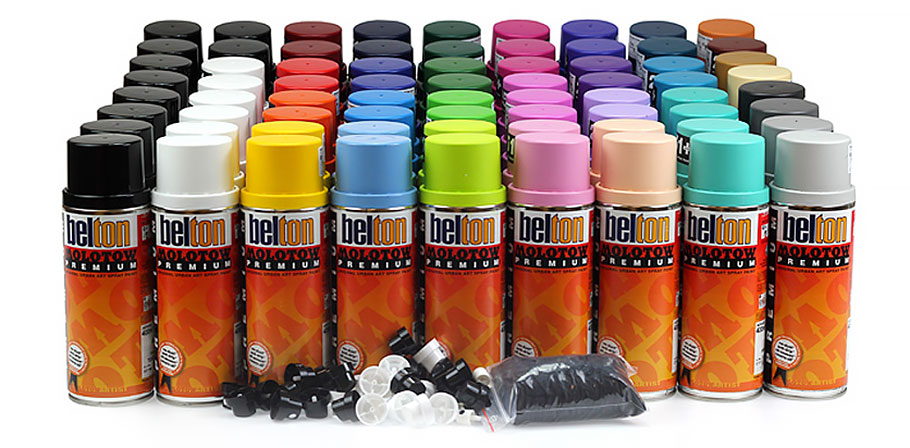
- Belton Molotow Premium spray paint cans - A range of 175 colours! -
In the pictures below, I used a shade of black tyres and not less than 5 shades of brown and ochre. I don't really know where I'm going, but I'm going! The next steps will be to put the shades of grey on the floors and platforms (but I'll stop before the fifty shades, I promise...)
- Necromunda Zone Mortalis - Undercoat and first shades of rust -
Click on this picture to open a high resolution pictures gallery
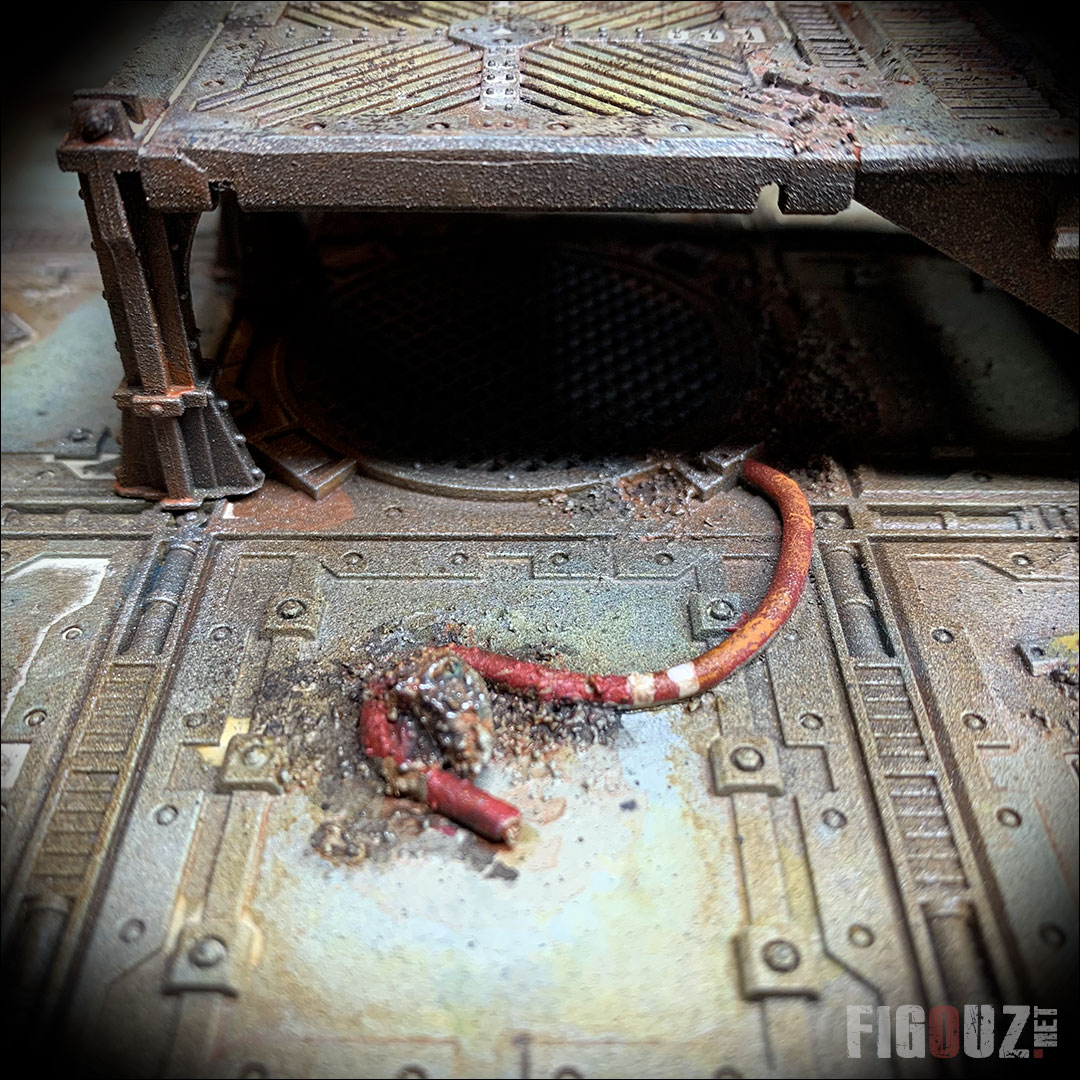
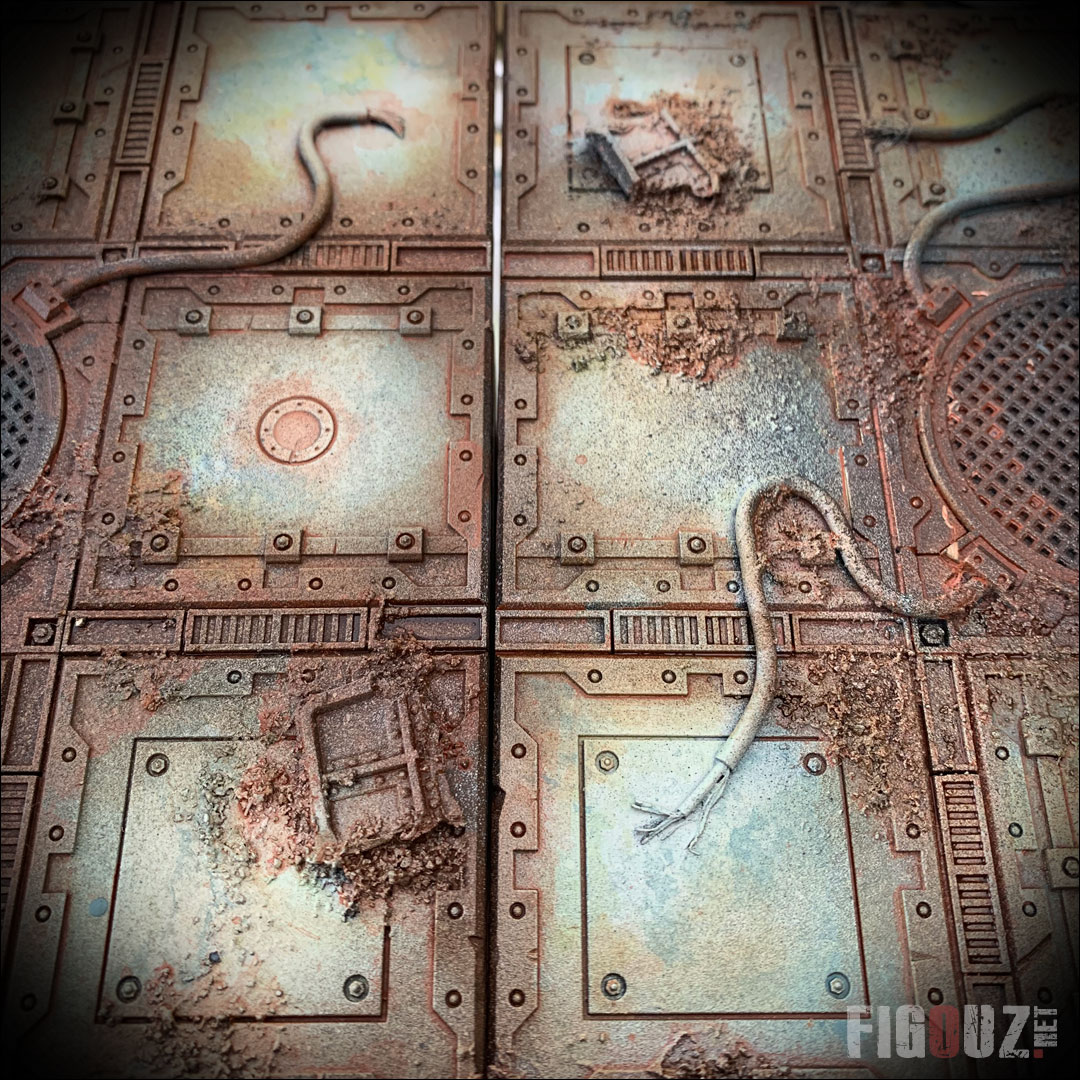
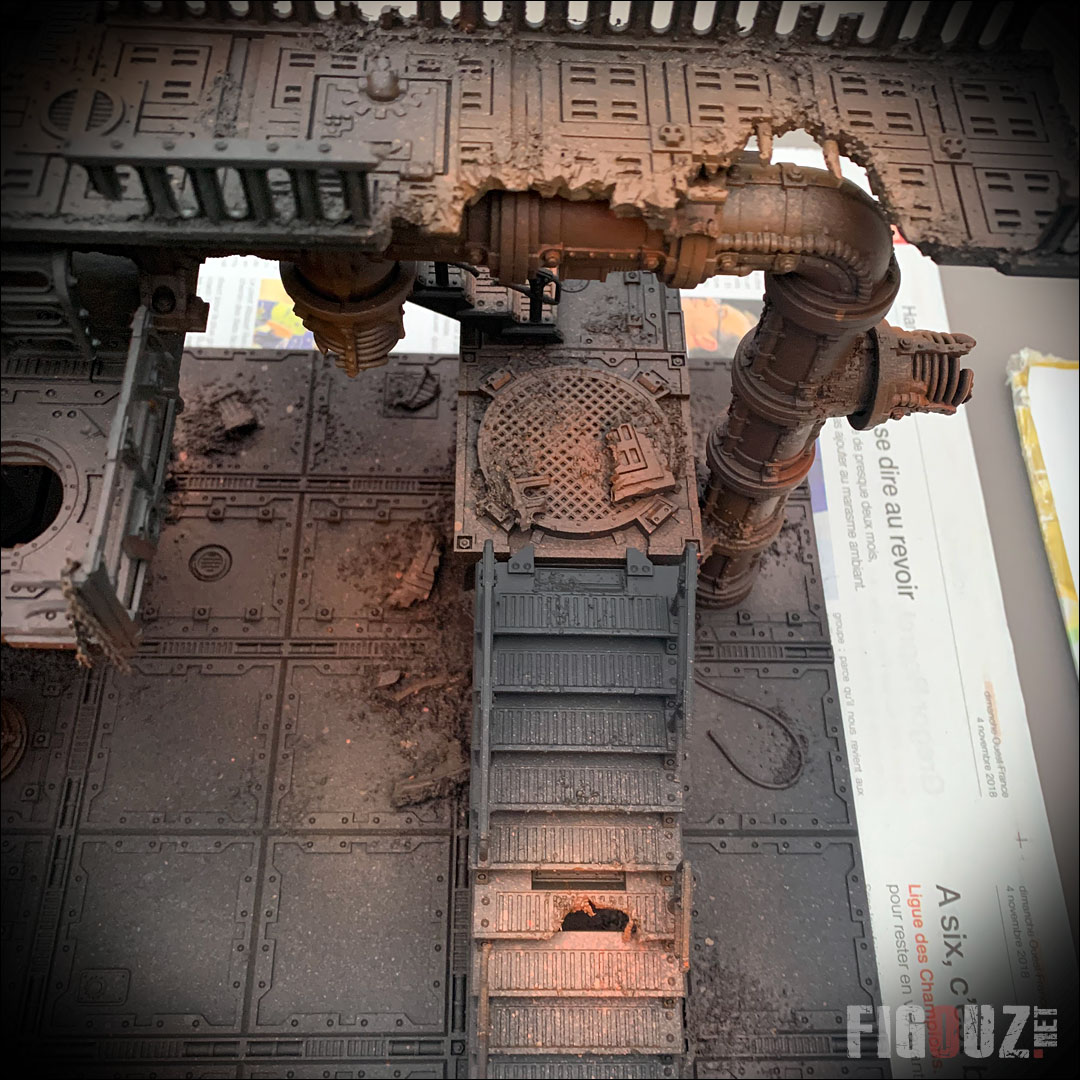
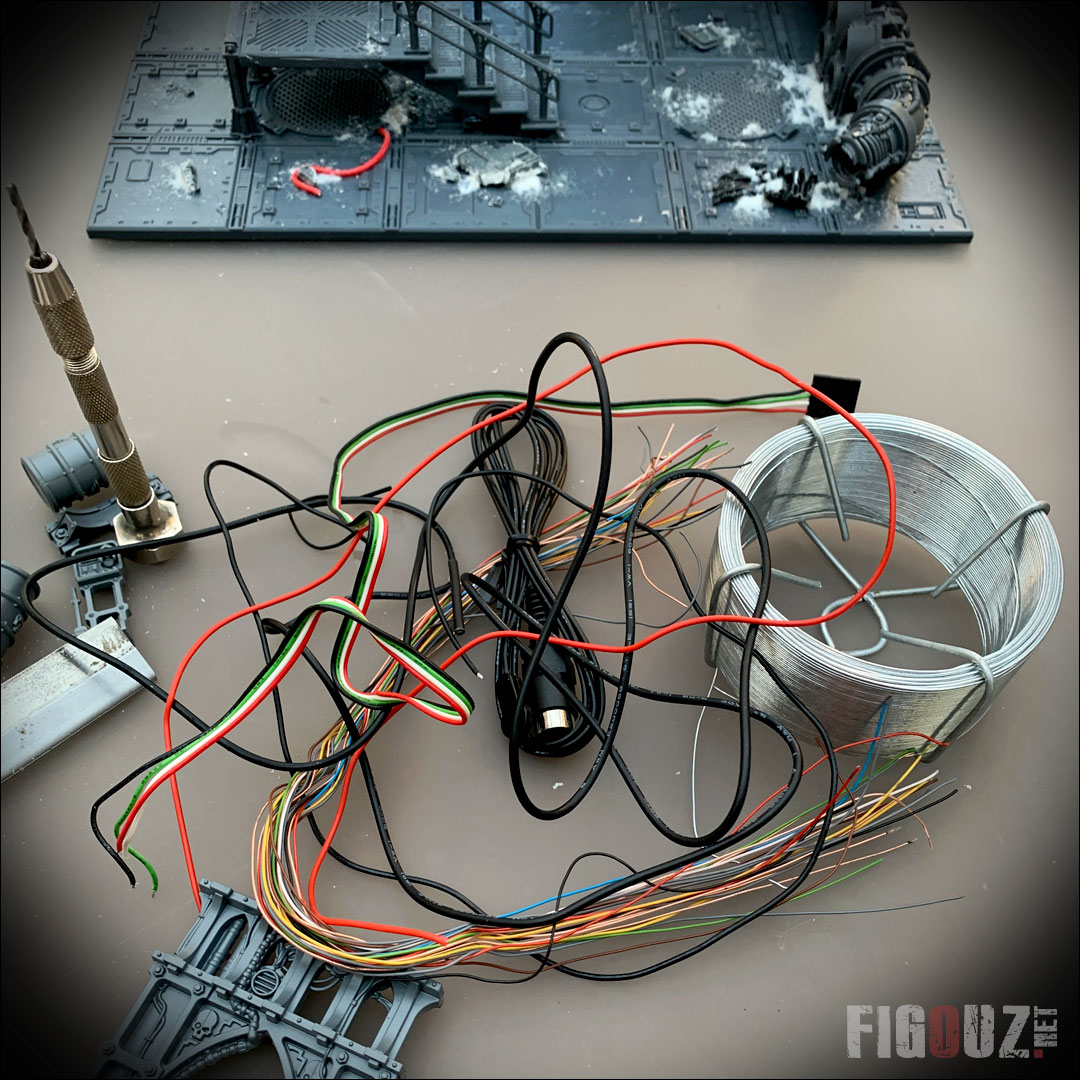
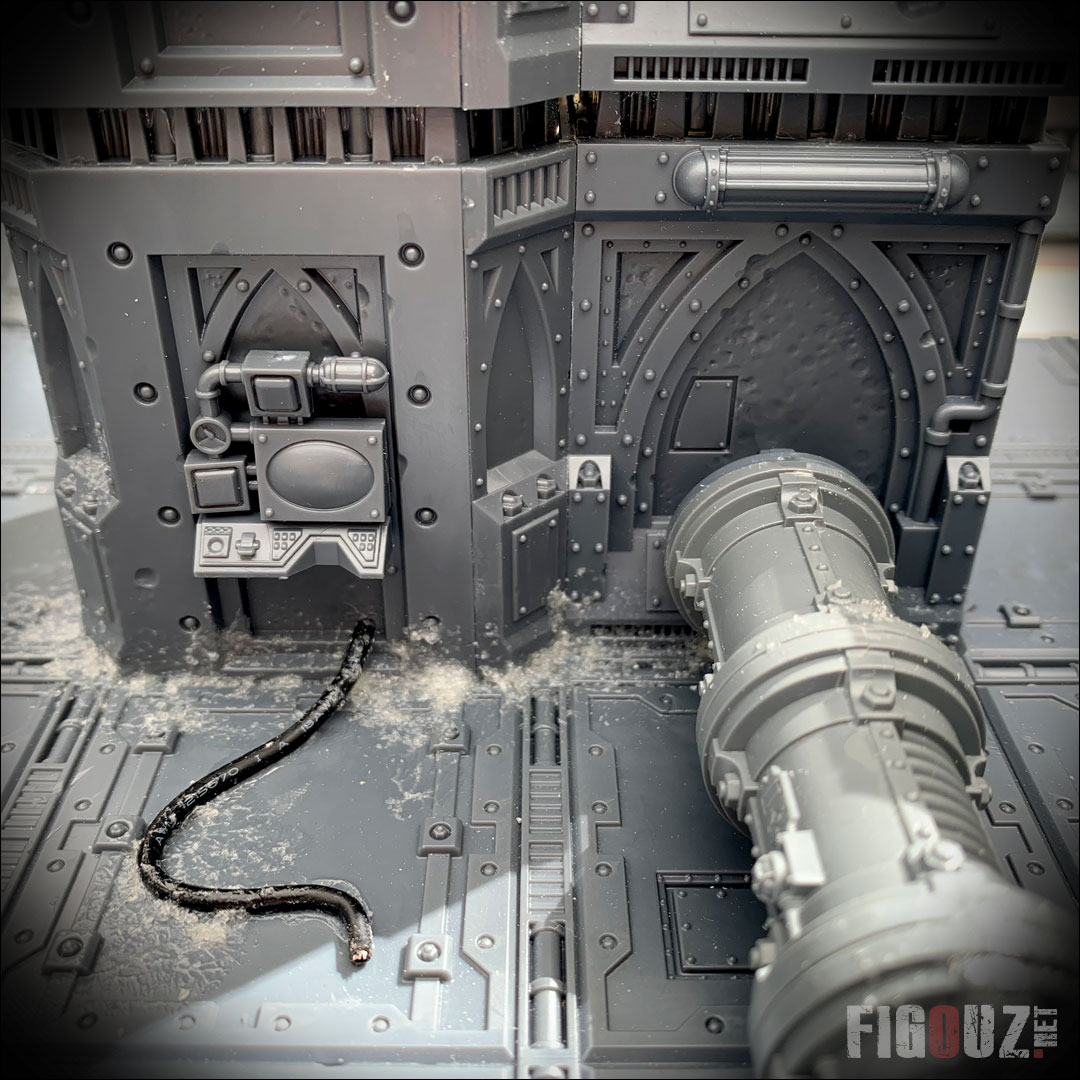
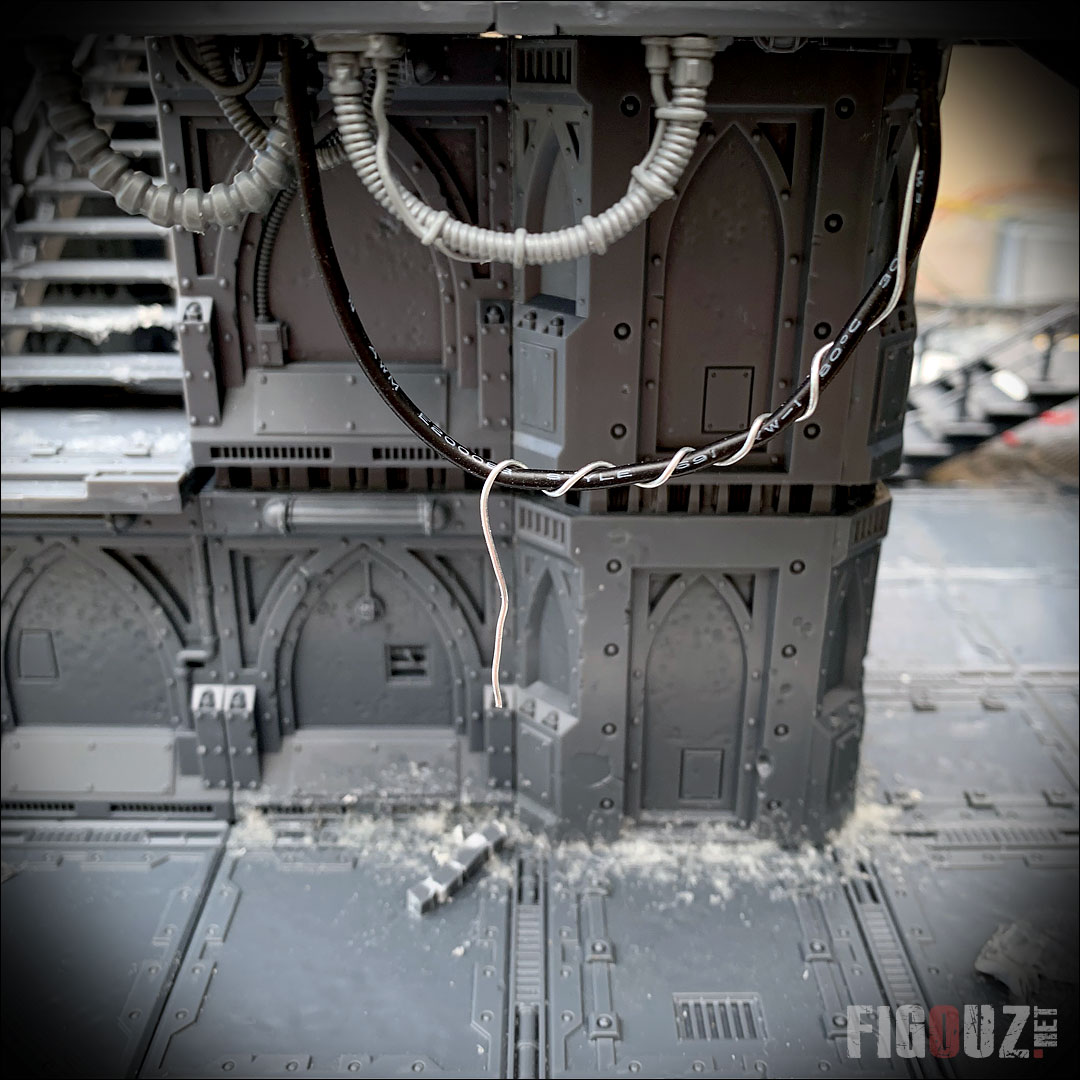
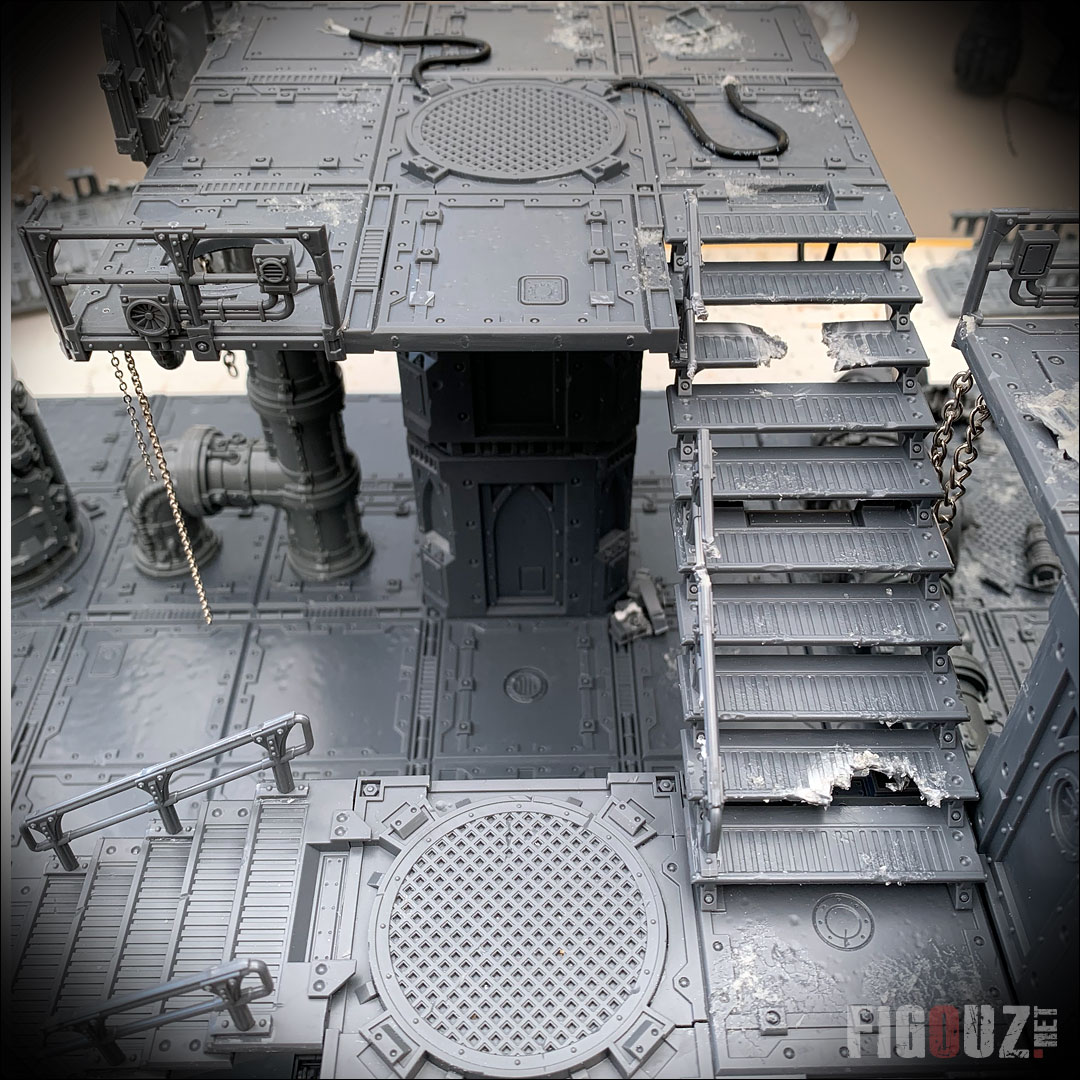
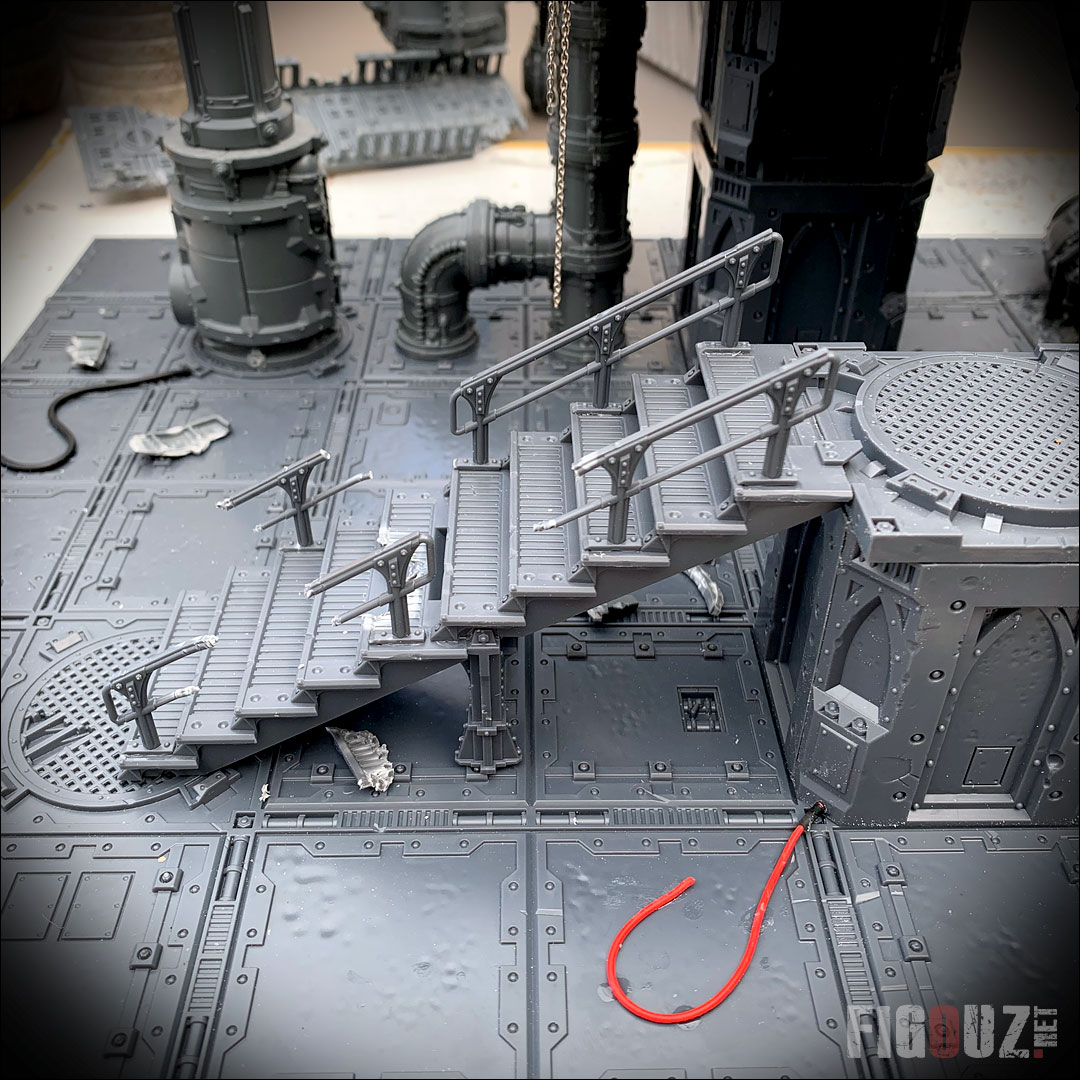
Adding cables, debris, rubble and texture !
::: 5 April 2020 ::
That alone justifies to glue its scenery elements !
I spent a very nice weekend on my terrace adding a lot of details to my first two Necromunda tiles : cables, debris, rubble and various textures... Here are the pictures and various tips resulting from these works. :)
- Necromunda Zone Mortalis - Adding texture, cables and debris -
Click on this picture to open a high resolution pictures gallery
TIP 1 :
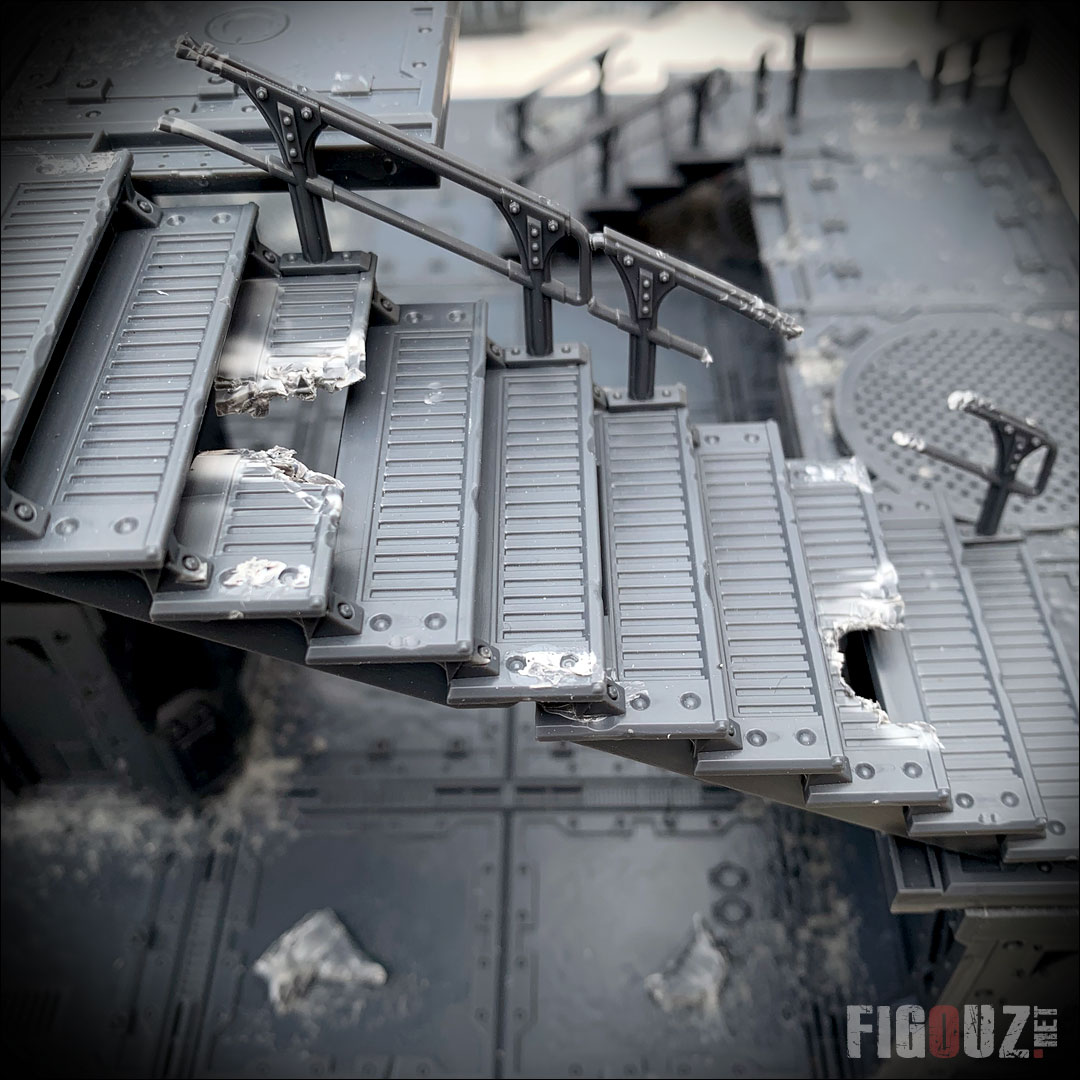
Games Workshop doesn't really provide enough stair railings (which is too much considering the price of the kits), I had to take some off and cut them in several parts to have more available and give a more decrepit effect to my sets.
These first strokes of pliers and cutter quickly made me want to destroy a few steps of stairs too, simulating holes created by rust.
For cables, which I have glued to the floor, or suspended to the platforms, I have used real electric cables of various diameters.
TIP 2 :
I advise you to change the plastic of these cables to fine sandpaper, as the paint does not adhere well and is very likely to flake off with time and handling.
TIP 3 :
When I damaged the walkways and stairs, I kept the shredded pieces of plastic resulting from this proper butchering in a safe place. resulting from this proper butchering. I glued this debris vertically from where it would have fallen naturally, i.e. under the footbridges and under the stairs. It is this kind of attention to detail that will bring credibility to your scenery kits.
For the texture at the foot of the walls and columns and around debris, cables and other gems, I used (this is a first) resin sand from Liquitex applied with a fairly stiff brush. A product that is not bad at all and replaces very well the sand glued with wood glue. This is a job that takes a lot of time to adjust everything to the mm, but the result is well worth it! No ?
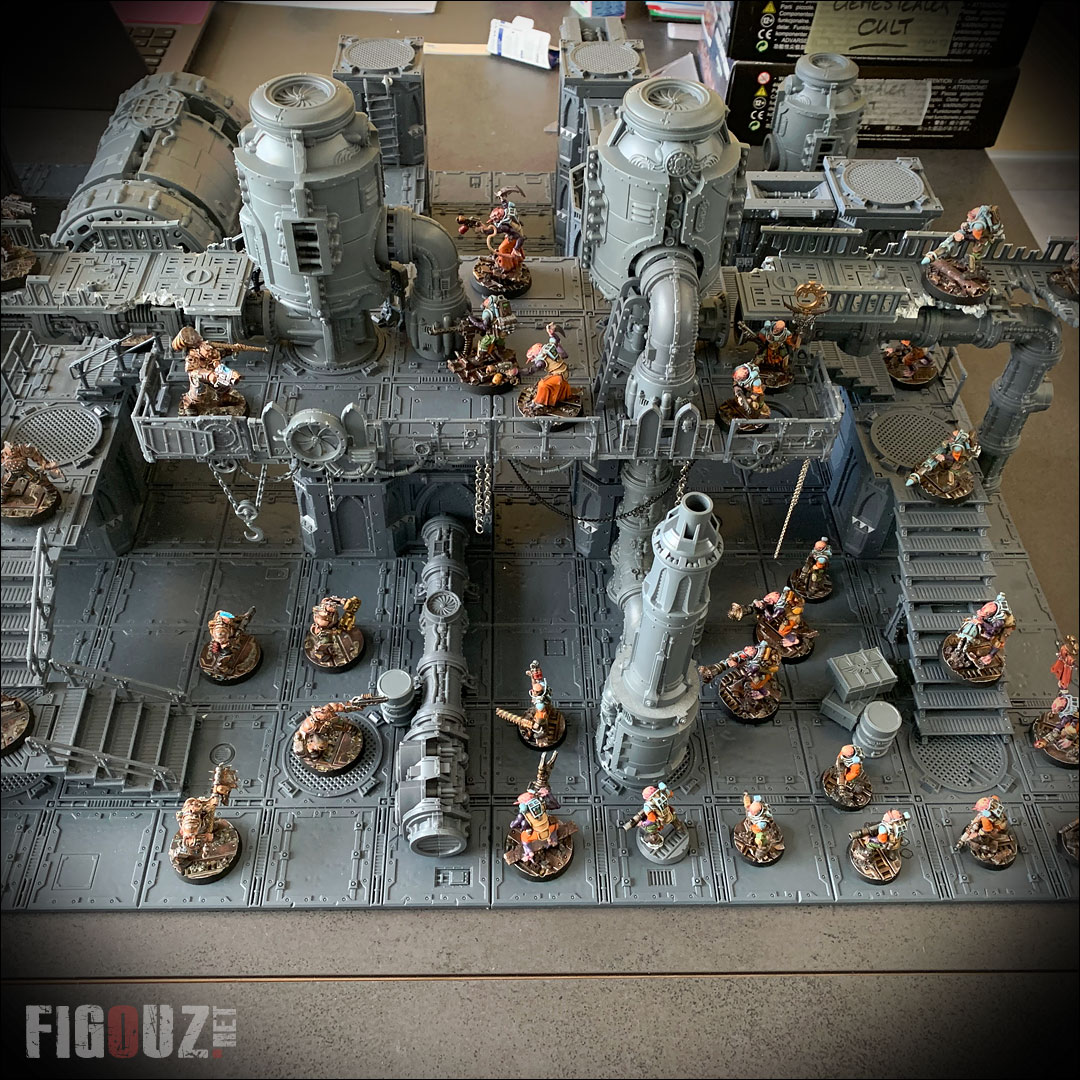
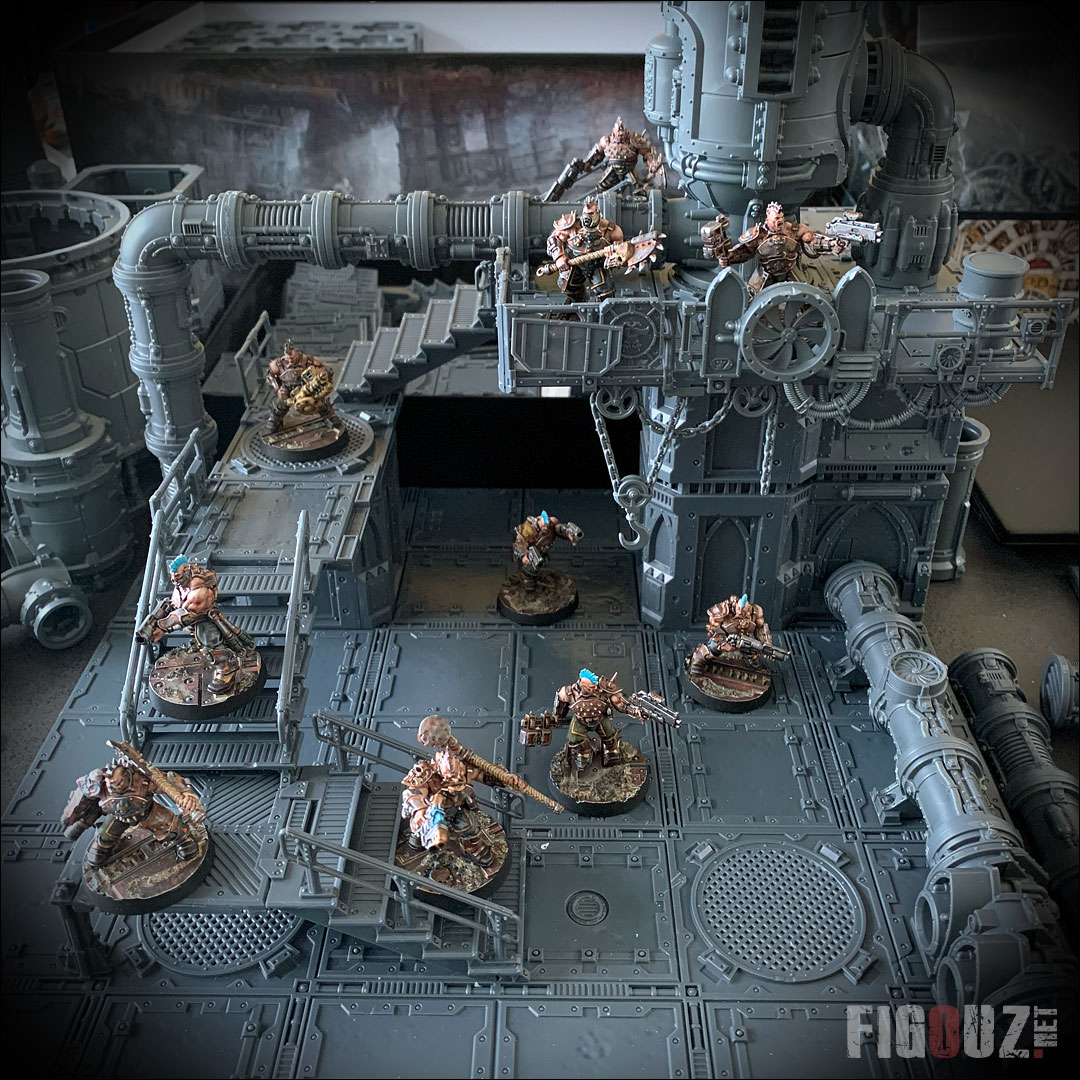
For the delight of the eyes: Gang Goliath vs Cult Genestealer
::: 2 April 2020 ::
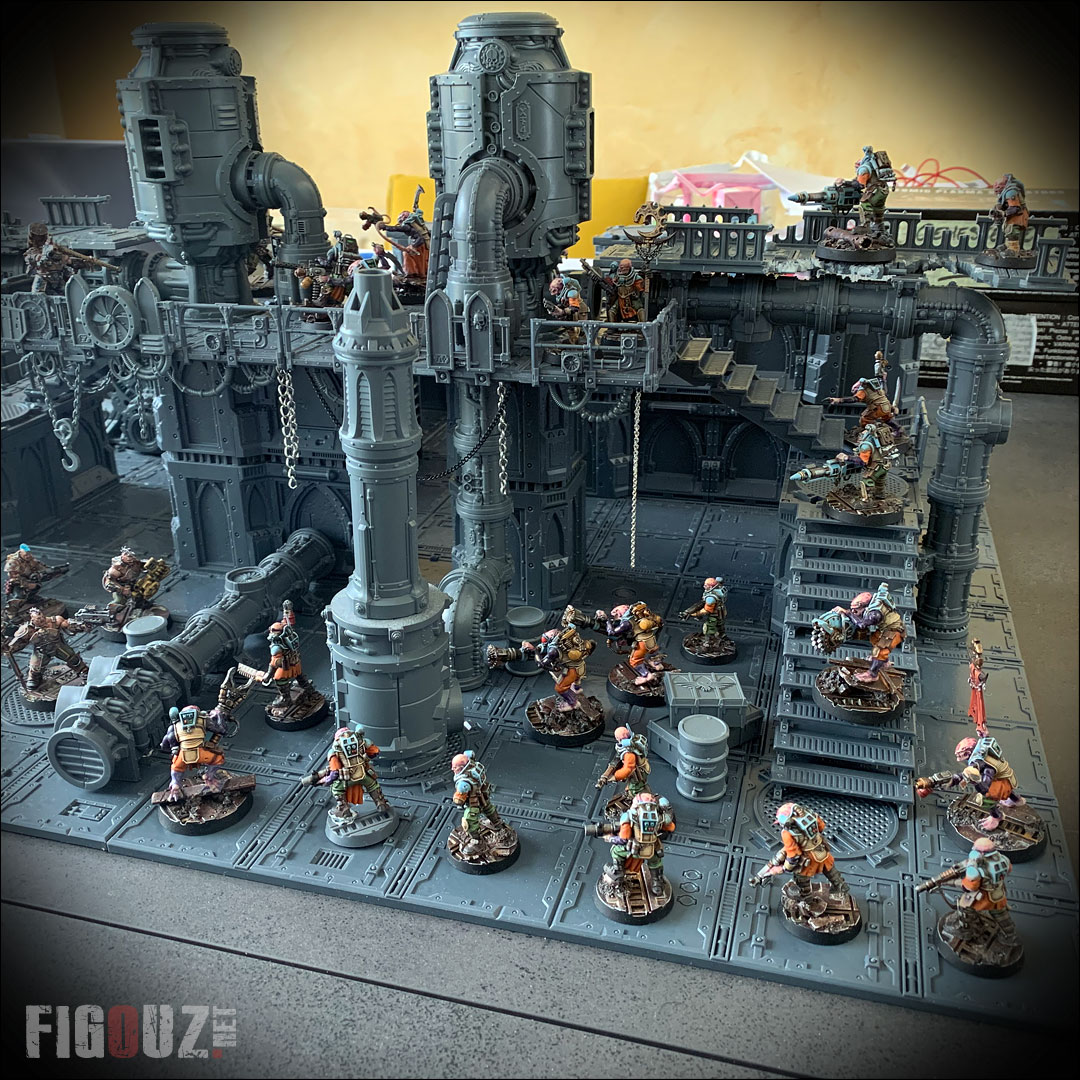
I couldn't help myself... Here is a picture showing an encounter between my Gang Goliath of the Steel Brotherhood and my Culte Genestealer of the Light of Zartha in the dark corridors of the underhive!
The next pictures will be dedicated to the work of texture and painting of these first two tiles of Necromunda scenery .
- Necromunda Zone Mortalis - Gang Goliath vs Cult Genestealer : Steel Brotherhood vs Light of Zartha ! -
Click on this picture to open a high resolution picture gallery
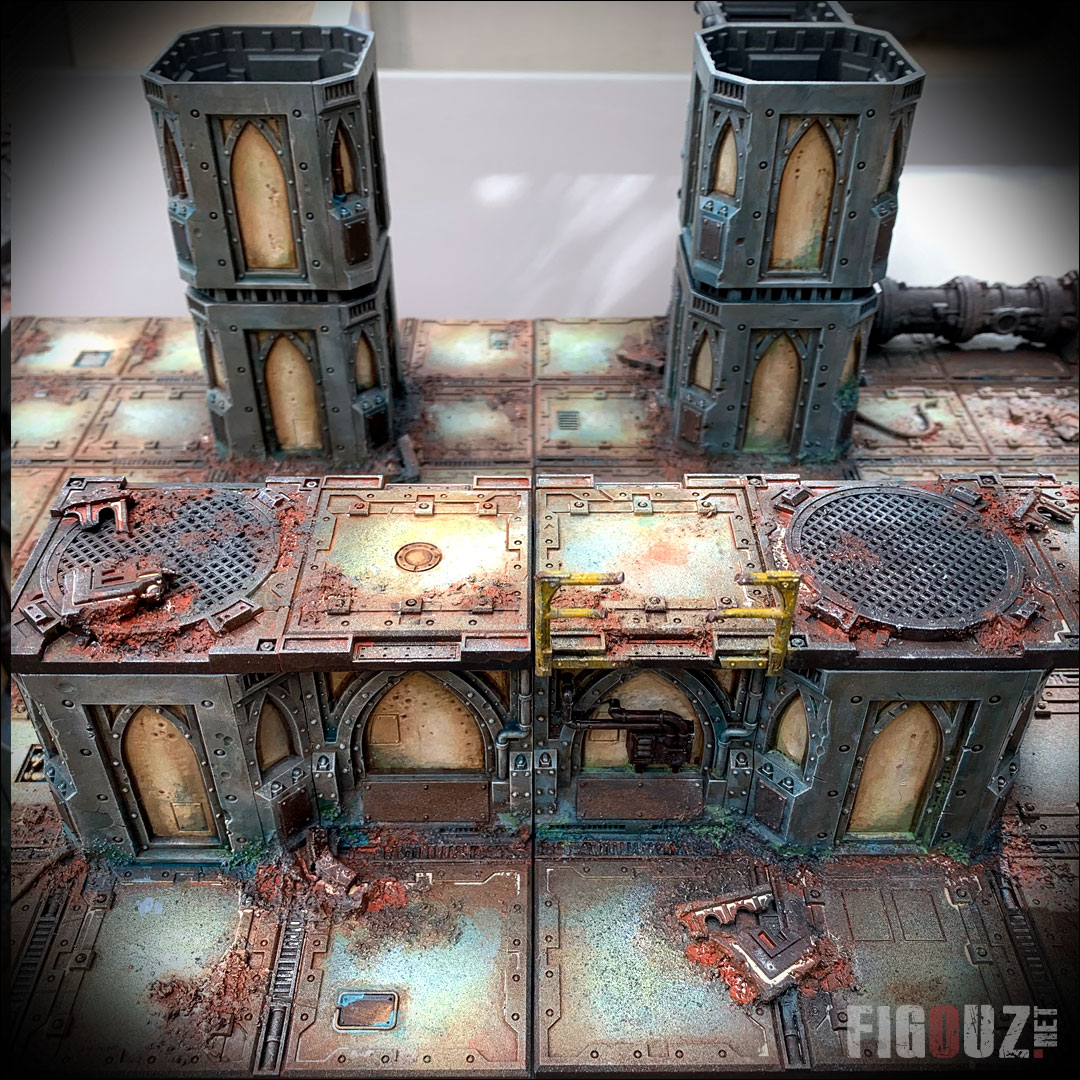
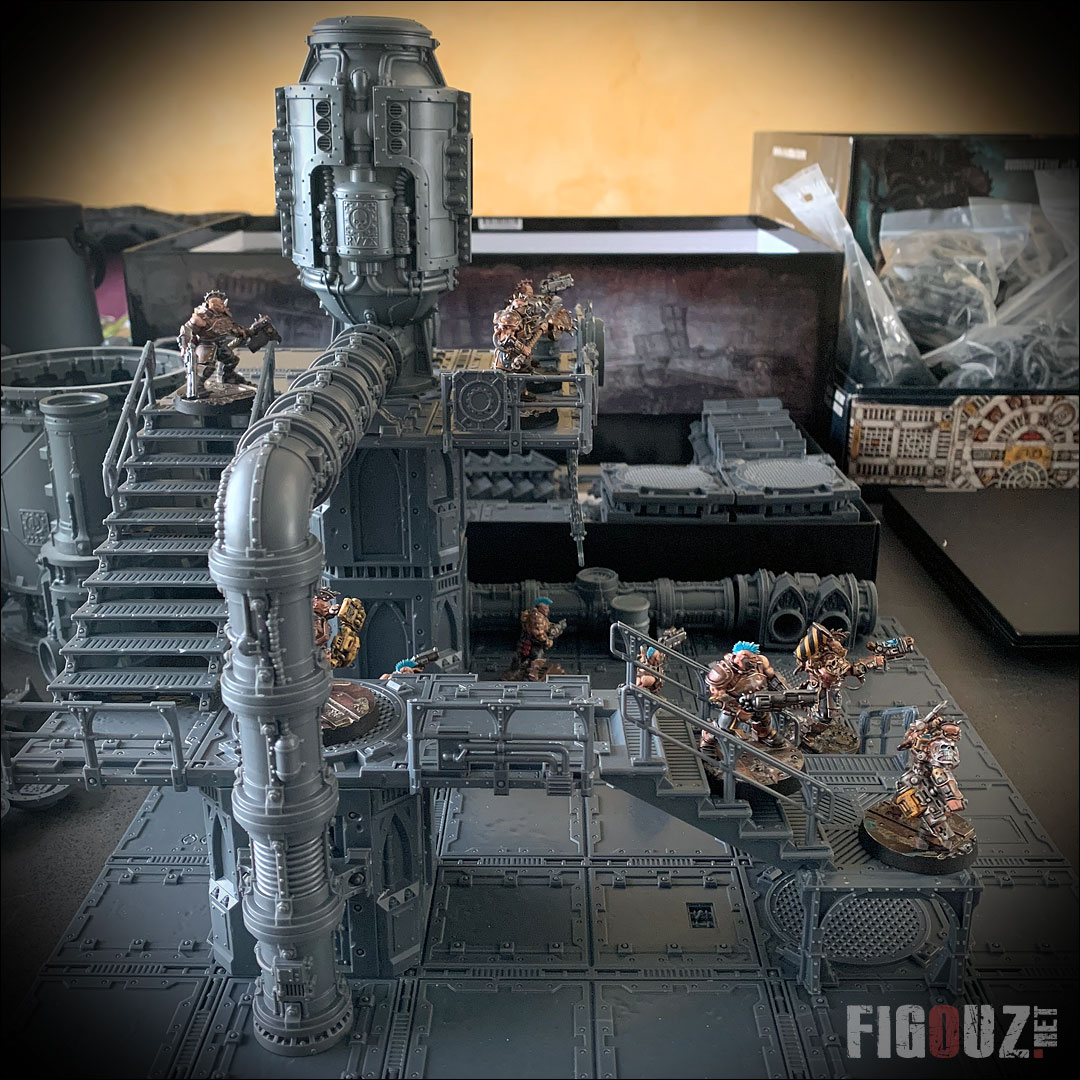
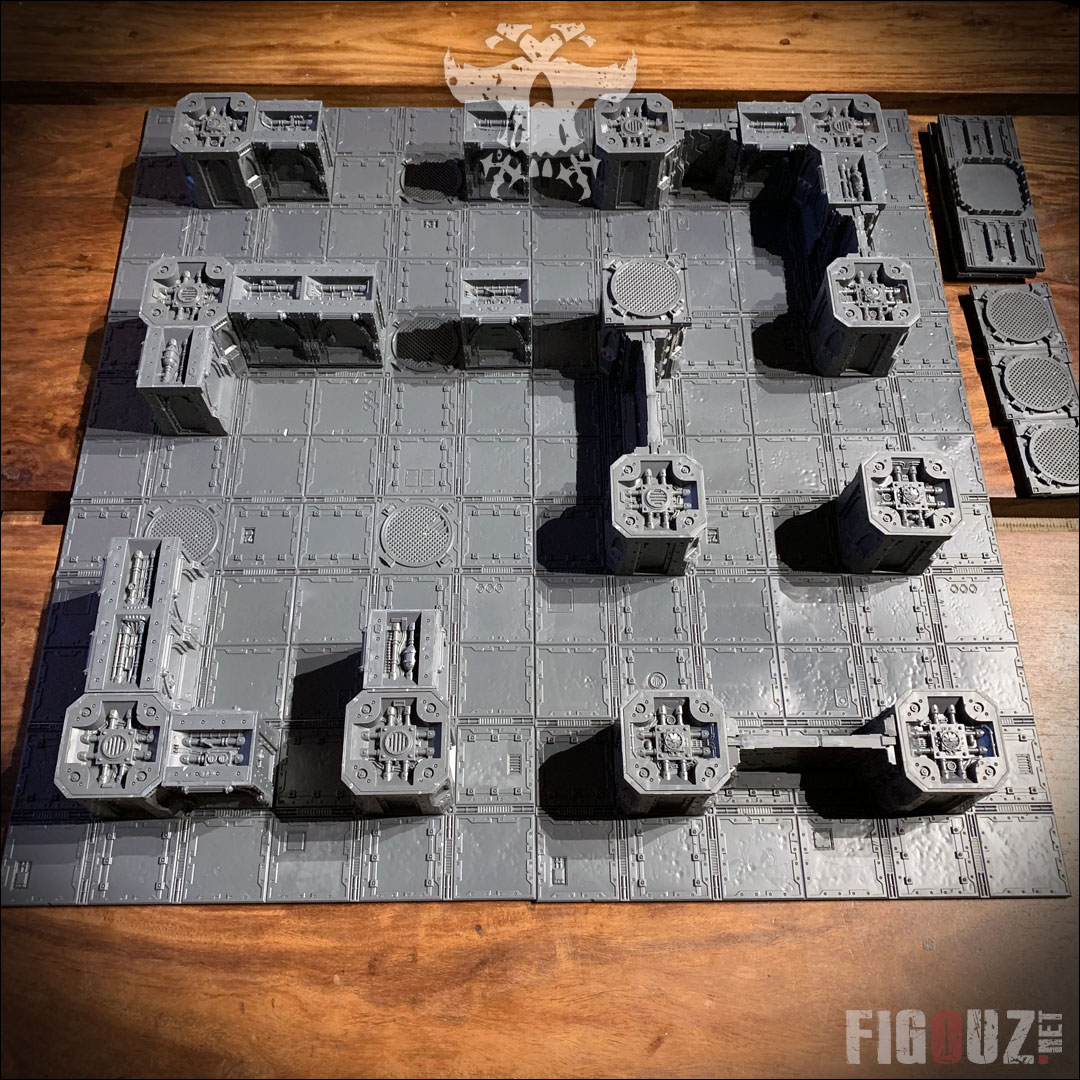
Example of the first two tiles modularity !
::: 1 April 2020 ::
 Mouhahahahahahaha! I love it when a plan comes together !
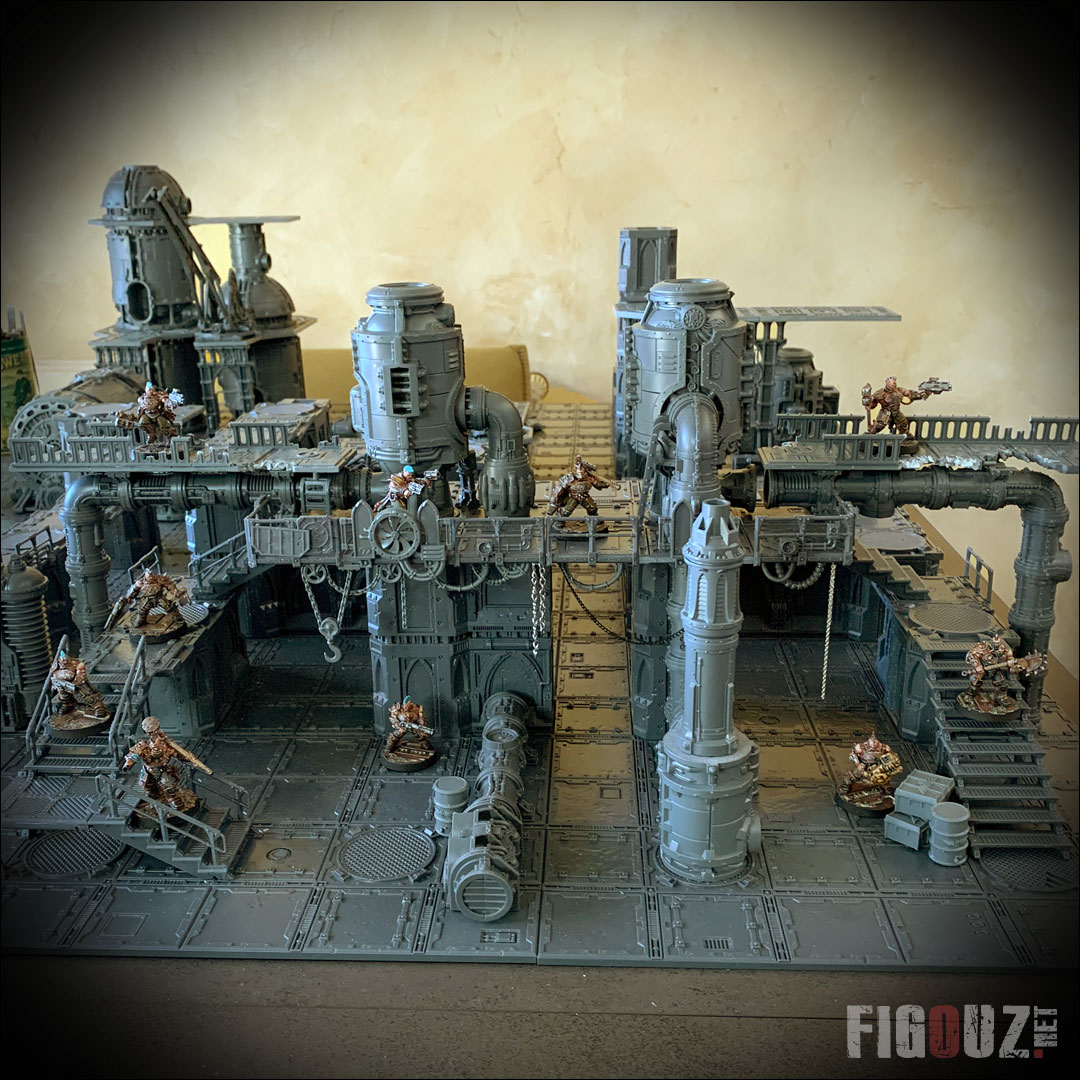
Now that the structural work is finished, I will finally be able to present to you all the modularity offered by these two first tiles of my future modular table Necromunda / Kill Team !
...And this, despite the fact that I decided to glue a good part of the elements, including the walls and columns to the floor plates.
I took a lot of pleasure in taking the few pictures below which show you no less than 5 different settings. (And you can also discover in the background of the pictures some other tests of tiles). What a kiff! ^^
Modular tiles - Setting 1 :
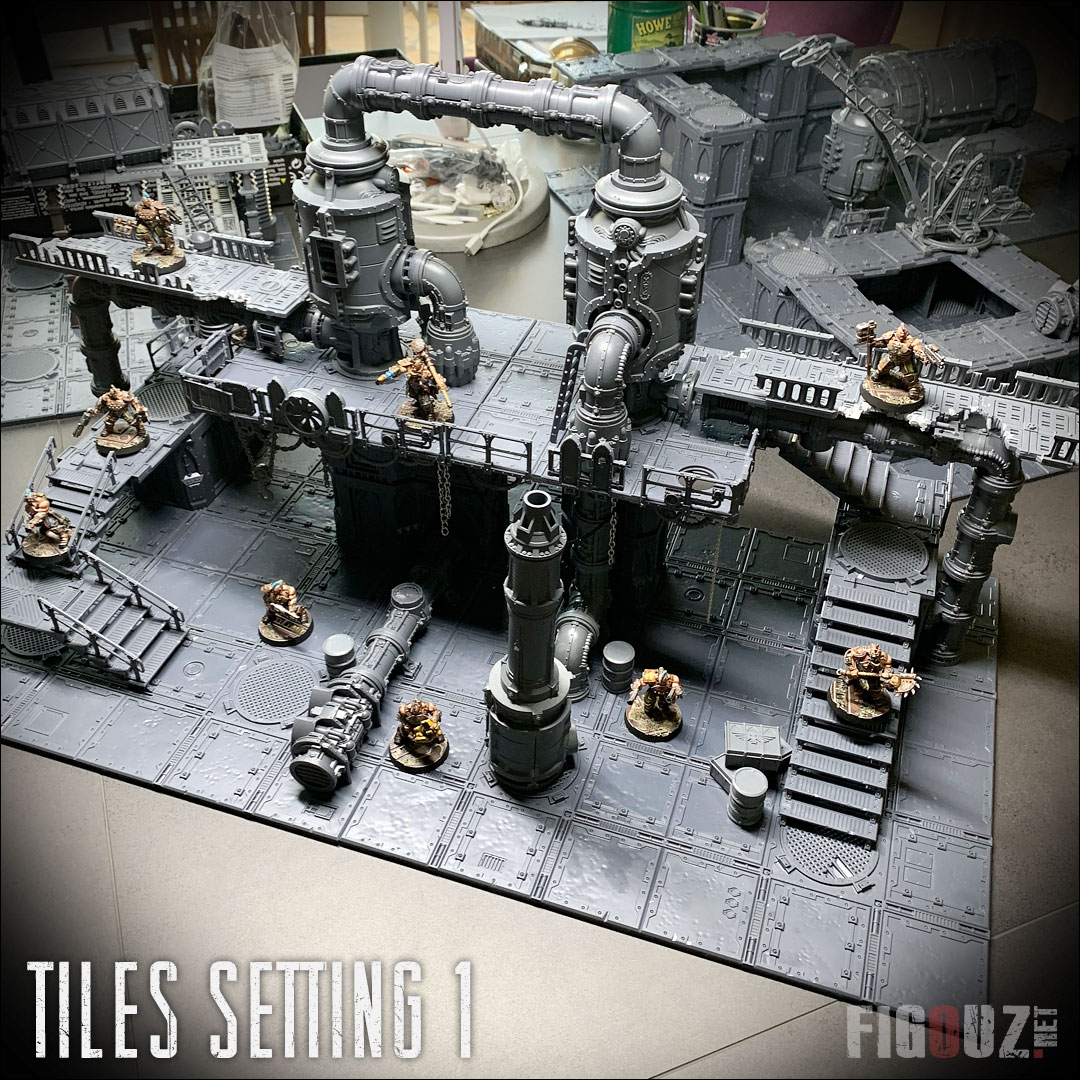
- Necromunda Zone Mortalis - Example of modularity of the first two tiles - Setting 1 ! -
Click on this picture to open a high resolution picture
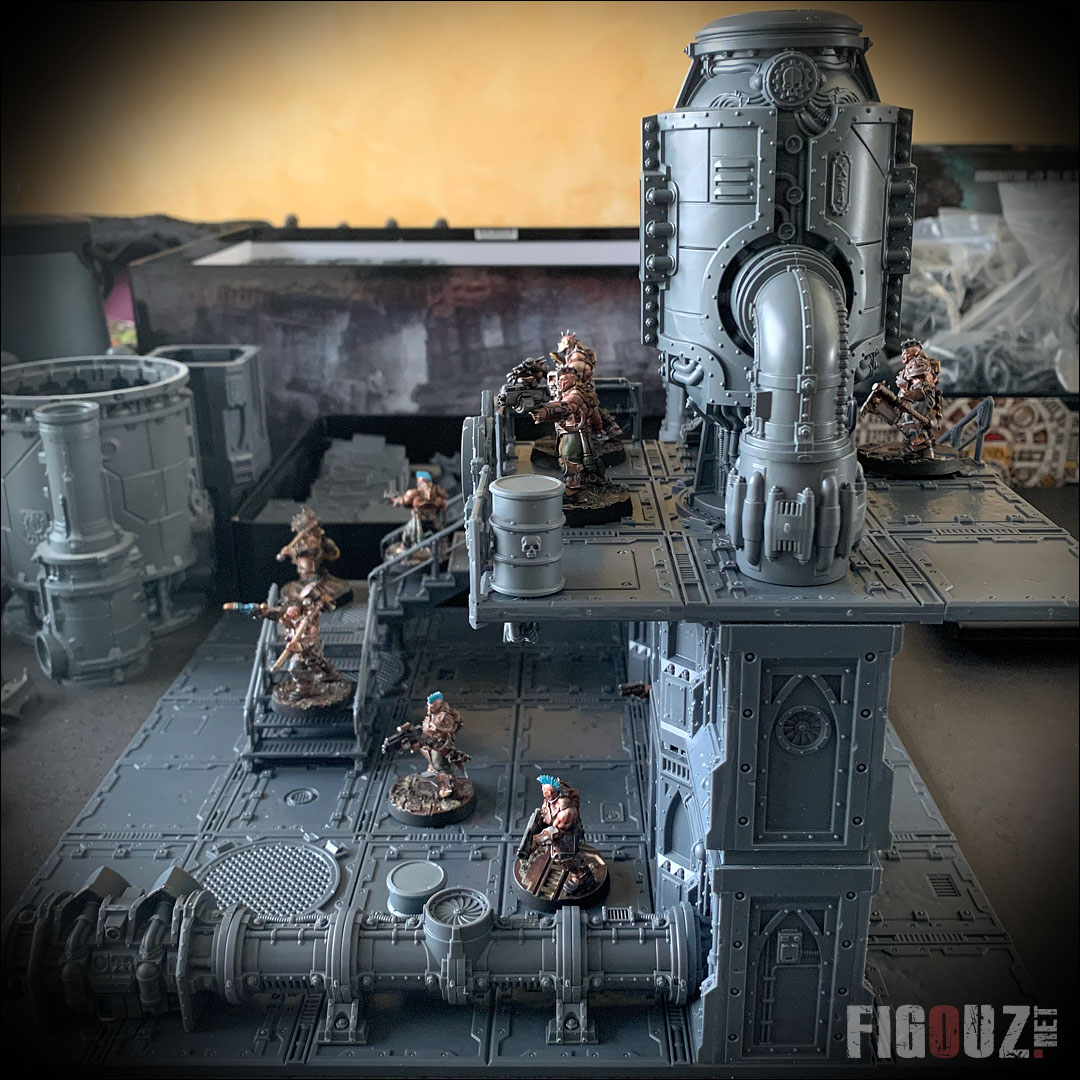
Modular tiles - Setting 2 :

- Necromunda Zone Mortalis - Example of modularity of the first two tiles - Setting 2 ! -
Click on this picture to open a high resolution picture
Modular tiles - Setting 3 :
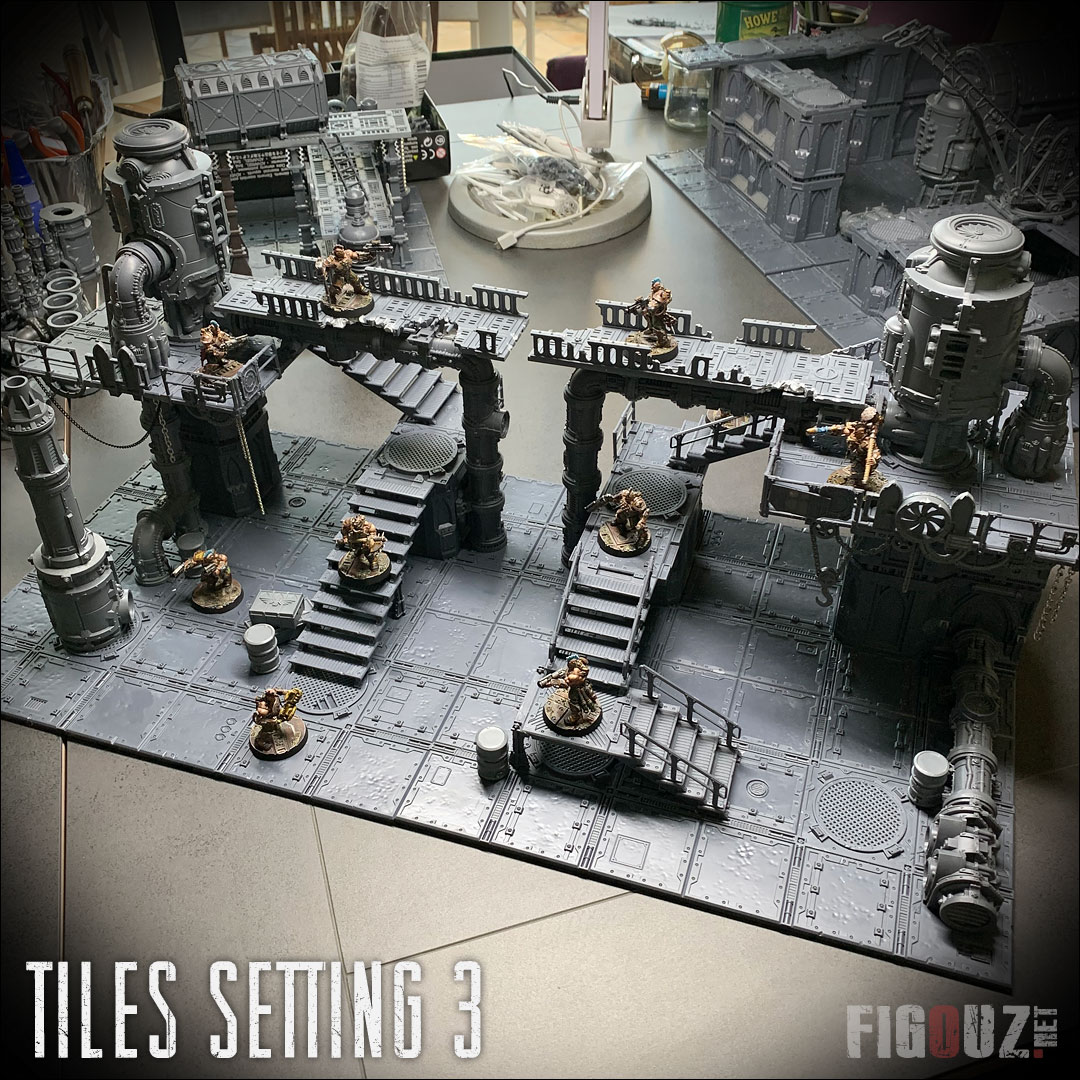
- Necromunda Zone Mortalis - Example of modularity of the first two tiles - Setting 3 ! -
Click on this picture to open a high resolution picture
Modular tiles - Setting 3 - Back view :
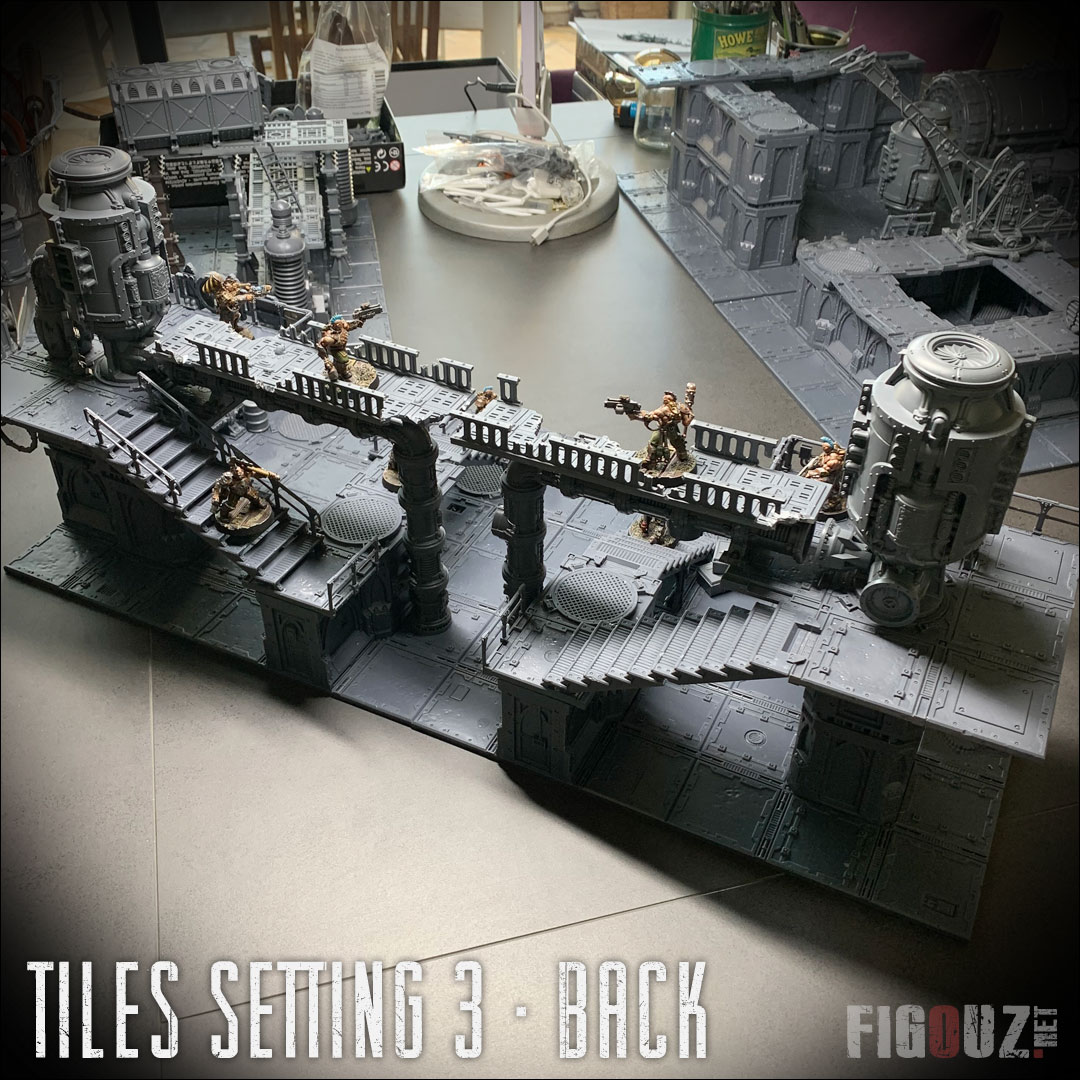
- Necromunda Zone Mortalis - Example of modularity of the first two tiles - Setting 3 back view ! -
Click on this picture to open a high resolution picture
Modular tiles - Setting 4
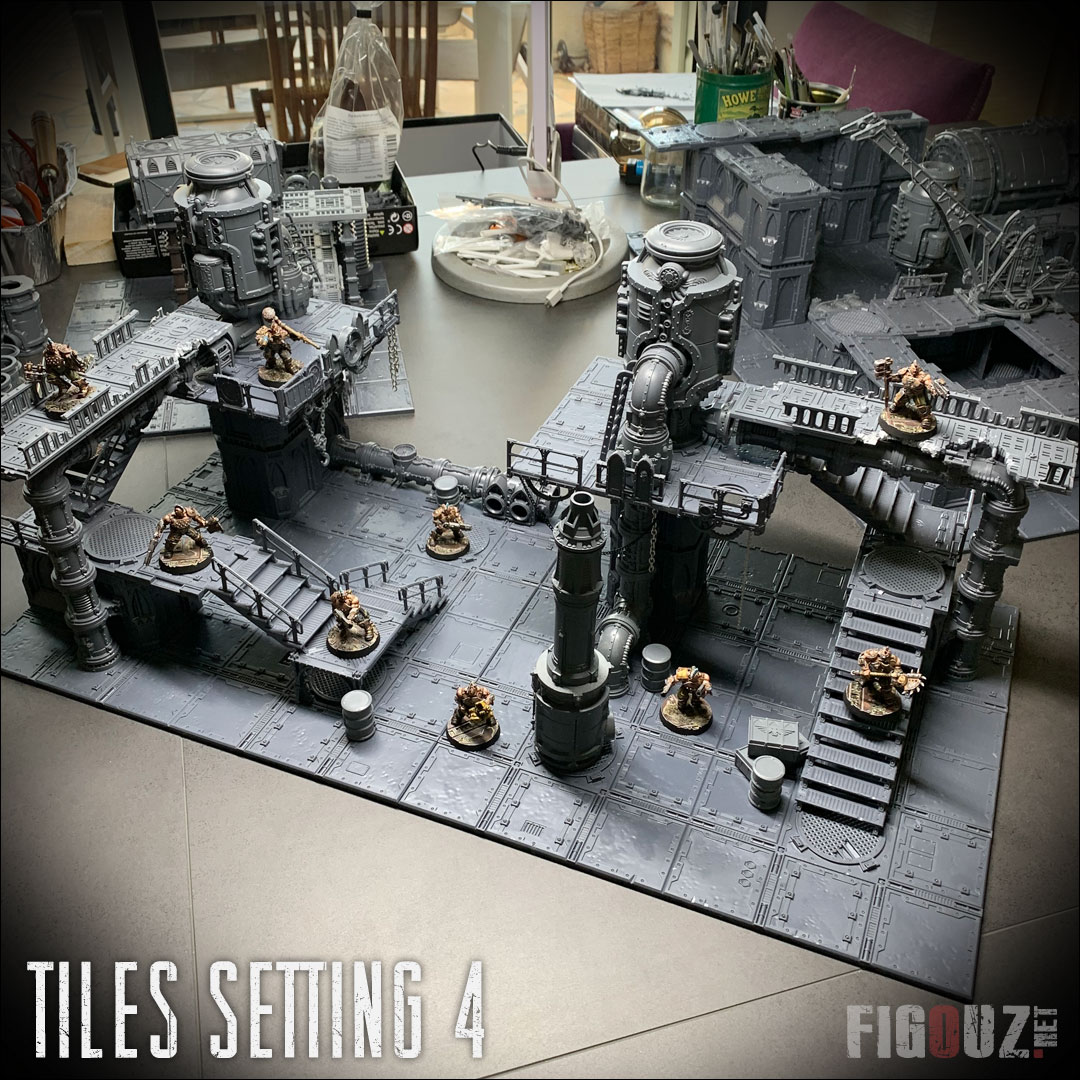
- Necromunda Zone Mortalis - Example of modularity of the first two tiles - Setting 4 ! -
Click on this picture to open a high resolution picture
Modular tiles - Setting 5
.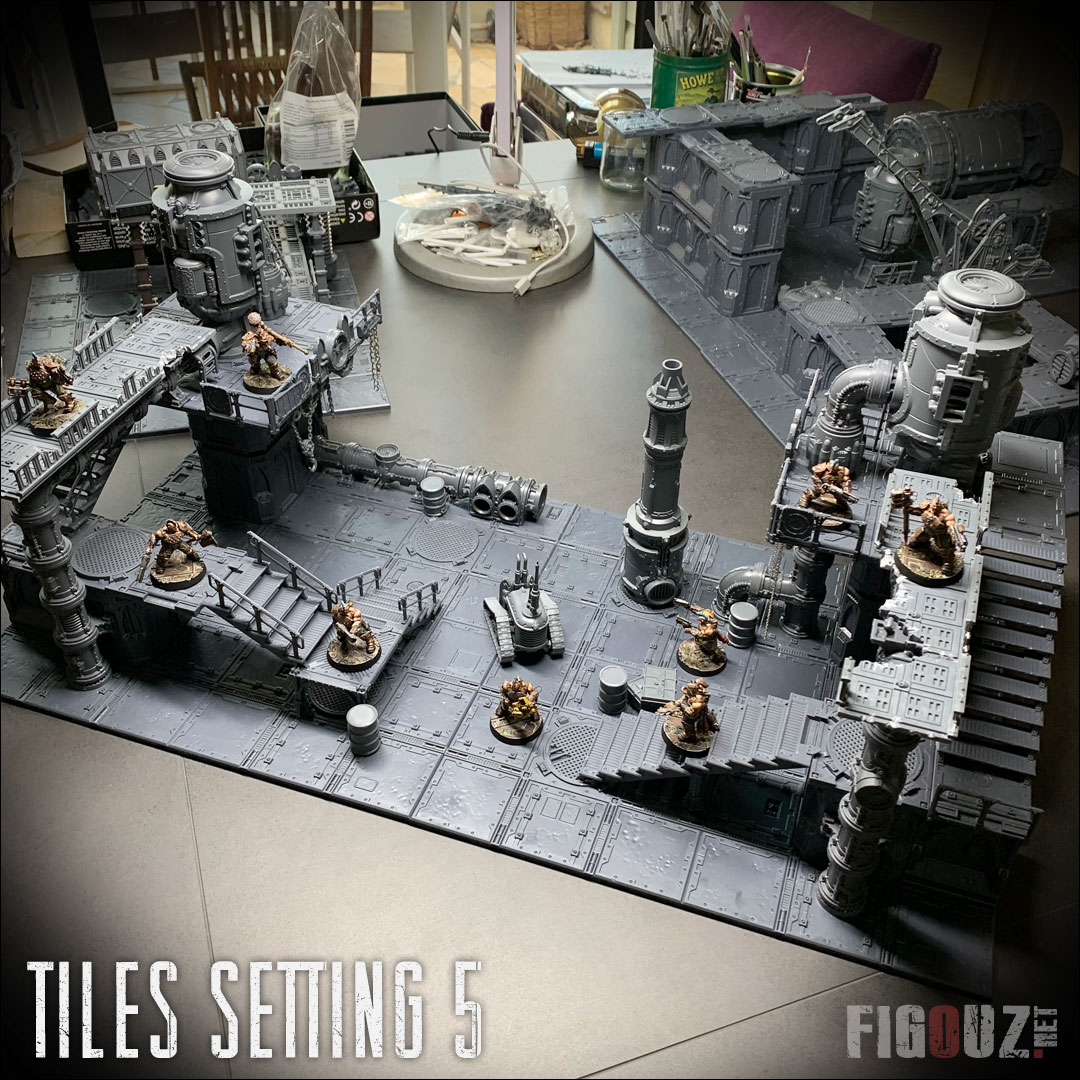
- Necromunda Zone Mortalis - Example of modularity of the first two tiles - Setting 5 ! -
Click on this picture to open a high resolution picture
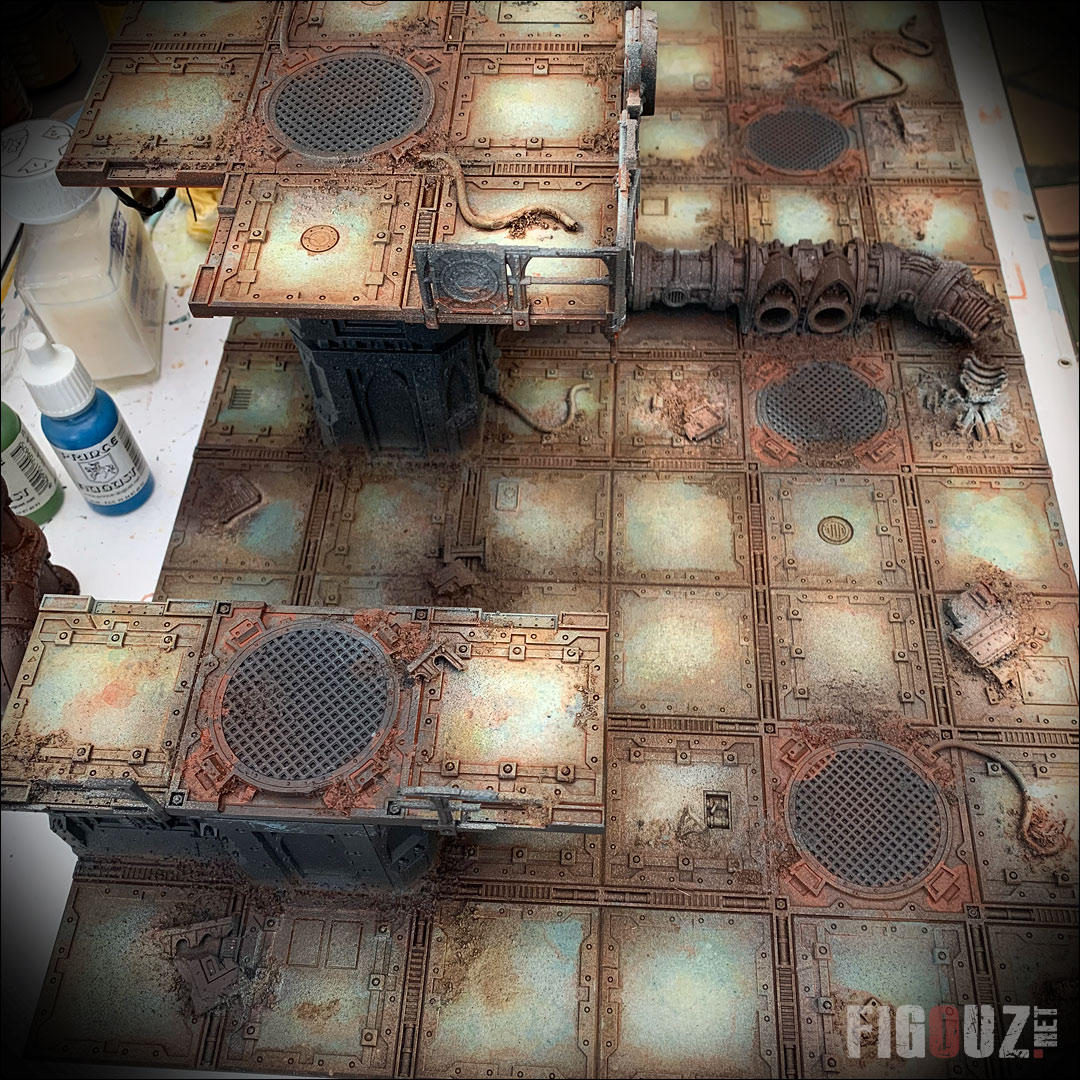
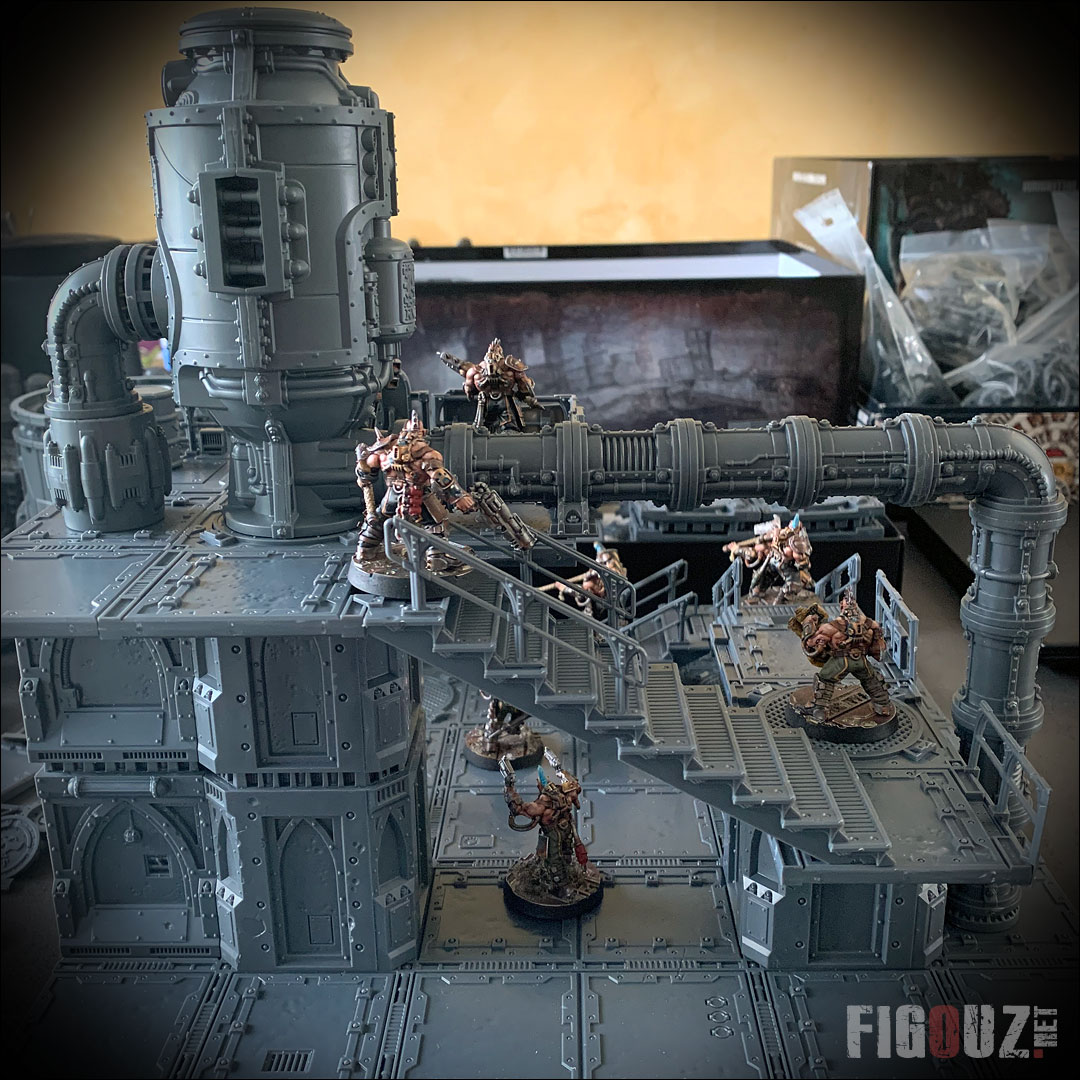
Building of the second footbridge
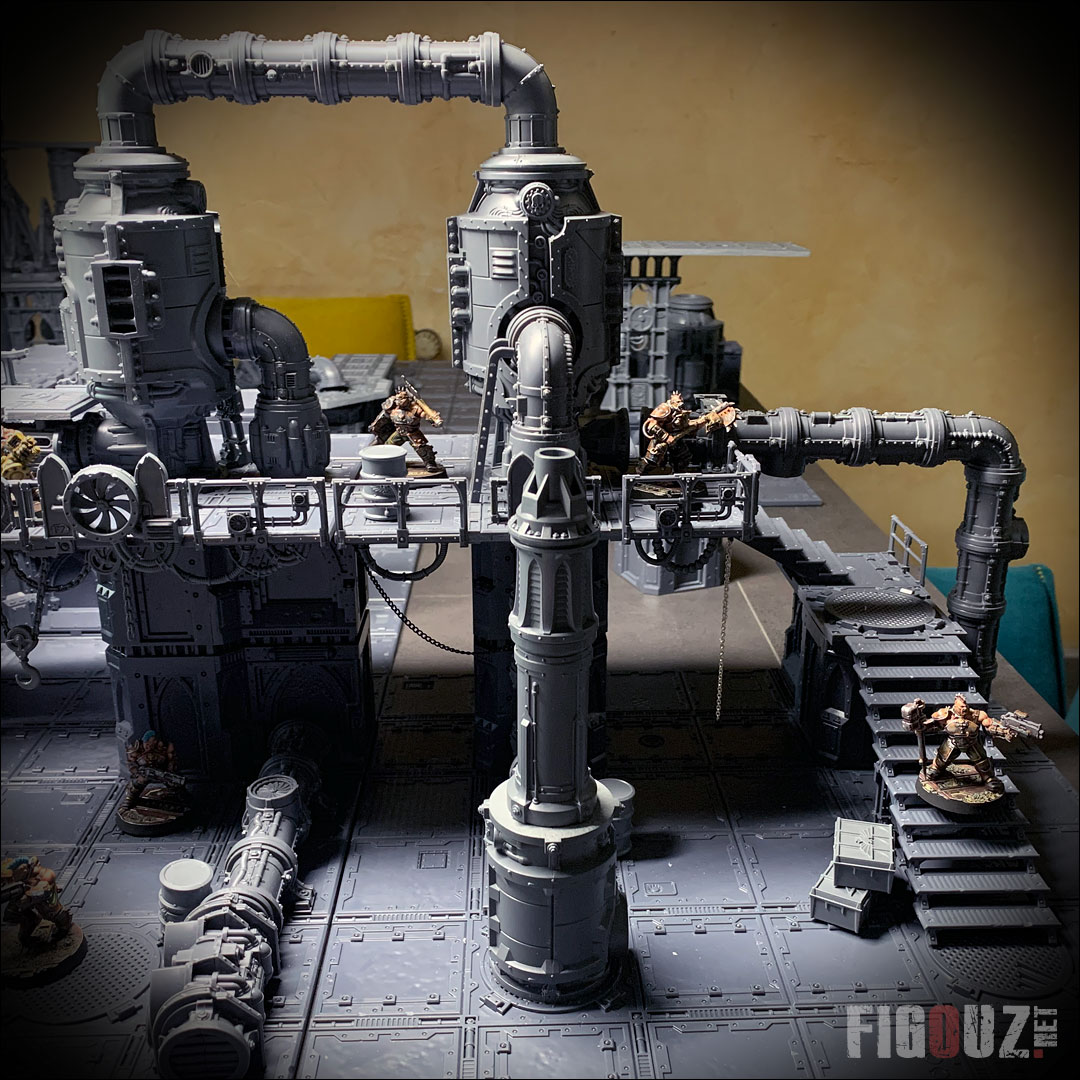
::: 31 March 2020 ::
I continue my work and after a second evening of work, the second footbridge, much more dilapidated and rusty than the first one, is almost finished.
I'm very happy about this, even though I should have glued the fasteners under the walkways and not on the pipes... But it's by forging that you become a blacksmith and the idea of leaving them modular came to me later on. :)
- Necromunda Zone Mortalis - Building of a second footbridge -
Click on this picture to open a high resolution version
And here is a picture of the first two Necromunda tiles, with the footbridges laid on the pipes. Note also the cables and chains hanging under the main platforms. I must admit that I am particularly happy with the result, even though nothing is quite finished yet. What a Kiff! ^^
- Necromunda Zone Mortalis - Building of a second footbridge -
Click on this picture to open a high resolution version
Idea of the day : Adding cables and creating footbridges !
::: 30 March 2020 ::
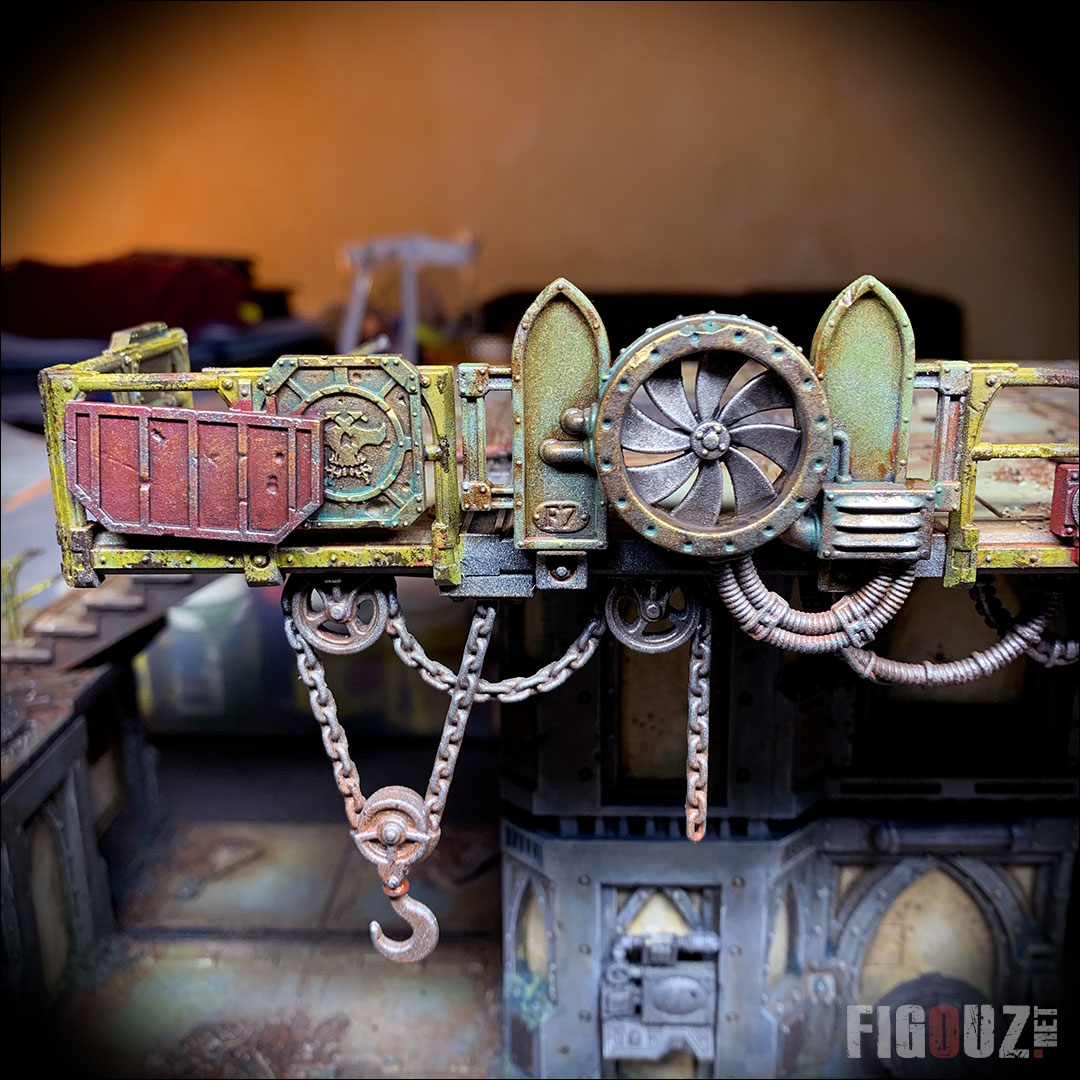
Tonight, while tinkering with my first two tiles, another idea came to me along the way to add even more modularity and playability to them. I'm in the middle of creating footbridges made from elements of flooring from the old Imperial Sector scenery.
These footbridges will be positioned on the right and left of the two tiles. Initially I thought of gluing them, but in the end I will make modular elements that will probably be magnetised to give them more stability. To create the handrails of these two footbridges, I used ladders from the Sector Mechanicus.
You can also see on these pictures my additions of cables and chains that hang under the platforms. It is the kind of details that will transform these sets into real small dioaramas.
Here are the first pictures taken in the light of my lamp. :)
- Necromunda Zone Mortalis - Adding cables, chains and creating footbridges ! -
Click on this picture to open a high resolution pictures gallery
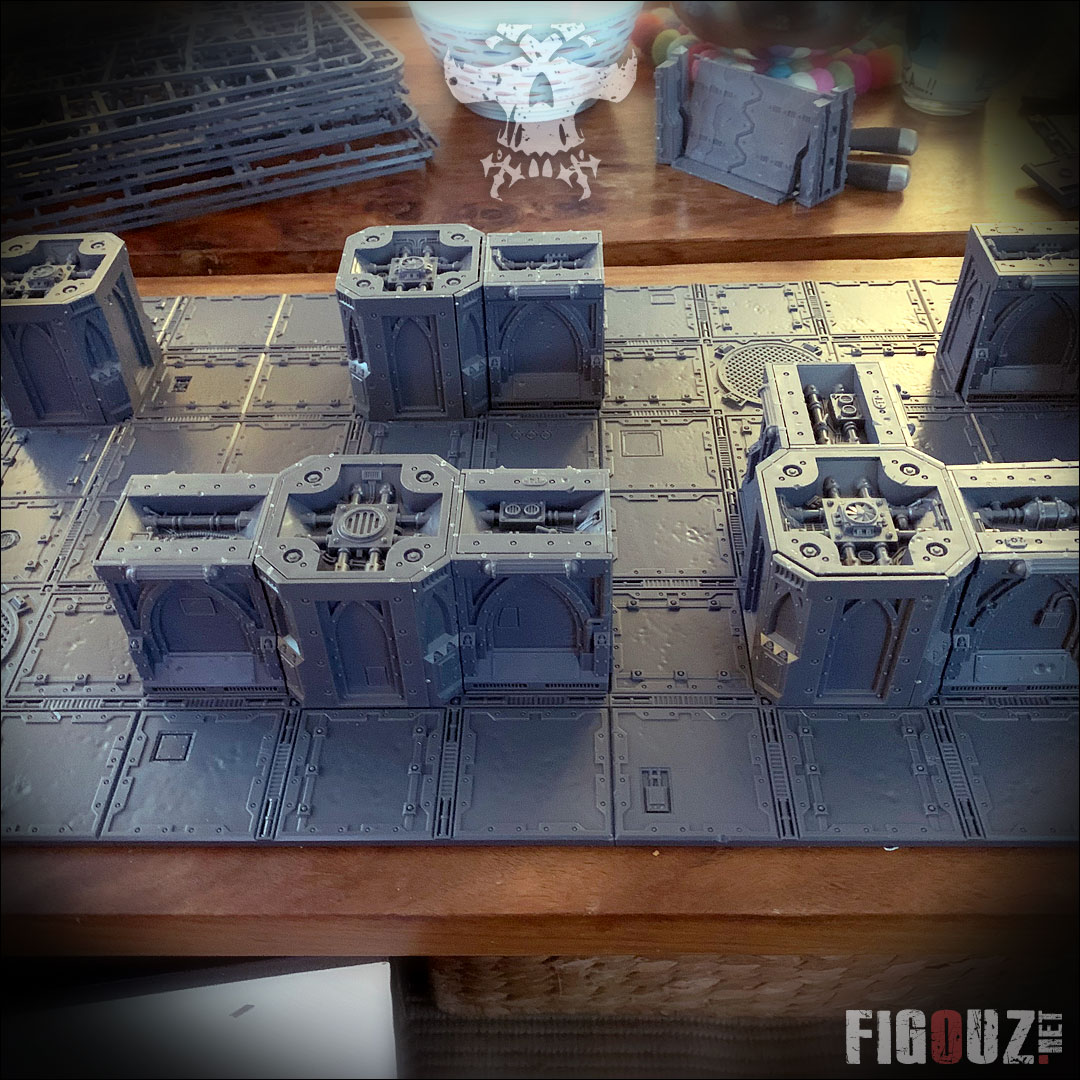
Numerous Tests and design of a second modular Tile
::: 29 March 2020 ::
Hello community! I hope everyone is doing well and that these first two weeks of confinement go well for each and every one of you! For my part, I finally have so little time to give to the zhobby. As a result, I have to wait until the evening and the weekend to get back to it.
Tests, tests and more tests...
I'm still in the same mode as for the assembly of my necromunda tiles. In order to fully understand the possibilities offered by these Mortalis Zone decors, I spent a lot of time assembling / testing the composition of 3 other tiles, always inspired by Broncofish's creations.
And I took a nice slap, to the extent of the Kiff that the possibilities offer! Because these tests have almost consumed 85% of the Mortalis Zone material I have at my disposal: That is the content of 2 boxes of Dark Uprising + 1 box of columns and walls + 1 box of platforms and stairs. It is unfortunately a fact, as soon as you want to go up a bit high and make platforms a bit wide, this type of assembly consumes a hell of a lot of elements! I have no choice: I have to revise my ambitions and mix a lot more Sector Mechanicus decors to create the 9 tiles I need for a 90cm x 90cm mini table. Otherwise, the already very high budget will explode !
- Necromunda Zone Mortalis - Tile creation tests -
Click on this picture to open a high resolution version
... and I decide to create a tile, mirror from the first one !
After a second full Saturday to procrastinate and test 10 sets of combinations, I finally went for the option to create a tile and a mirror of the first one. And you'll understand why in a future publication, because the modularity possibilities of these two tiles are quite crazy in the end.
I'm talking about a mirror tile, but in fact, this second tile has some variations that I invite you to find in the pictures below. Note that the pictures that will open in the gallery are classified in reverse chronology.
In order to link these two tiles in one of the configurations, I wanted to create a removable pipe element that would be positioned on the two Alchomite Stack.
Even if I really liked my work of yesterday and what these two tiles give in terms of look and feel and playability, I'm personally a little disappointed not to have this "Déclic" yet, which would allow me to make crazy assemblages as we can see in some ultra creative people. The fact is that I'm still having a hard time mixing the Sector Mechanicus and Zone Mortalis sets, at least as far as columns, platforms and big elements like furnaces are concerned.
- Necromunda Zone Mortalis - Design of the second modular tile, mirroring the first one! -
Click on this picture to open a high resolution pictures gallery
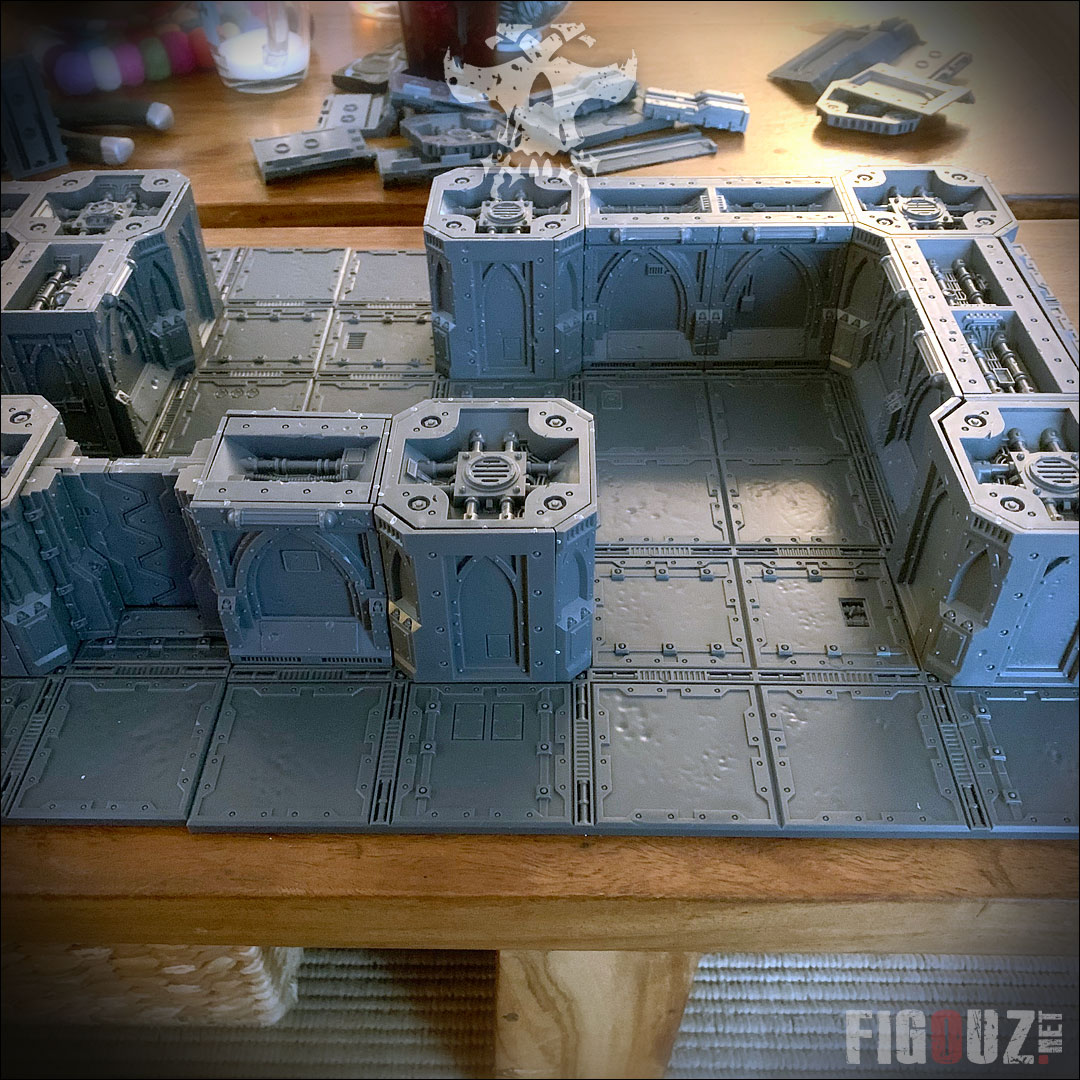
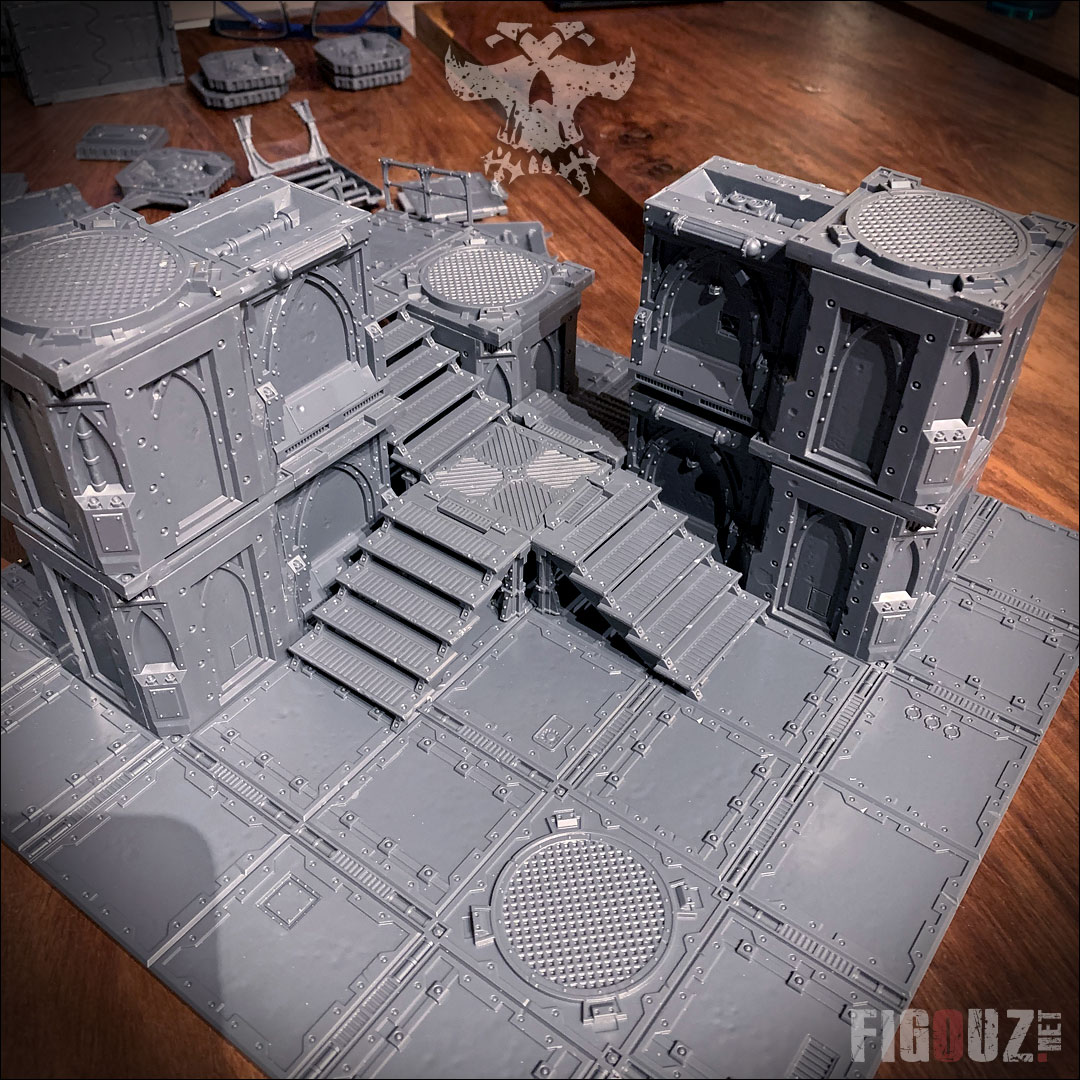
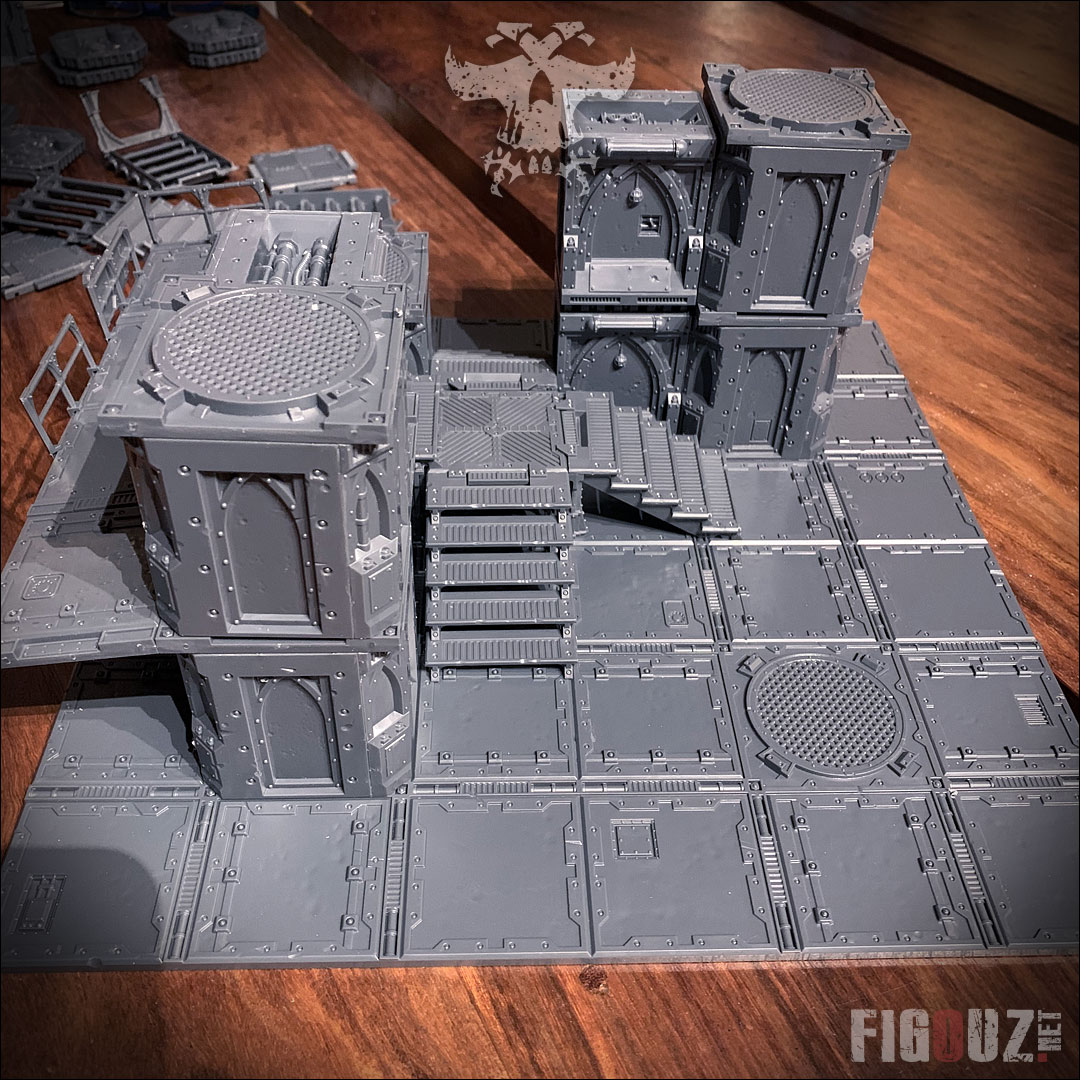
Finalization of the first modular tile and staging of some minis.
:: 17 March 2020 ::
This is the second part of the publications dedicated to my very first necromunda zonemortalis / sector mechanicus tile.
As explained in the previous article, I decided to glue the decor elements components of my modular tiles. I am going to design 9 tiles in the long run (16 at the most) and I would like to go as far as my free time and motivation will allow me to add texture, details and make semi dioramas.
And I think this decision is the right one, because in the case of this first tile, it would have been impossible for me to assemble the pipes in this way without glue. And what about the bodyguards, chains and other pipes added to the upper platform !
I spent a lot of time adjusting everything to the mm. Because, as I explained in a previous article, plastic tiles in the dead zone are not that practical as soon as you get out of the assembly of columns / walls / doors. The reliefs drastically complicate the positioning of the scenery kits that come out of the rails.
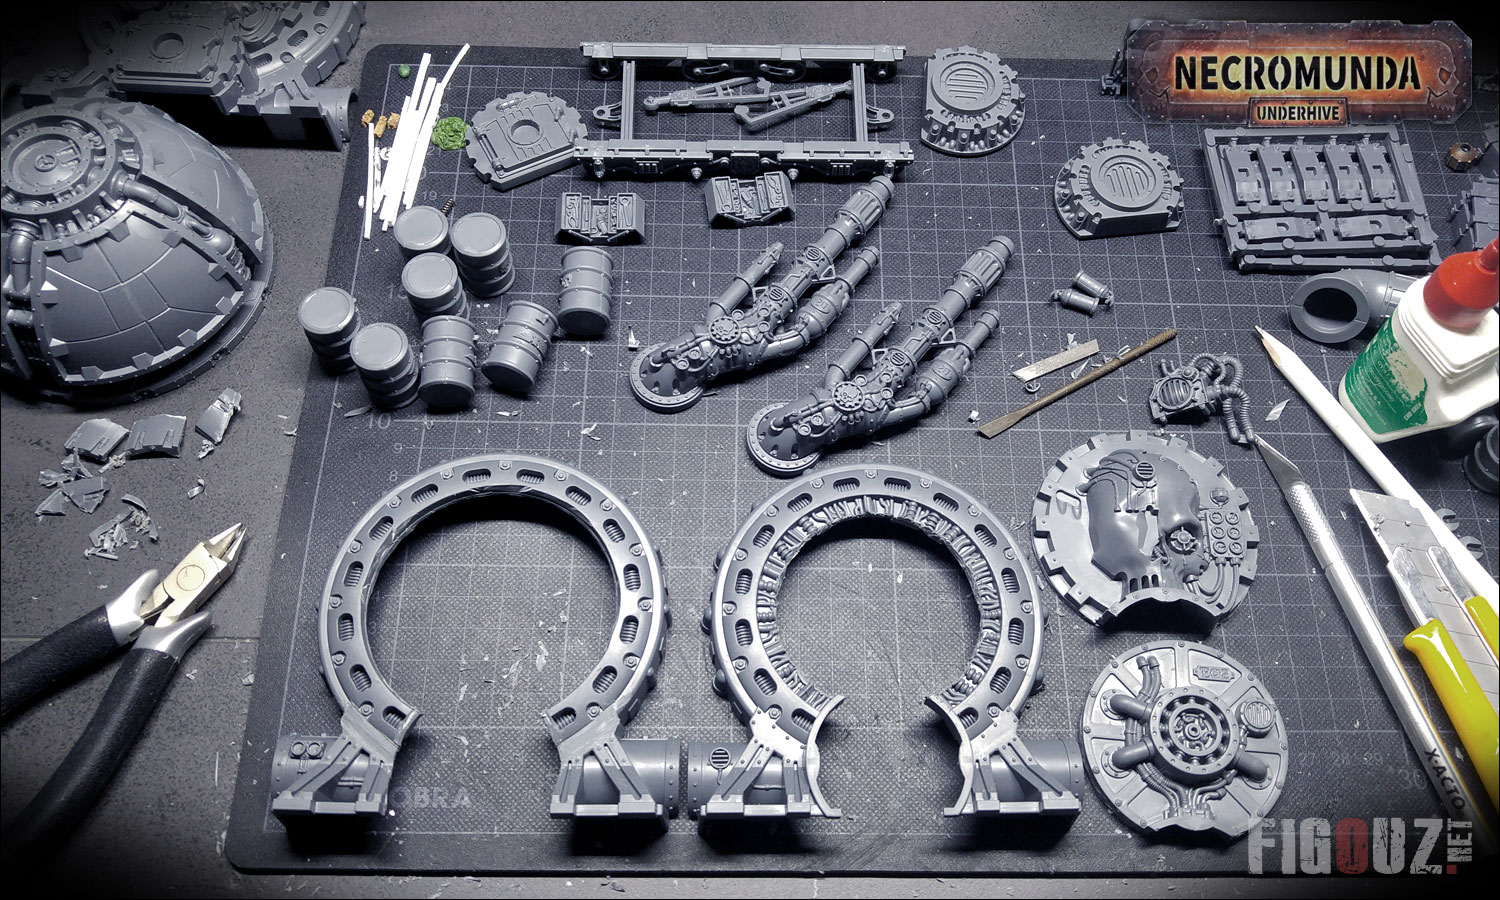
For the moment, I have designed sub-assemblies not glued on the floor tile to facilitate the painting of certain areas.
And what better way to validate a concept than to choose one of its gangs Necromunda and put some miniatures in the scenery. To do so, I took my Gang Goliath of the Steel Brotherhood out of the box in which my Gang Goliath is stored for, I must admit, a staging of the miniatures for which I took a lot of pleasure ! It's great, isn't it?! ^^
- Necromunda Zone Mortalis - Finalization of the first modular tile -
Click on this picture to open a high resolution pictures gallery
Concerning what motivated my decision to glue the scenery elements, here are the arguments for and against :
- The pros:
- The parts are very rare in my house, so I don't need extreme modularity by magnetizing the whole set or preserving walls, columns, stairs, etc. separately.
- The modularity I will find by arranging each tile differently according to the parts.
- I'm going to be able to make assemblies mixing elements of decor from the Zone Mortalis, from the Sector Mechanicus, from the old Imperial Sector, from the new Sector Imperialis... But also containers and cans from the Munitorum Armoured Containers, cranes & ...
- I'll be able to add and glue texture, rubble, additional decorative elements (pipes, skulls, etc.).... In short, to give life to these scenery kits.
- I'm going to set up some free elements that I can place wherever I want to bring cutlery or support scenarios.
- It is moreover perhaps there that the magnets will intervene, even if I have never been fan of the management of polarity (I am systematically mistaken).
- And finally, I won't need to spend an hour just setting up the game table. It's a real experience with my Sector Mechanicus sets during my few home Kill Team games.
- The cons:
- The really binding point will be the storage and the space that all these sets will take up. This is a real concern in the Zaïus house, which no longer has a single cm² of available storage space.
- Packing these scenery kits may also be complicated when participating in an event requiring their use.
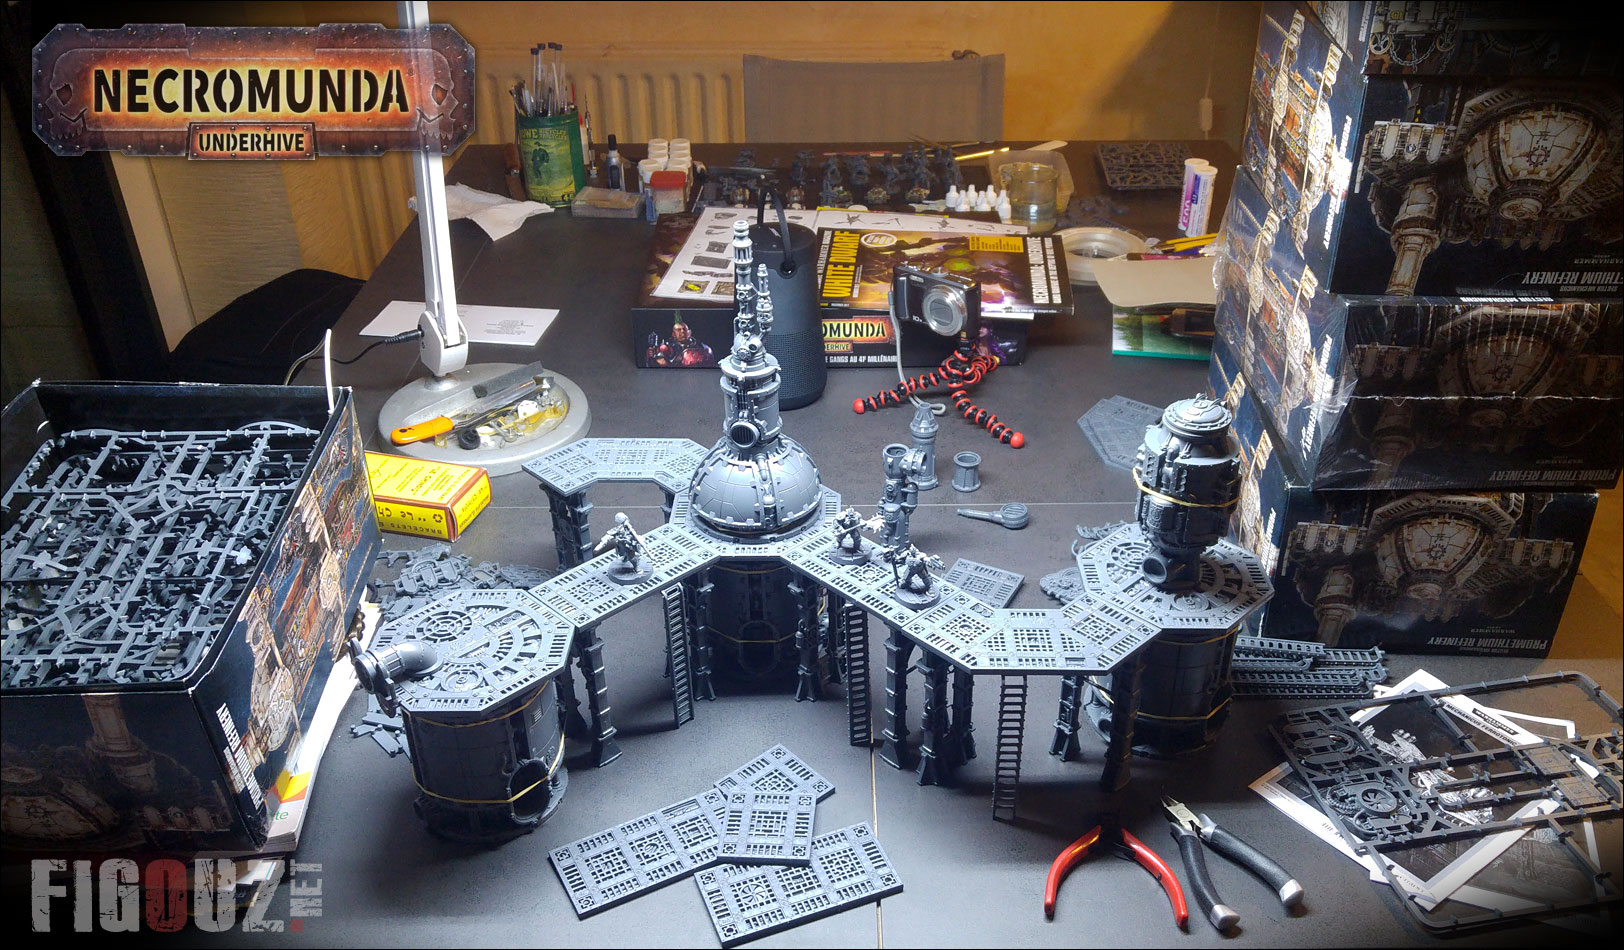
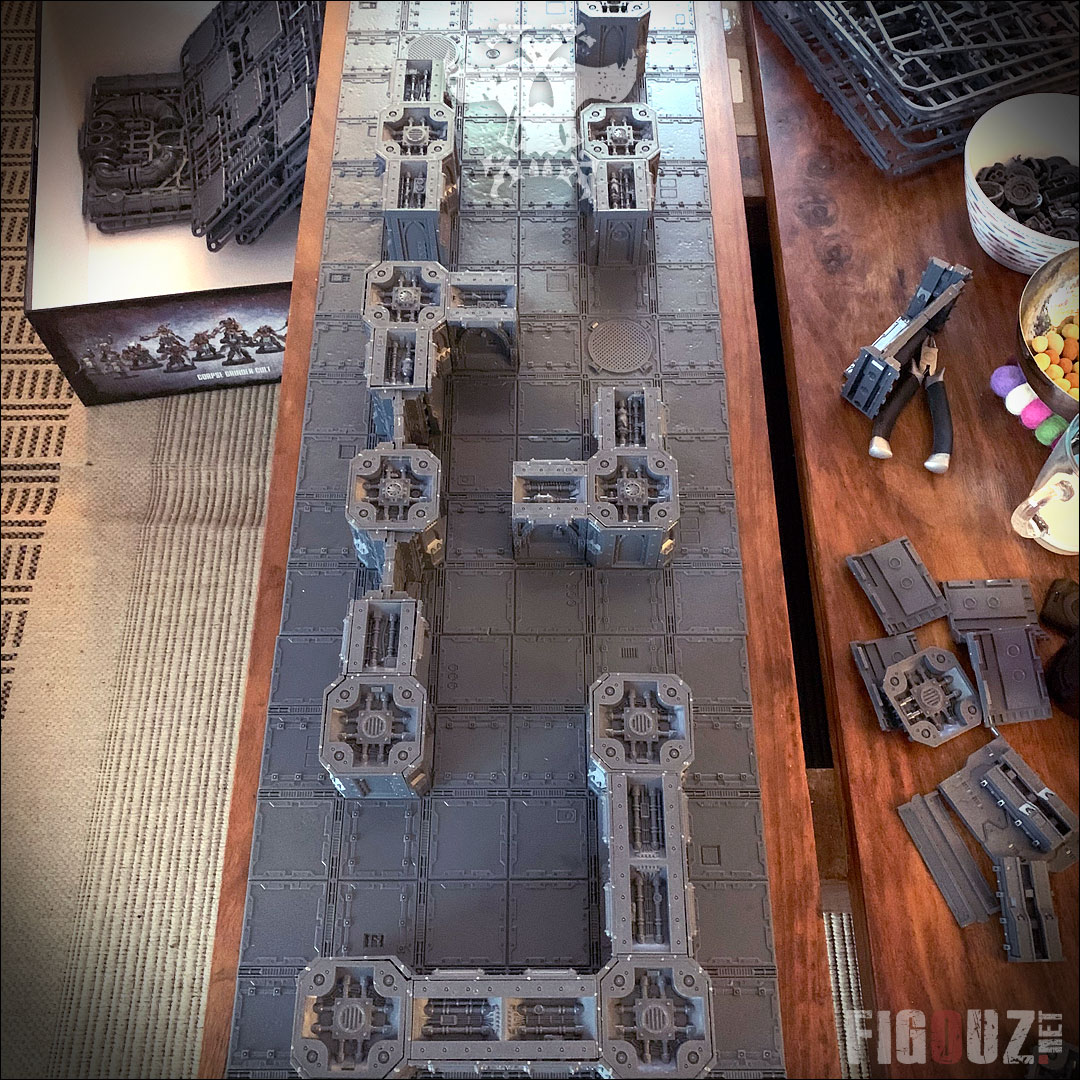
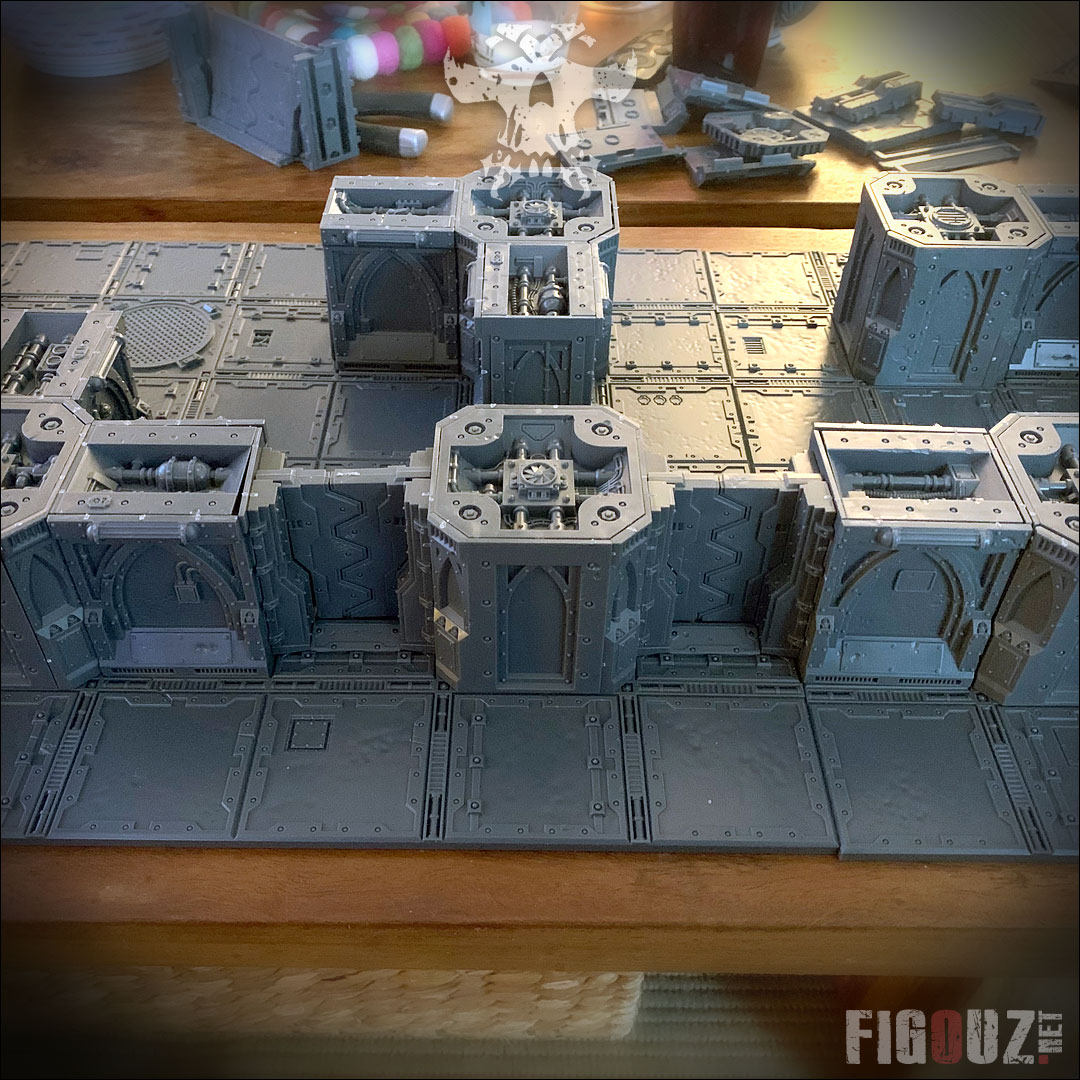
Design of the very first modular tile based on the Zone mortalis and Sector Mechanicus scenery
:: 15 March 2020 ::
« March and it's off again... » Or something like that!
Spring is here and this period has become over the years the only one during which I indulge in the hobby in a much more dynamic way, my Mojo periods being more and more rare and spaced out. And this year is very special because it is placed under the sign of COVID-19 and the mention of a confinement is on everyone's lips... But for me, if there is containment, it will be synonym of telework and remote management.
But let's talk about nicer things! I have the very great pleasure to share with you a first batch of pictures of the design of my very first Necromunda tile mixing the elements of Dark Uprising zone mortalis scenery kits and Sector mechanicus scenery kits in which I invested two years ago. In the end, considering the possibilities offered, I am quite happy to have been procrastinating and not to have built these decors until now!
Careful! The following pictures may offend some of you: some see it as a kind of porn (hehehe), others as a shameful display of money. This is of course absolutely not the purpose of these pictures ;)
- Necromunda Zone Mortalis - Display of materials and design of the first modular tile -
Click on this picture to open a high resolution version gallery
I also take the opportunity of this article to address a prayer to my beloved wife, Ste Stephanie, who accepts without flinching that I spread all my grey plastic and my model making mess on the family dining room table. And this, as always, for an indefinite period of time. I didn't dare to take the extensions out of this already imposing table, but I still added two coffee tables to accommodate a few boxes of scenery and free up the workspace. :p
Not being able to get started (the apprehension of screwing up), I went looking for a lot of inspiration on Facebook and Instagram to get started on this first tile. And my heart was set on one of the creations of @Broncofish, a very nice guy from across the Rhine with whom I had the opportunity to exchange. I'm a very, very big fan of what he did with his death zone scenery. I'll probably get more and more confident mixing the sets as I go along, but I think that's a good starting point.
I will present you the finished tile very soon and I will tell you about the decision I took to glue everything (But yes!). Stay Tuned! ;)
- Necromunda Zone Mortalis - Design of the first modular tile -
Click on this picture to open a high resolution version
ZoneMortalis and Sector Mechanicus scenery kits | New order
::: 1 March 2020 ::
I had a feeling... The contents of the two boxes of Necromunda Dark Uprising will not be enough to make the sets I have in mind. As soon as one wishes to superimpose two heights of walls, columns, the consumption of material per slab is exponential. Likewise, platforms and staircases run very very fast.
So I took the decision to order additional boxes and as usual, I didn't go for lace! Here is the list of the material which came to supplement the already very consequent one which is in my possession.
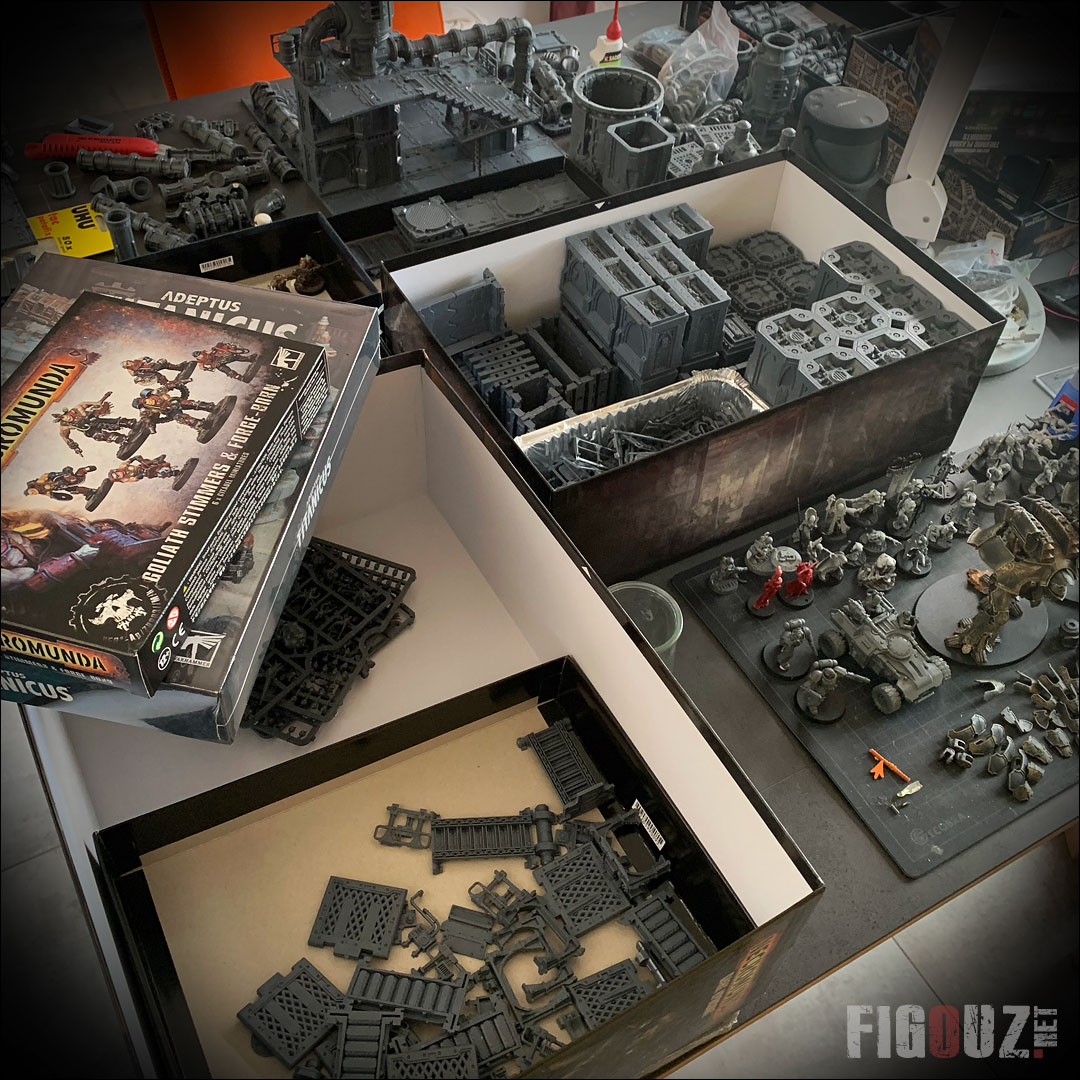
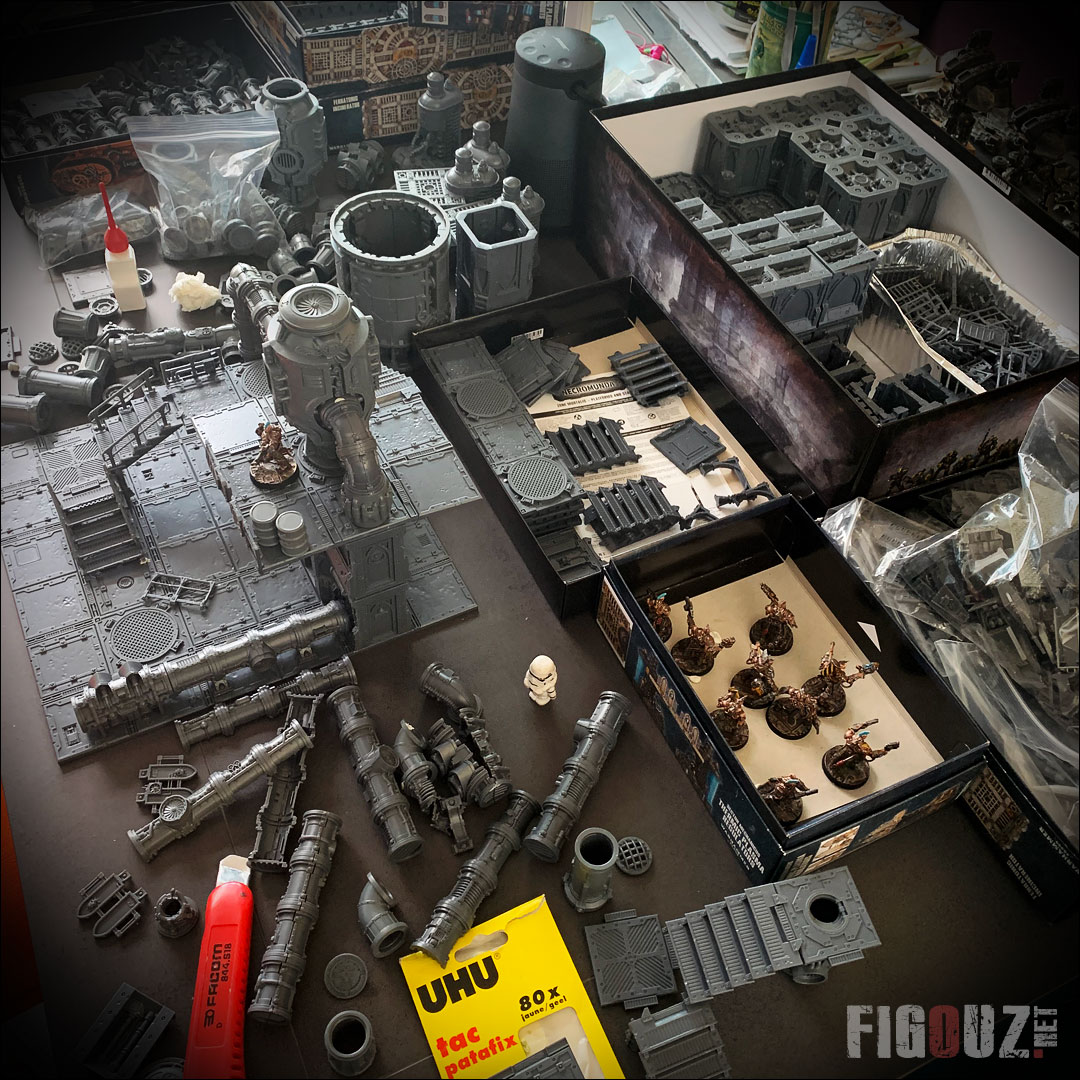
- 1 Necromunda: Hive Warzone big box
- 2 Zone Mortalis: Platforms & Stairs boxes
- 1 Zone Mortalis: Columns and Walls box
- 1 Necromunda: Zone Mortalis Floor Tile Set additional box
- 1 Necromunda: Underhive Graffiti Transfers box
- 1 Necromunda: Zone Mortalis Scenic Bases box
- 1 Sector Mechanicus Tectonic Fragdrill box
Necromunda Zone Mortalis Hive Warzone
This big box Necromunda Hive Warzone, which unfortunately remained in the GW catalogue for a very short time, contains the same material as the Necromunda Dark Uprizing box in terms of clusters of decors. I had a hard time getting my hands on this box!
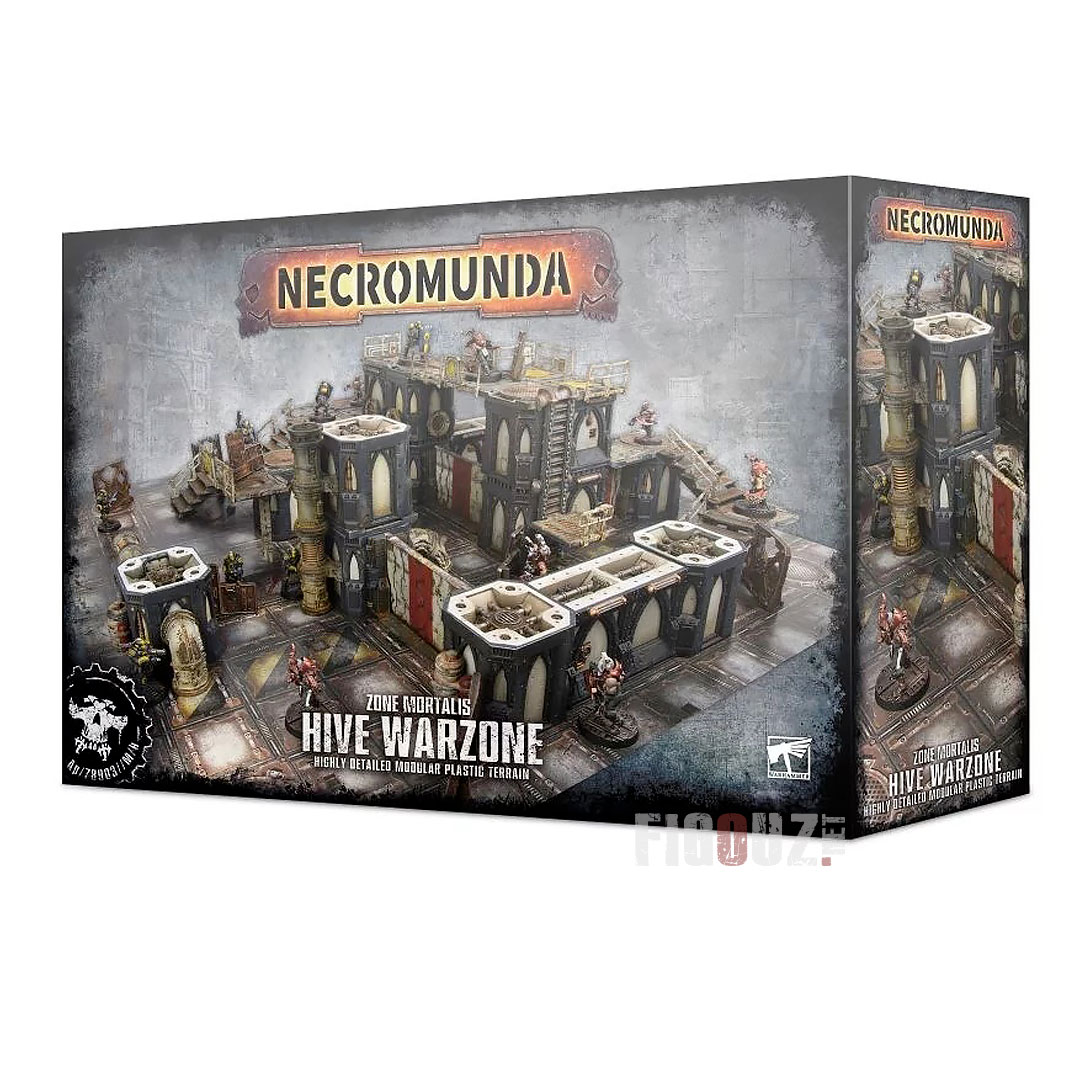
- The huge Necromunda Zone Mortalis Hive Warzone box -
Click on this picture to open a high resolution version
- The contents of the huge Necromunda Zone Mortalis Hive Warzone box! -
Click on this picture to open a high resolution picture
Mortalis Columns and Walls area.
This is one of the two Zone Mortalis scenery kit boxes that Games Workshop quickly added to its catalogue after the release of Dark Uprising. It's far from being cheap, but it allows you to complete your needs without having to buy a huge box of material.
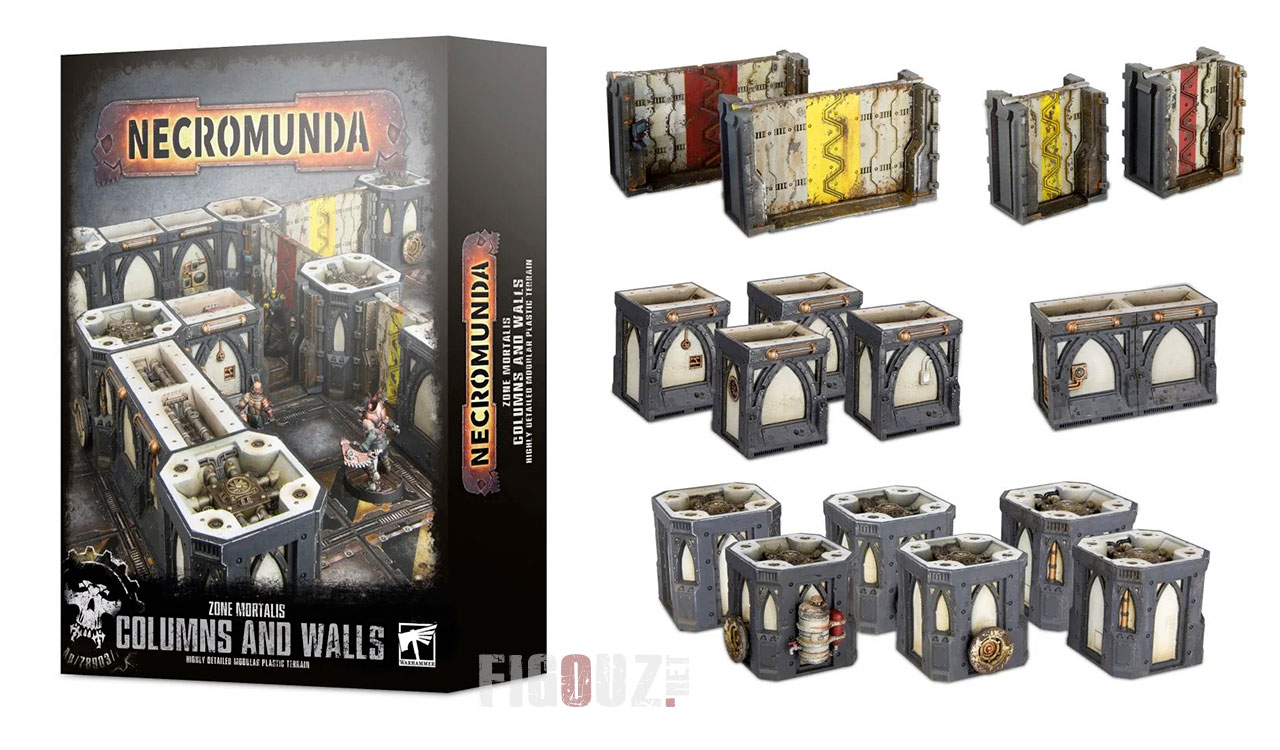
- The Zone Mortalis Columns and Walls box -
Click on this picture to open a high resolution version
Mortalis Platforms and Stairs area
As for the Walls and Columns, Games Workshop publishes a box of Platforms and Stairs scenery kits, quickly added to its catalogue after the release of Dark Uprising. It's an expensive box (50€) but will unfortunately be essential if you want to play with more floors in your mortalis zone. The platforms leave very quickly according to your compositions.
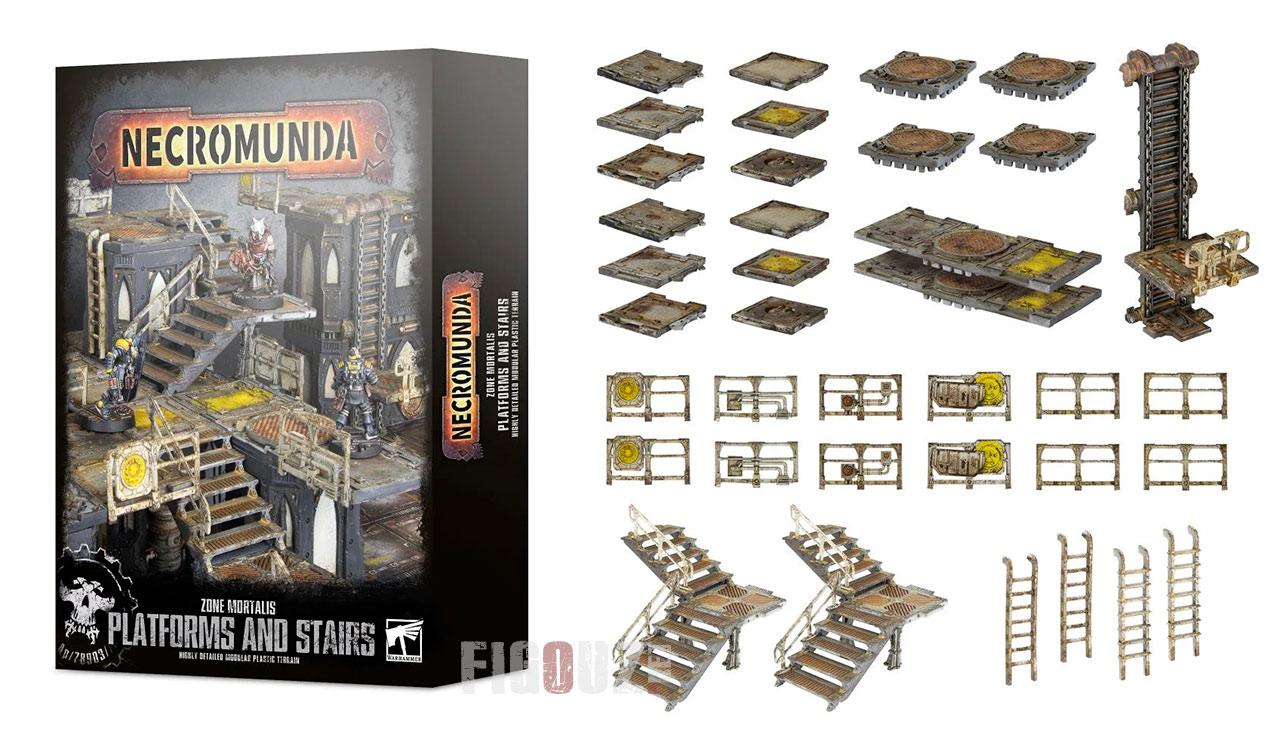
- Zone Mortalis Platforms & Stairs box -
Cliquez sur cette image pour ouvrir une picture haute définition
Zone Mortalis Scenery Tips par Owen Patten !
:: 1 décembre 2019 ::
Owen Patten, the young and talented creator of the new zone mortalis plastic scenery kits offers us a lot of assembling tips on his twitter account. He shares no less than 15 tips that I strongly invite you to discover through this single link !

Zone Mortalis plastic scenery kits | Necromunda Dark Uprising
::: 30 November 2019 ::
Big! For a bunch of bunches, that's a hell of a lot of bunches: 34 just for the two huge boxes of stuff! But what a kif these scenery kits, it's an old dream come true. 3
Be warned: It took me several hours of work just to degrease and deburr all these decor elements. And I even managed to get a few blisters on my hands from using the cutting pliers...
Then comes the assembly of the walls and columns, which again requires a good deal of time if it is to be done properly. But here are some pictures of the reward of these first hours of assembly. Here again, we can spend some time testing the combinations. ^^
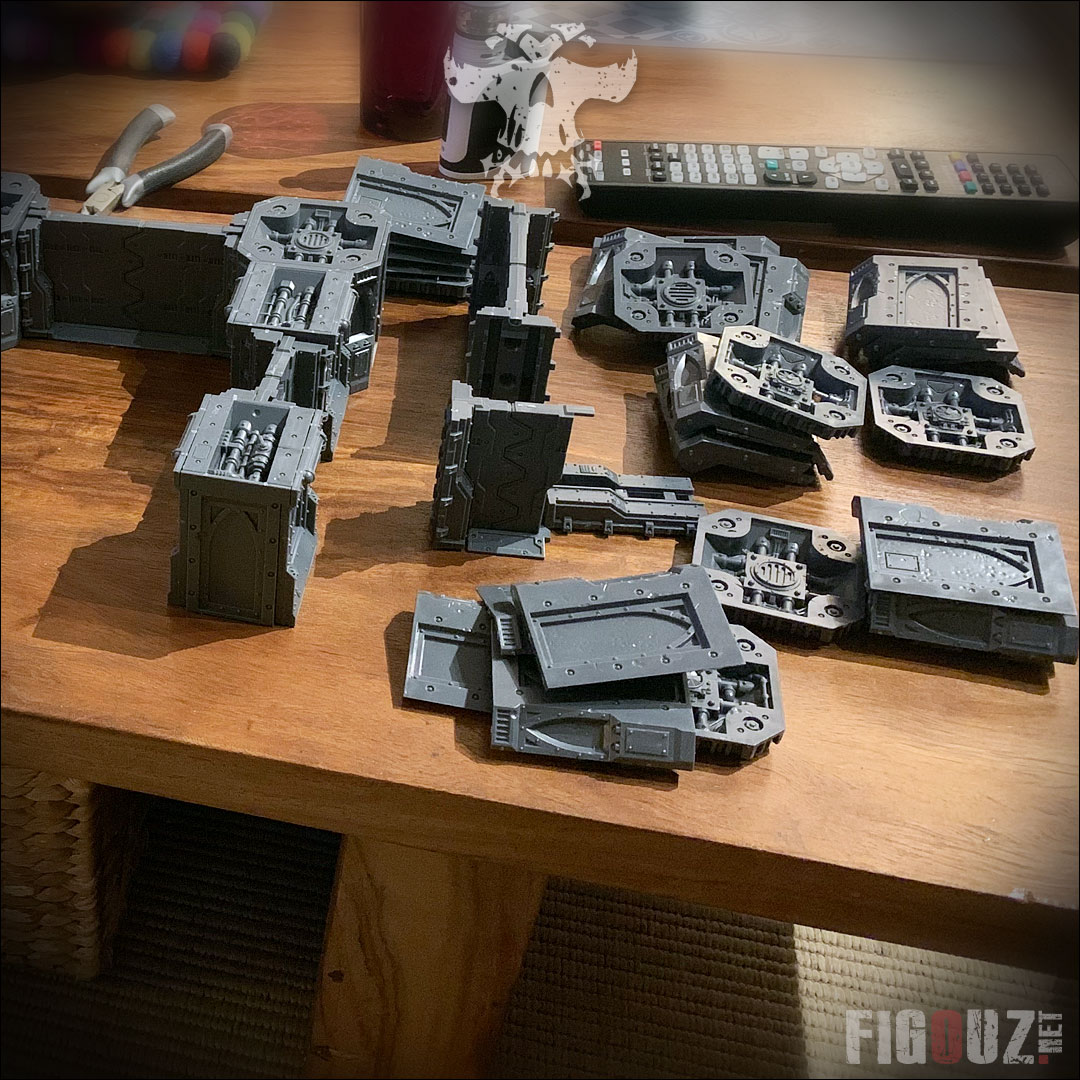
- Dark Uprising - Plastic Mortalis Zone scenery kits : First assemblies of columns, walls and doors -
Click on this image to open a high quality picture gallery
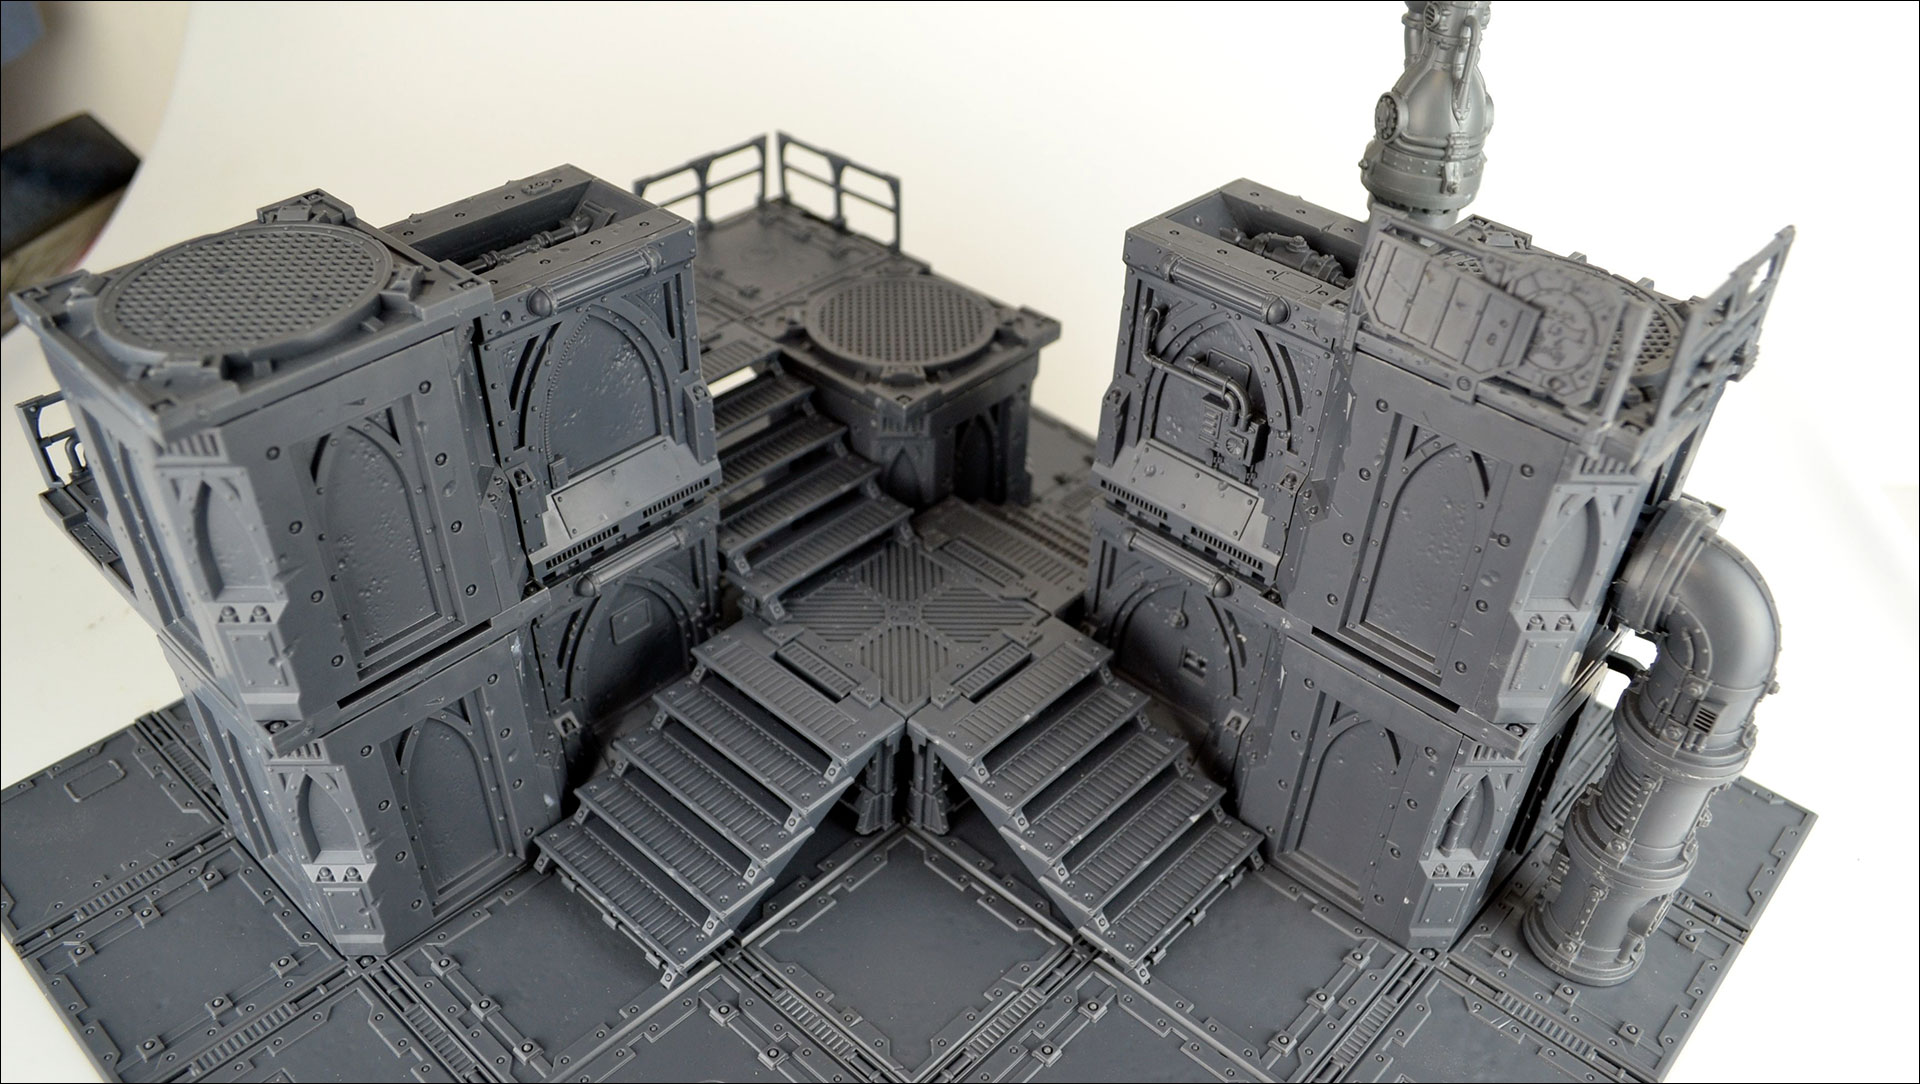
I am once again amazed by the ingenuity of these sets, designed this time by the young but very talented Owen Patten. (To be followed on his twitter account).
In this plastic version of the Mortalis Zone scenery kits, columns, walls and doors are assembled like a set of bricks and hold very well on the plastic tiles. Slabs whose reliefs are used as dedicated hanging areas.
If you wish to start with a 100% modular and dismountable table, you will nevertheless have to go through the magnet to ensure a minimum of solidity during the game. Otherwise, beware of falling figurines and collapsing dead zones !
Are Zone Mortalis scenery kits compatible with other ranges?
Another very positive point, the whole thing is 200% compatible with the Sector Mechanicus and Sector Imperialis scenery kits designed by Ray Dranfield. Here again, you will find many tips on Owen Patten's twitter account.
- Great compatibility between the plastic Zone Mortalis scenery kits and the sector Mechanicus or the sector Imperialis kits -
Click on this picture to open a high resolution version
/!\ Notes of Venerable Zaïus : I will regret later to have rushed to stick everything. Because I will end up gluing definitively my decorative elements in sub-assemblies, which are themselves fixed to the tiles. And it is quite possible to save wall faces for certain compositions.
Another point to bring to your attention: The reliefs of the plastic tiles potentially interfere with the correct positioning of all decorative elements other than columns, walls and doors. In fact, they greatly constrain the way you will design your tiles. If you want to make a custom design, you will have to be clever and use elbow grease by cutting / filing these reliefs or by using thick glue or other fixing products to fix, for example, sector Mechanicus scenery kits. You will also have to compensate for the additional height of a few mm if you are a precision engineer like me.
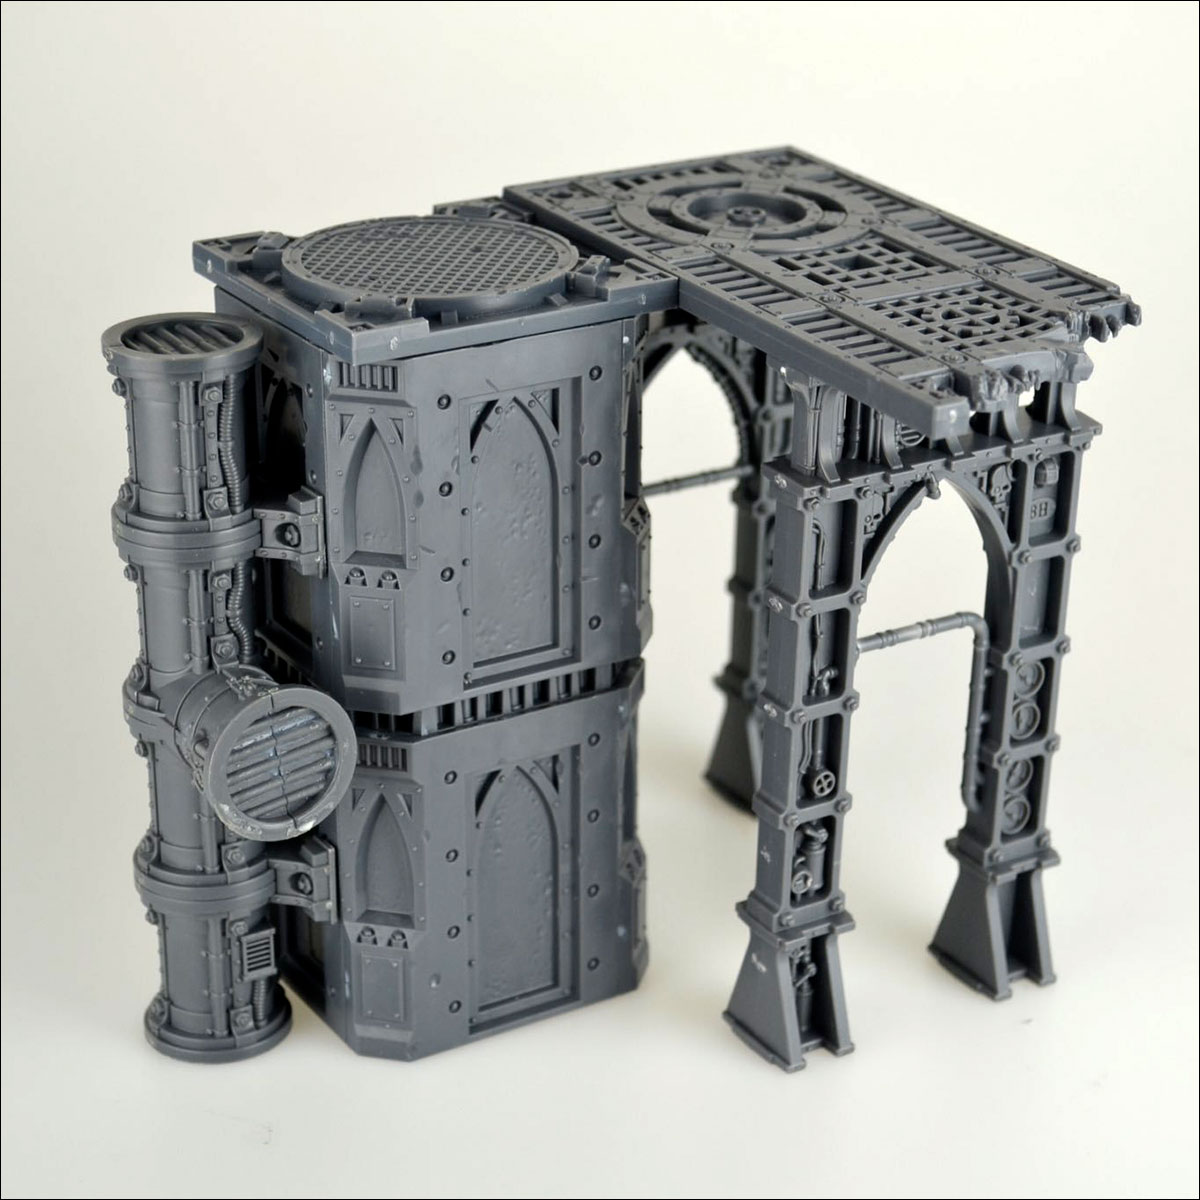
Of course, I couldn't help but go further once the stairs and platforms were properly prepared and I tested one of the assemblies proposed by Owen Patten on his twitter. None of the elements in the pictures below are glued together. It is a simple assembly of the blocks. And we can see that the platforms are held together a little by the grace of the Holy Hobby. :)
- Dark Uprising - Plastic Mortalis Zone scenery kits : More ambitious assembly test -
Click on this picture to open a high resolution version
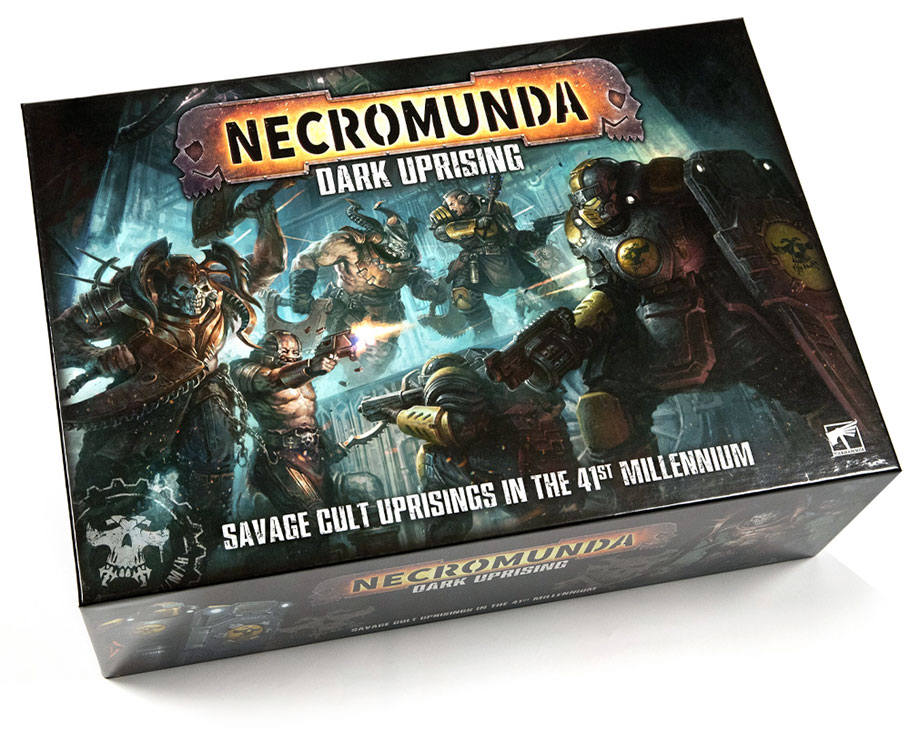
ZONE MORTALIS: Necromunda Dark Uprising modular plastic scenery kits !
::: 27 November 2019 ::
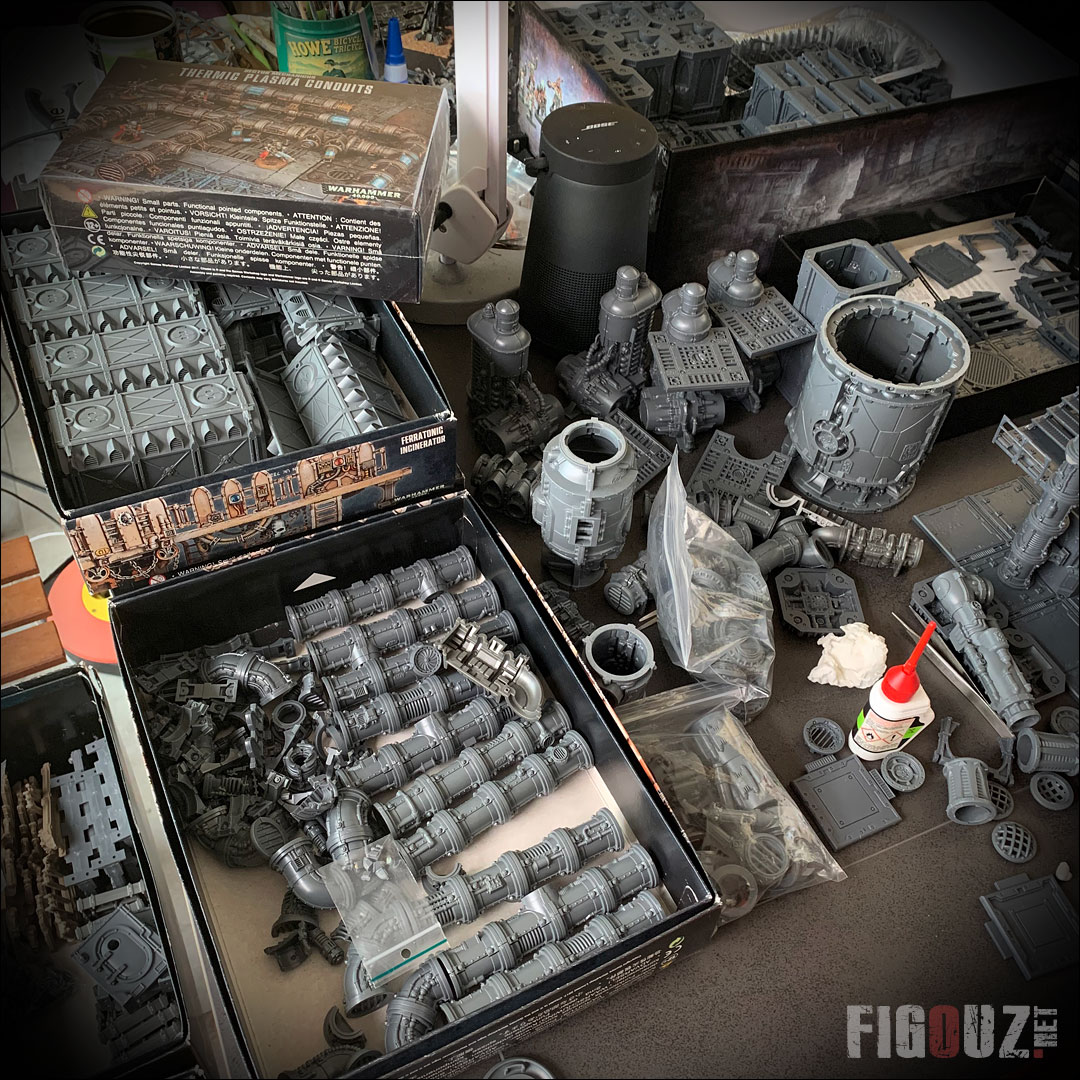
MOUHAHAHAHAHAHAAAAAAAAAAAA !!! It's Christmas before Christmas! Look what I just received !
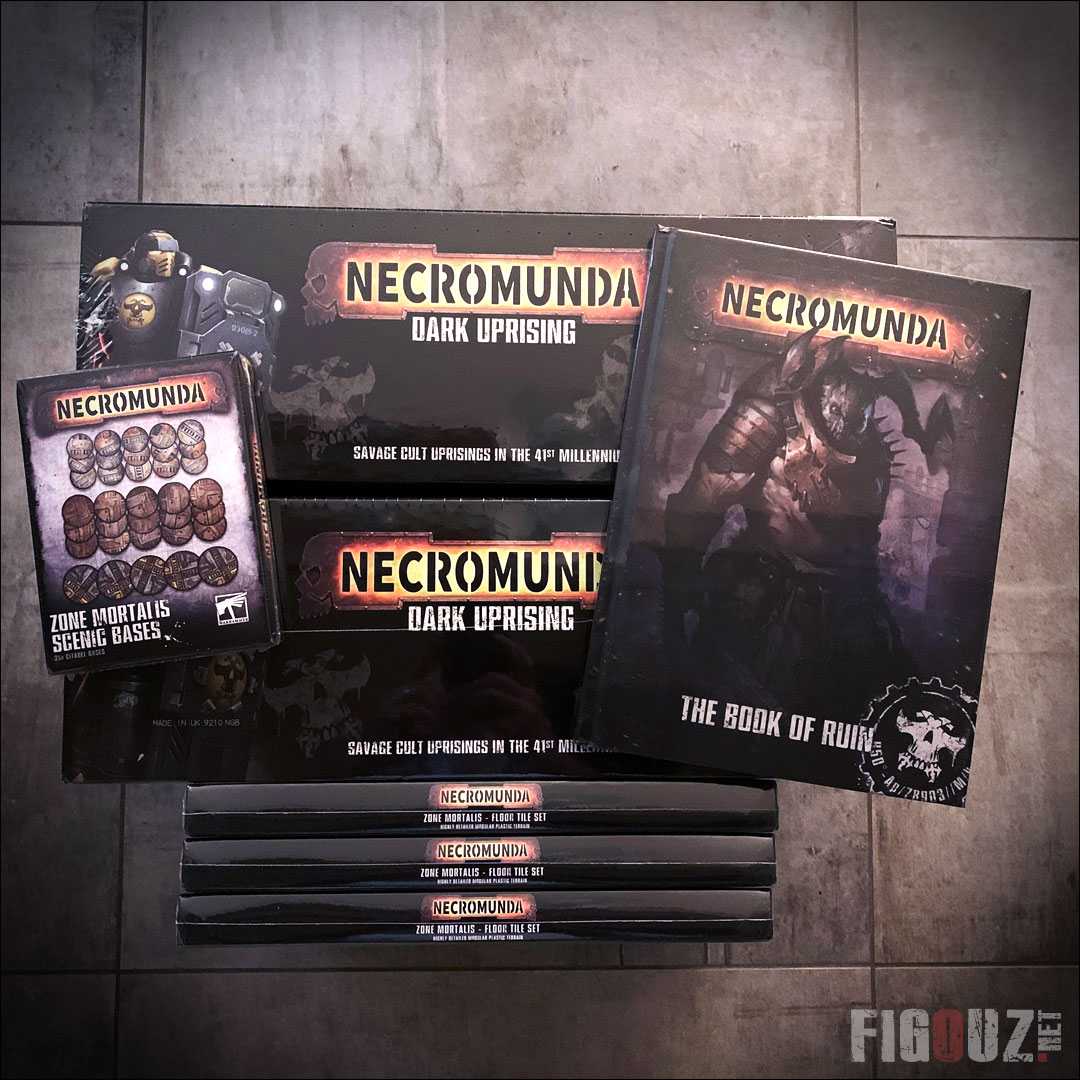
- My HUGE Necromunda Dark Uprising order : 2 Dark Uprising Boxes & 3 Mortalis Floor Tile Set boxes -
Click on this picture to open a high resolution version
As articles are becoming rare on the site (you have to join the Figouz.net social networks!), I didn't mention in its pages the publication of the new big box Necromunda : Dark Uprising that I was waiting for with great impatience.
Big Z notes: In 2018, I fell stiff foldingo from the new sets of Sector Mechanicus sets created by Ray Dranfield for Games Workshop. These truly incredible industrial set kits allow to create the ultimate 3D game table, and feature truly exceptional modularity with truly exceptional modularity.
Then in 2019 the new box "Strong>Necromunda Dark Uprising" was released, bringing a brand new range of modular plastic decors from Zone Mortalis®/Strong®. scenery kits designed by the young but very talented Owen Patten. It was necessary to foresee it, these extraordinary decors will make a real hit (including in my bank account) ! These bunches of plastic kits will later come out in separate boxes , but even if they allow to boost one's stock of stairs for example, they are much less interesting financially than the big boxes initially published.
Plastic floor tiles for the Mortalis Zone (Zone Mortalis Floor Tile Set) will be out of stock worldwide for months, and each return to stock never lasts very long!
I ordered directly 2 boxes of Dark Uprising and 3 boxes of Zone Mortalis Floor Tile Set, just to make sure I have a good base of scenery kits, because if you want to go up high, it seems that the elements are consumed very very quickly. And it was a great help to me, especially concerning the tiles, because they very quickly became a worldwide break...
- The huge Necromunda Dark Uprising box ! -
Click on this picture to open a high resolution version
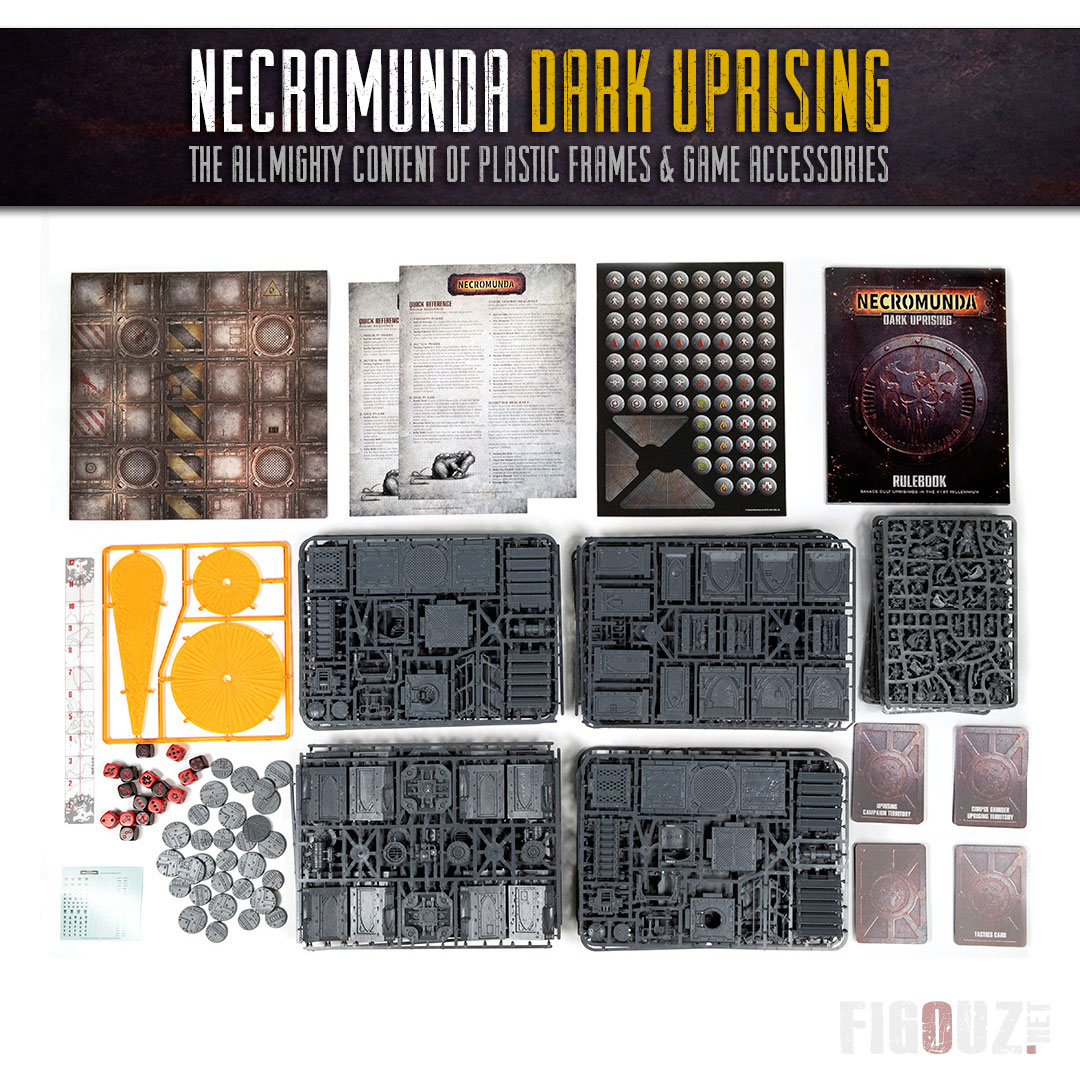
These boxes are absolutely HUGE and filled to the brim with stuff, including the brand new plastic frames allowing to build a particularly modular Zone Mortalis. As well as two gangs, the box also contains 17(!) frames of scenery including Zone Mortalis columns, platforms, walls and doors. Not forgetting pipes, accessories, railings and other handrails. A pure delight for every hobby addict !
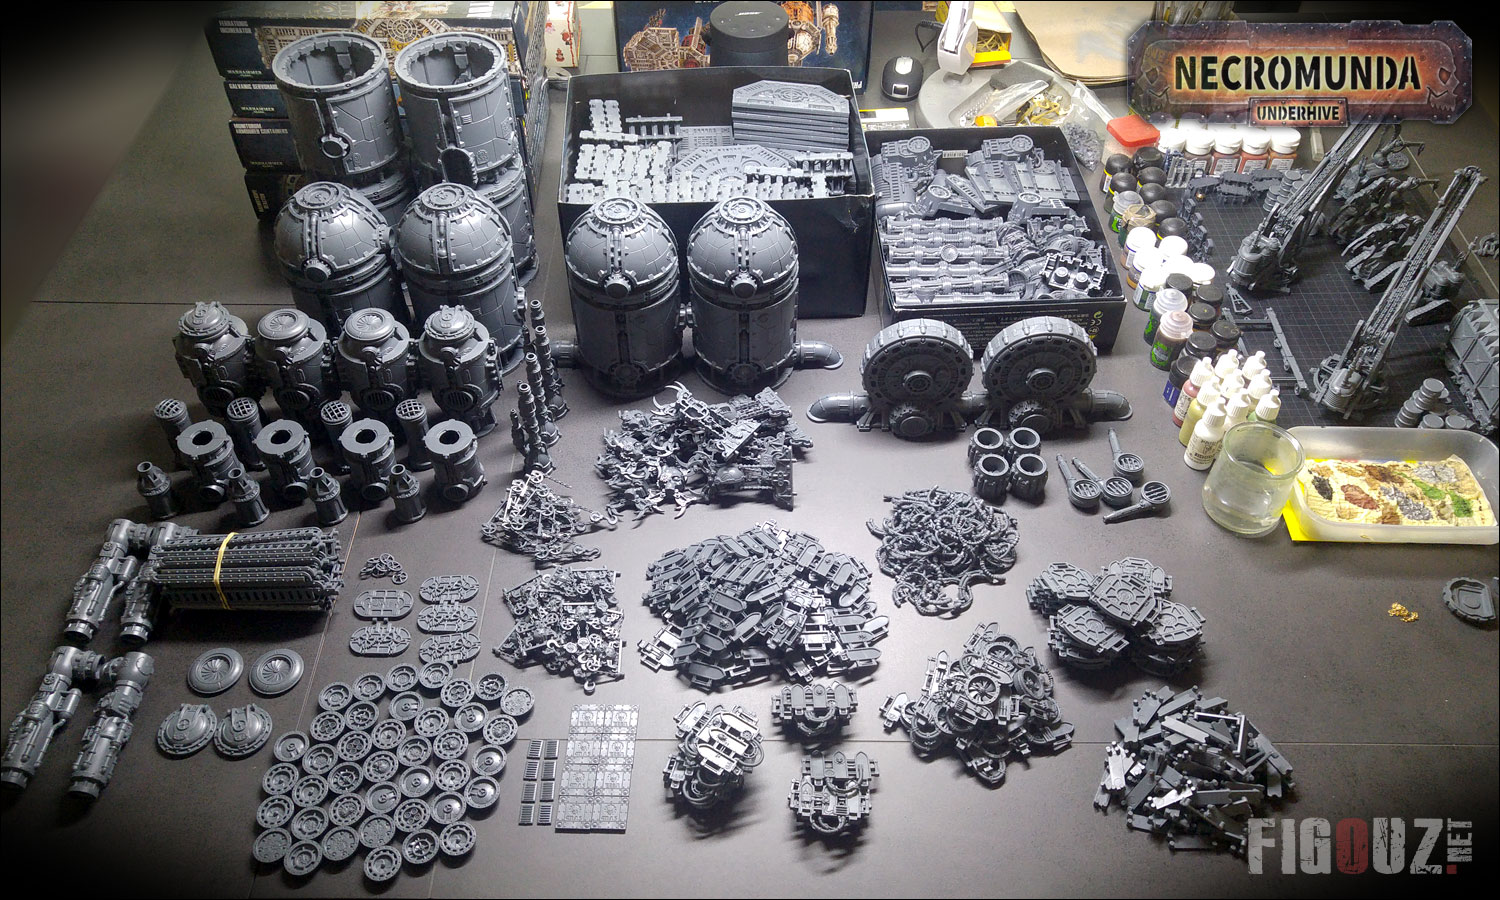
Contents of each Necromunda Dark Uprising box: ::: Sunday 04 February 2018 :: Speed up my weekend's work! I spent more time to tinker with the website (switch to 1280px wide) and to publish the Necromunda news of the Forge World Weekender on the @figouz.net Facebook page than on my zhobbyesque works... But I still managed to crush some plastic pieces without losing a finger (which was not a foregone conclusion) to create a beautiful furnace mixing elements from the Haemotrope Reactors box and an incinerator cylinder, the whole constituting a very nice element of horizontal furnace ! I spent hours on this piece. Wishing to keep the centres of the two parts of a reactor rather than sanding them, I started to cut them out. But for lack of adequate tools, I went there with X-Acto and elbow grease... You might as well say that you have to be very careful not to leave a finger or your hand in the cutting direction. The slightest skid and it's a serious accident insured. ::: Wednesday 28 January 2018 :: Foutreglute & Putentrailles © ! I will be able to open a bitz shop dedicated to Sector Mechanicus! I glued all my sub sets together yesterday. But deburring all these elements will make me mad... Ôo I feel like I'm getting nowhere when I've already spent the last 10 hours there... But a simple composition test of an industrial block of 3 levels allows us to say that all this time will be rewarded one day (far away) by nice scenery elements and a great Necromunda / Inq28 / Inquisimunda table ! ^^ ::: Monday 22 January 2018 :: I have attacked the assembly of my second box of Galvanic Servohaulers. In the picture below, I invite you to pay attention to the switch between the two engines which allows to obtain 2 different models of cranes and tractors. It's a TIP that I saw on the twitter thread of Ray Dranfield, the brilliant designer of all these really bluffing sets of modularity. The combinatorics are really bluffing ! ::: Sunday 21 January 2018 :: Scraping, deburring, scraping, gluing... I am so conquered by these scenery kits that no one stops me anymore ! One day later I slapped both boxes of Munitorum Armoured Containers. I glued 4 of them, but 2 of them remained as sub-assemblies which will allow me to paint easily the inside because I intend to leave them open. A second crane and 2 more tractors are being assembled. picture tomorrow ! ::: Saturday 20 January 2018 :: In addition to the Sector Mechanicus set boxes, I invested in 2 boxes of Galvanic Servohaulers and 2 boxes of Munitorum Armoured Containers. Creating industrial structures is great! Adding nice decorative elements that will bring life and details to my future Necromunda table is better! To vary a little from my long sessions of degreasing with cutting pliers, which are particularly boring on the big boxes of the Sector Mechanicus, I thus undertook to assemble these scenery kits which will allow me to create 2 cranes, 4 tractors, 6 armoured containers, 18 barrels of promethium and 24 boxes of supplies. I SURKIFFE!!!! What a foot! I'm really amazed by the quality of all this material and the compatibility of all these elements. So two pictures of this first assembly session. We can see that the trailer is designed to accommodate only the crane, but is also designed to transport a container. Top I tell you ! ::: Saturday 20 January 2018 :: WOOT ! I have started to unseal a box of Prometheum Refinery and Ferratonic Incinerator : these decorations are a real T.U.E.R.I.E. ! On the other hand, I spent 2 hours to cut all the frames of only one of those big boxes, I have sudden cold sweats... Of course, I couldn't help but make some first assembly tests and put some Necromunda figurines in it. I'm going to have a blast designing this Necromunda/Strong modular table. Definitely ! Venerable Zaïus note: Madame Zaïus asked me ironically if I didn't want to add an extension to our dining room table that I've been squatting for months with my zhobby projects? I love it! ^^ ::: Saturday 20 January 2018 :: In 2017, I've fallen in love with the new Sector Mechanicus scenery kits created by Ray Dranfield for Games Workshop. These truly amazing industrial sets allow to create the ultimate 3D gaming table, and are equipped with a truly exceptional modularity.
Wooooooooooow! I saw big! Ôo I have just received my allmighty order of 18 boxes of decorations from the Sector Mechanicus to design a beautiful and well supplied Necromunda gaming board! I'm not telling you my face (and that of Mrs Zaïus !) when the two huge boxes were put down by the delivery man. ^^ Mouhahahaha! It's up to me to do the long sessions of stripping, deburring and assembly testing. There's enough to keep me busy for months without even having something finished. Together with some members of the Facebook community who are embarking on the same Hobbyesque adventure, we are discussing the project of magnetizing all the pieces to make the full elements modular and easy to stow/store. But the building project is announced long and huge ! But this is my favourite project for 2018. So when you like... It's a question I've been asked a lot on @figouz.net Facebook page, so here are the details of what I ordered and received : As for each of the projects I'm involved in, I prepare my purchases using excel files and other media often created on pictureshop. And it is in this framework that I designed a visual allowing me to see at a glance the clusters that compose each box of decors and thus better determine in which kits one must invest to create the table of one's dreams. I leave you, the call of the opening of the boxes and the first degreasing is too strong! In the meantime, here is an example of a Necromunda / Kill team table designed by the Warhammer World team and which is almost entirely based on these beautiful Sector Mechanicus scenery kits. As for each of the projects I'm involved in, I prepare my purchases using excel files and other media often created on pictureshop. And it is in this framework that I designed a visual allowing me to see at a glance the clusters that make up each box of decorations and thus better determine in which kits we should invest to create the table of our dreams. In September 2017, I shared a first version of this file on the @figouz.net Facebook page (join the community!) and I realized then that it was of great interest for all players: more than 4,500 people were reached by my post. I have updated this file with the last box of Sector Mechanicus scenery kits, which is without any doubt the most interesting in terms of purchase : the Promethium Refinery set with its 8 plastic frames, sold for a modest sum of 90 € on the Games Workshop website. Only the straight platforms are missing in these frames. By mixing 3 or 4 boxes of these sets, you will have a very solid base to create your table! VIEW THE VISUAL : Note that the one displayed in the gallery is in the format 3500 x 2242 px. And to complete this help file, here is an HD visual of the clusters composing all these sets of SECTOR MECHANICUS decors. Nothing better than already having an idea of the possible assemblies and combinations! And they are really incredibly numerous, you can take my word for it!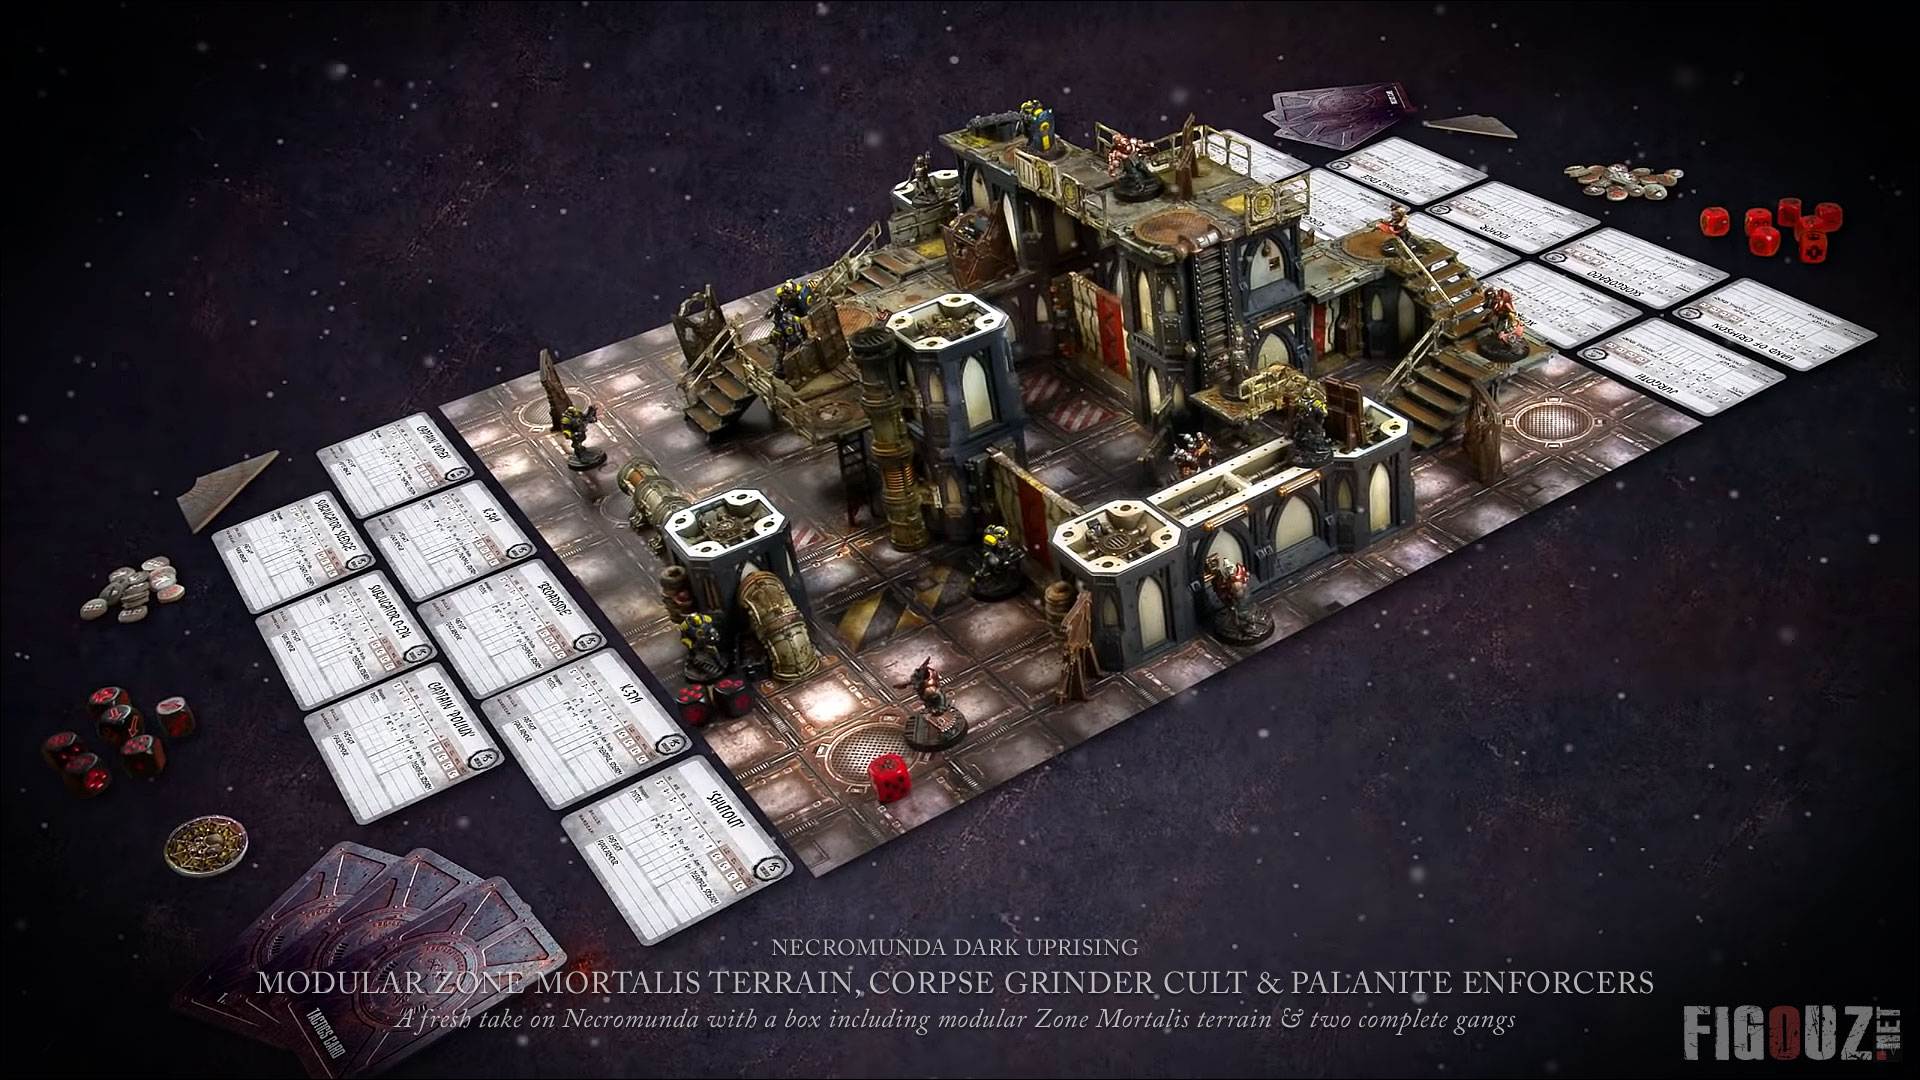
- The incredible content of the huge Necromunda Dark Uprising box! -
Cliquez sur cette image pour ouvrir une picture haute définition
26 plastic miniatures, each supplied with a Citadel 32mm Round Base :
Also included is a 128-page softback rulebook containing:
- The incredible content of the huge Necromunda Dark Uprising box ! -
Click on this picture to open a high resolution version
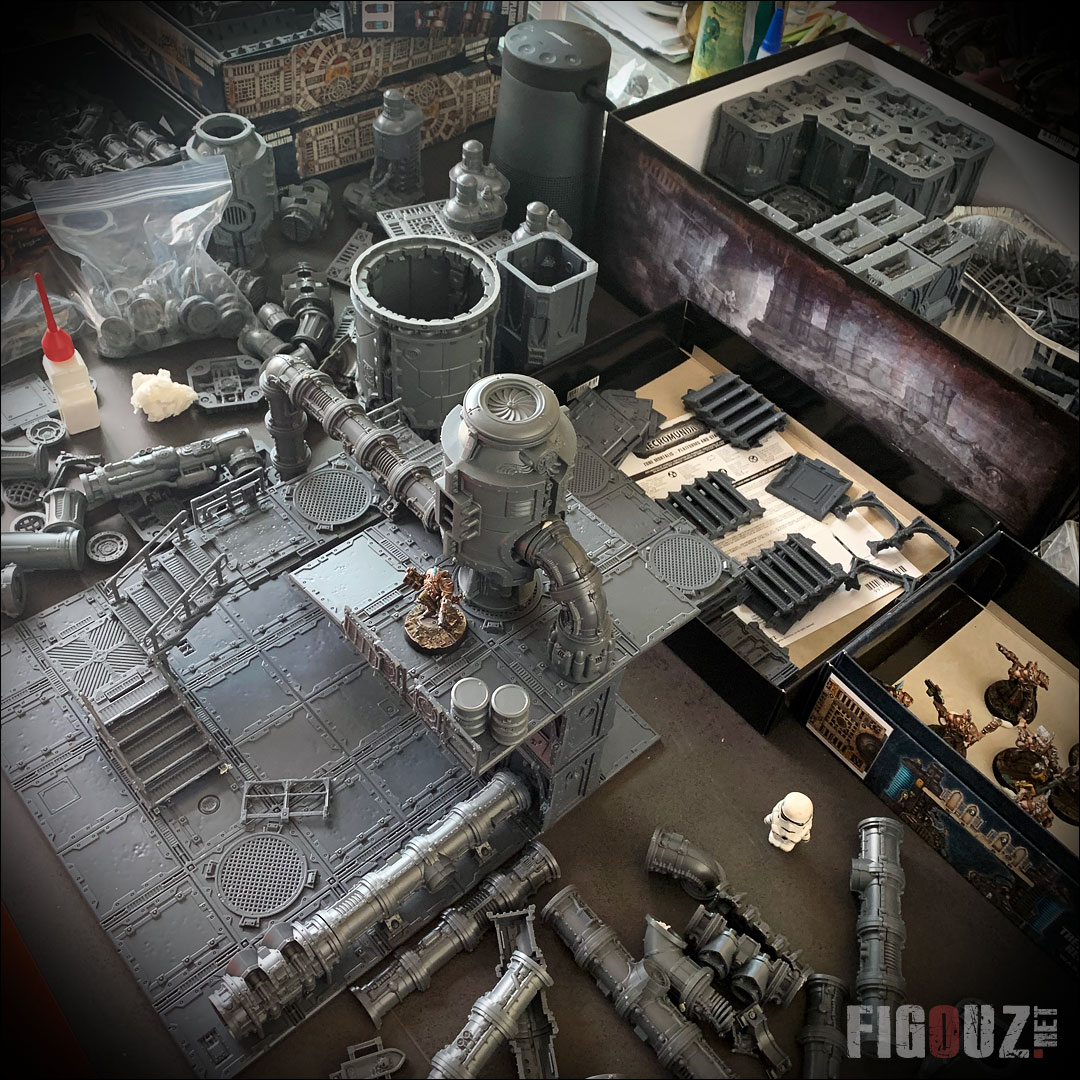
Haemotrope Reactors - Creating a horizontal furnace !
- Furnace design - Cutting both sides of a Haemotrope Reactor -
Click on this picture to open a high resolution picture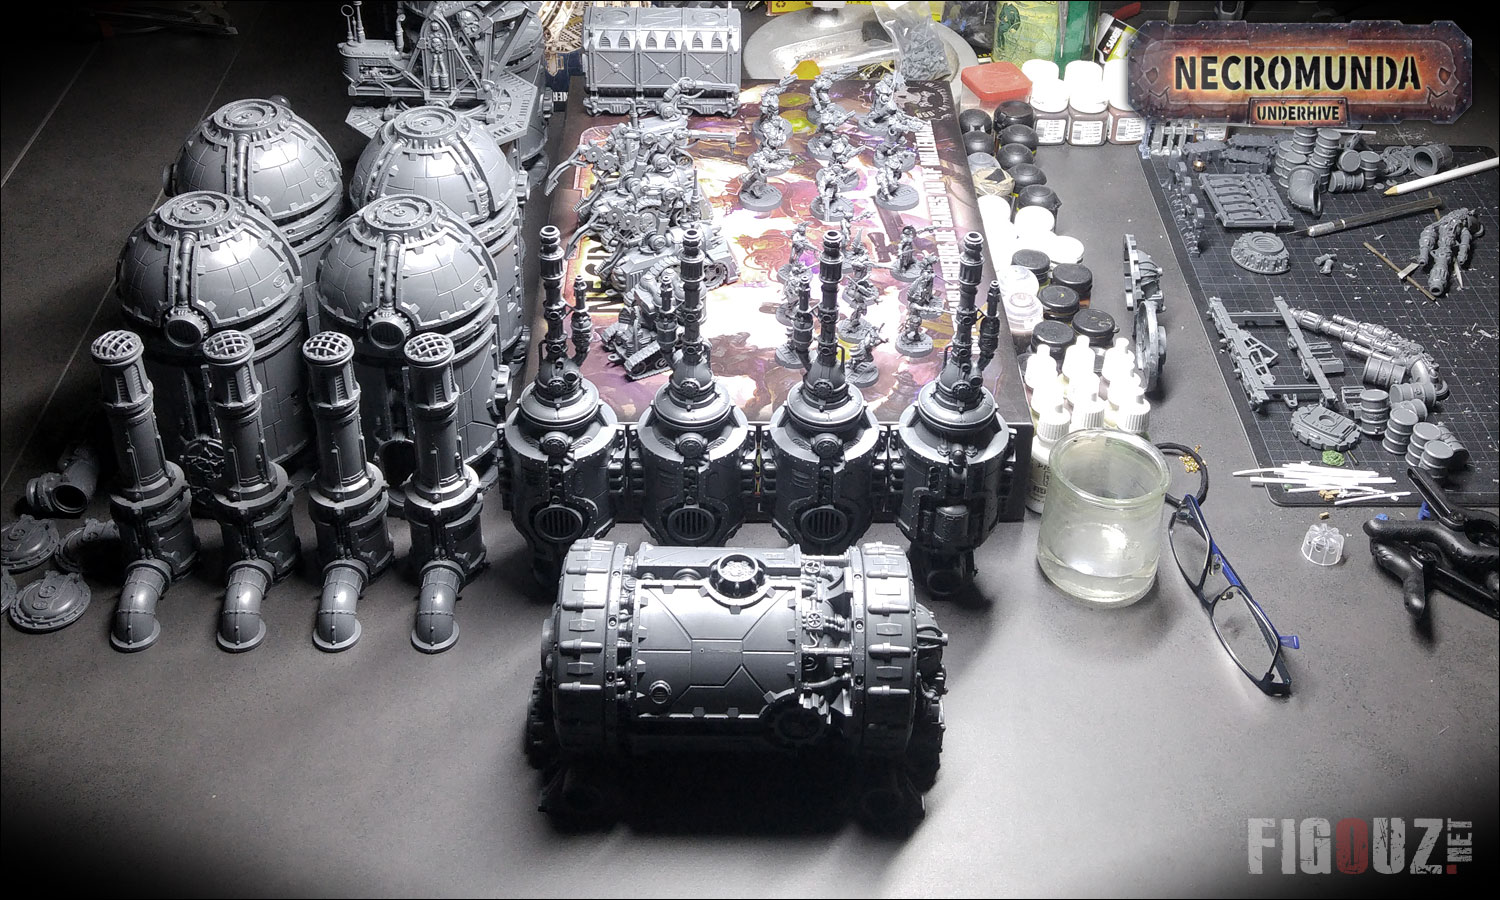
- The Furnace assembled next to the other scenery elements of the Sector Mechanicus -
Click on this picture to open a high resolution version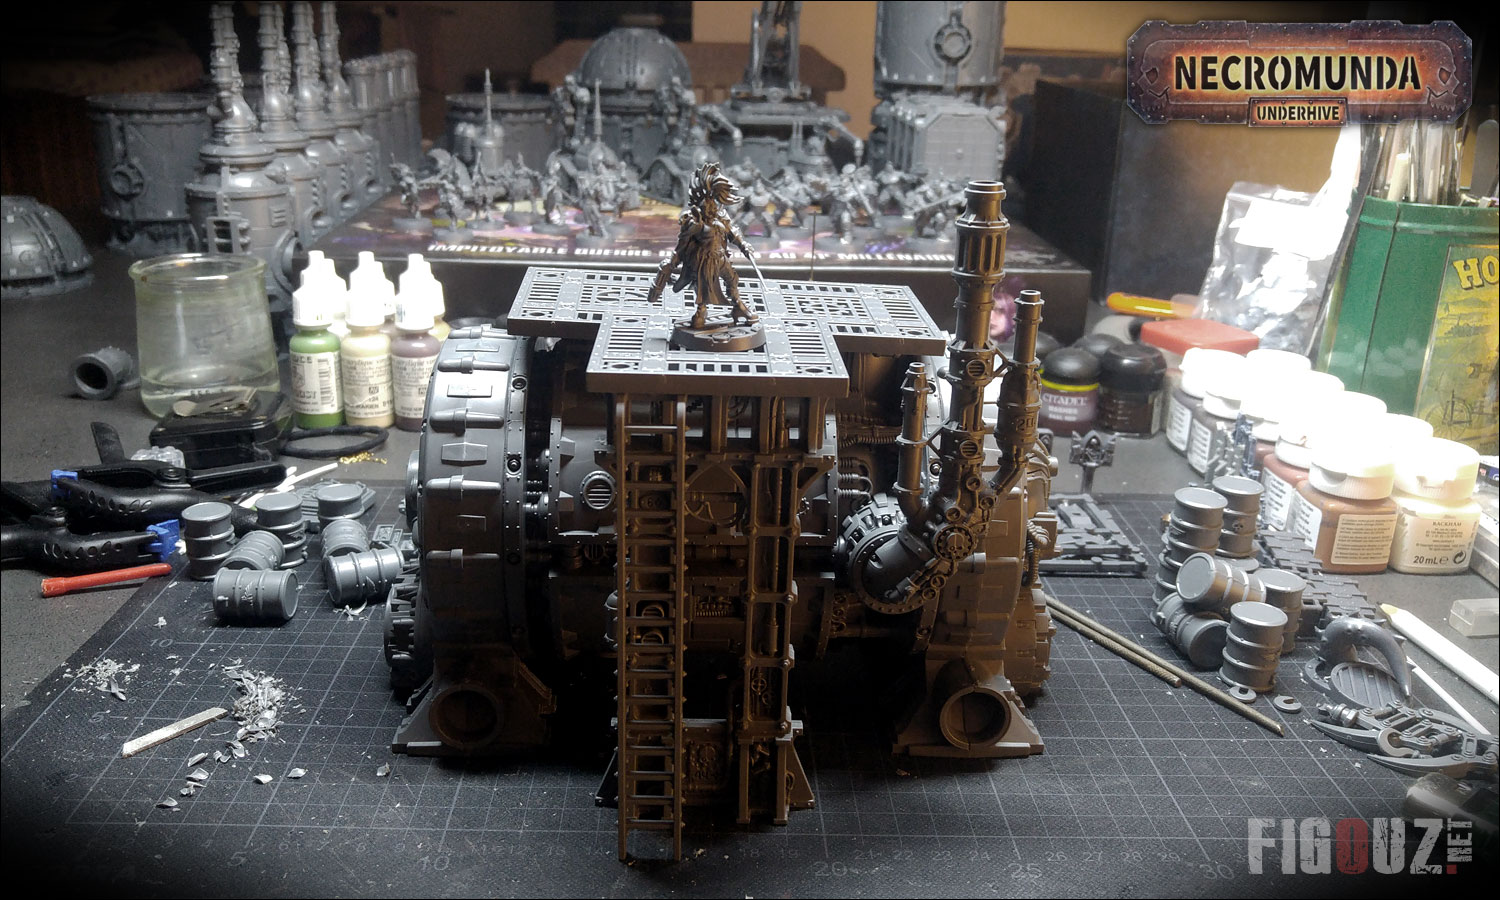
- Test of adding platforms, access ladder and other details to the furnace (without glueing) -
Click on this picture to open a high resolution version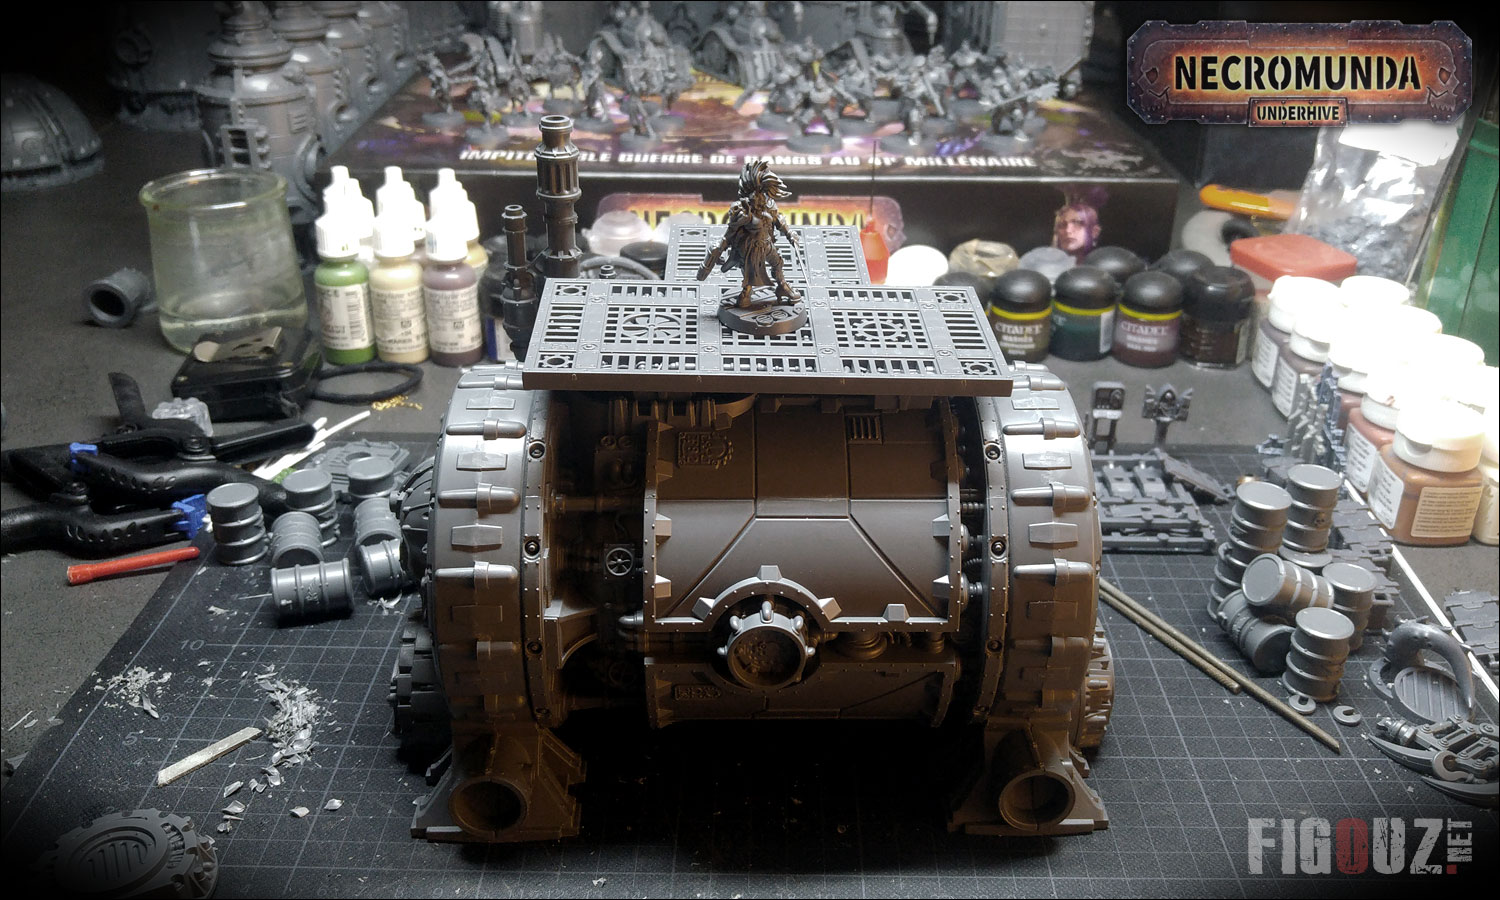
- Test of adding platforms, access ladder and other details to the furnace (without glueing) -
Click on this picture to open a high resolution versionSector Mechanicus - Assembly of sub-assemblies !
- Overview of all decor elements of Sector Mechanicus & assembly test of a 3-level structure -
Click on this picture to open a high resolution version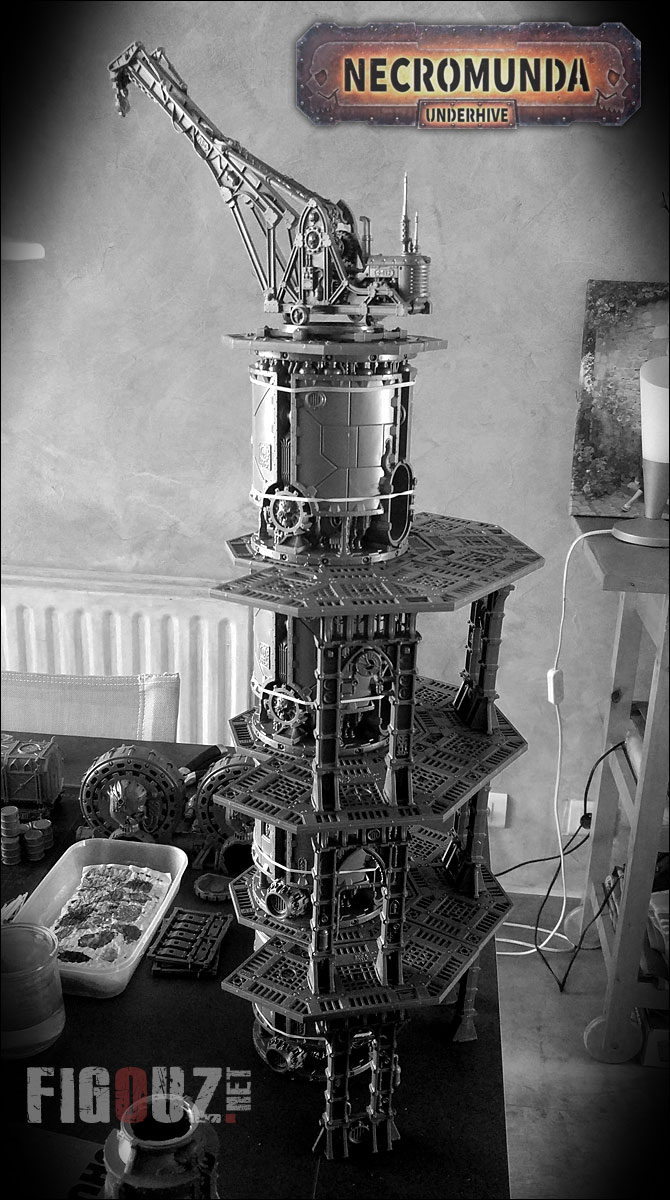
- Assembly test of a 3-level structure -
Click on this picture to open a high resolution version
- Assembly test of a 3-level structure -
Click on this picture to open a high resolution pictureGalvanic Servohaulers - assembling a second box !
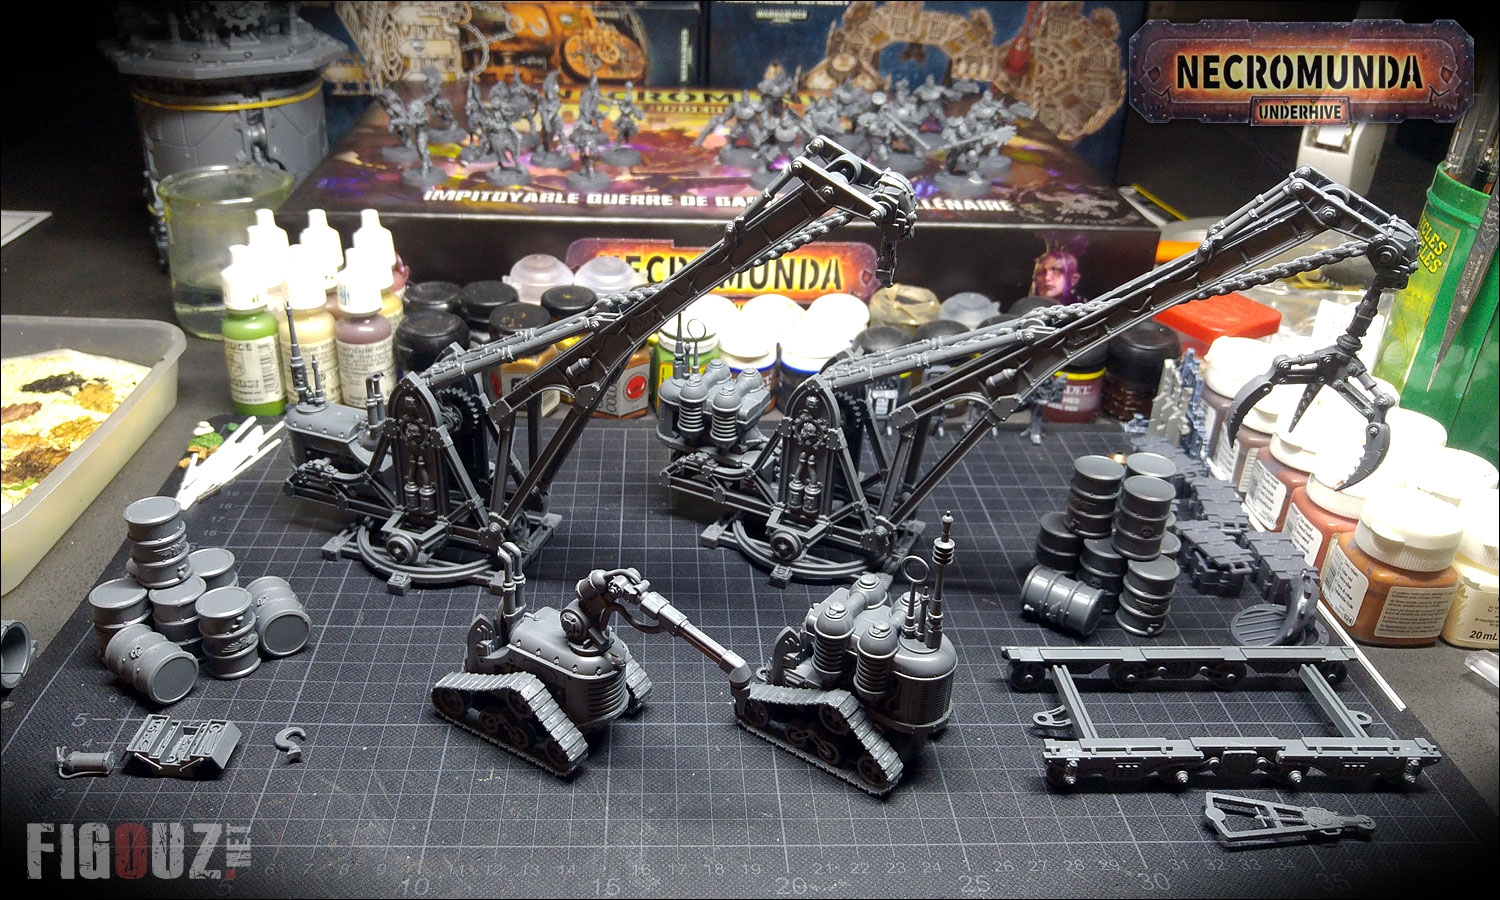
- 2 boxes of Galvanic Servohaulers allow to create 2 different cranes and 2 different tractors by switching the engines -
Click on this picture to open a high resolution versionMunitorum Armoured Containers - assembly !
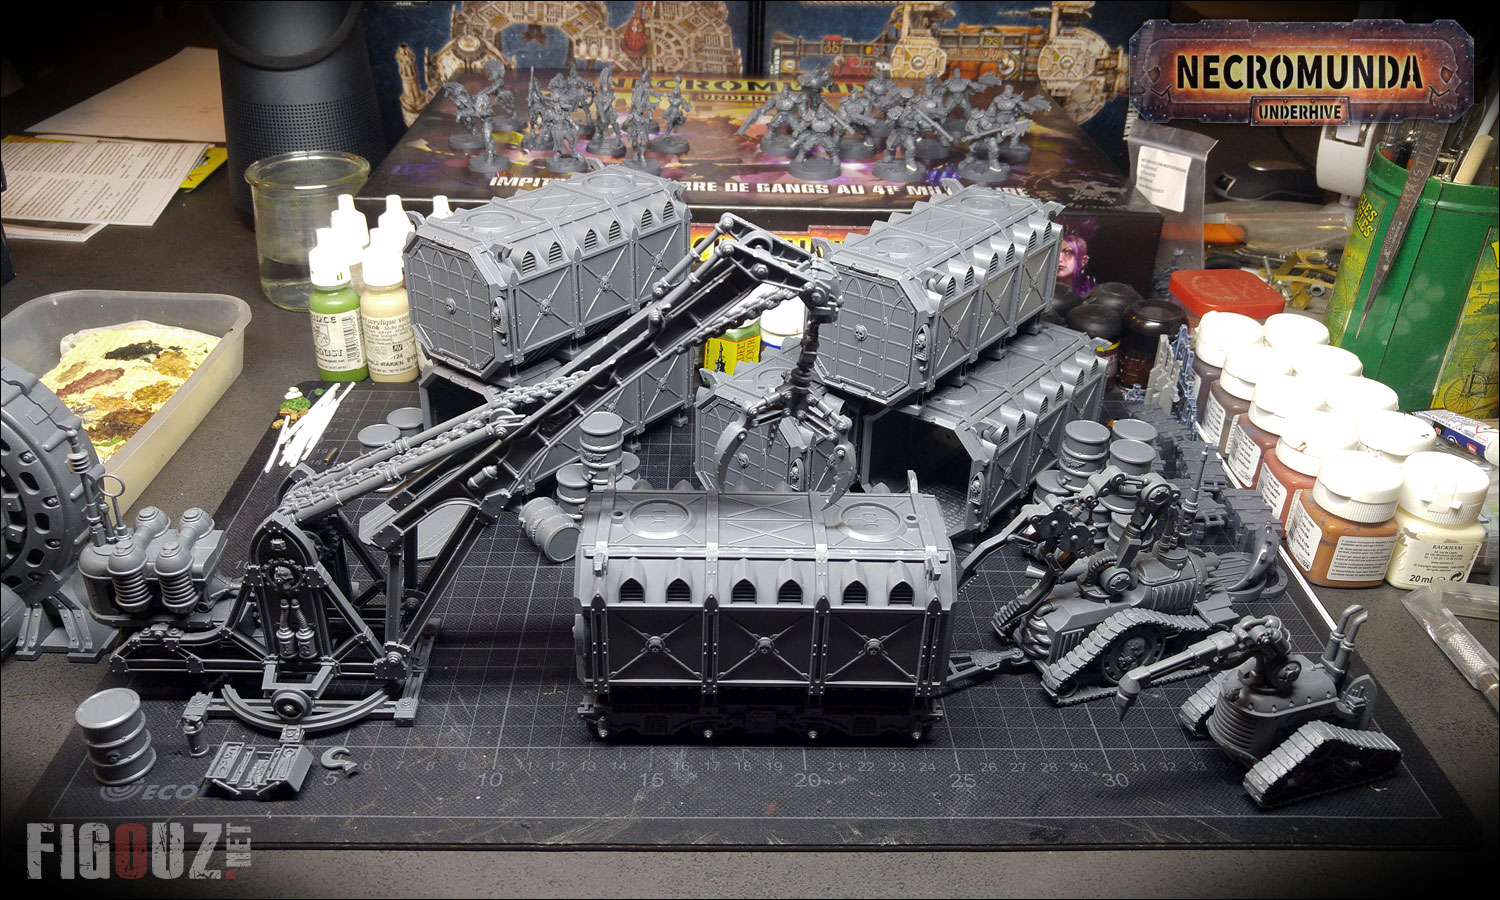
- Assembly of Munitorum Armoured Containers containers, barrels and boxes -
Click on this image to open a high resolution pictureGalvanic Servohaulers - Assembly !
- Assembly of the Sector Mechanicus Galvanic Servohaulers scenery kits: Crane and Tractors -
Click on this image to open a high resolution picture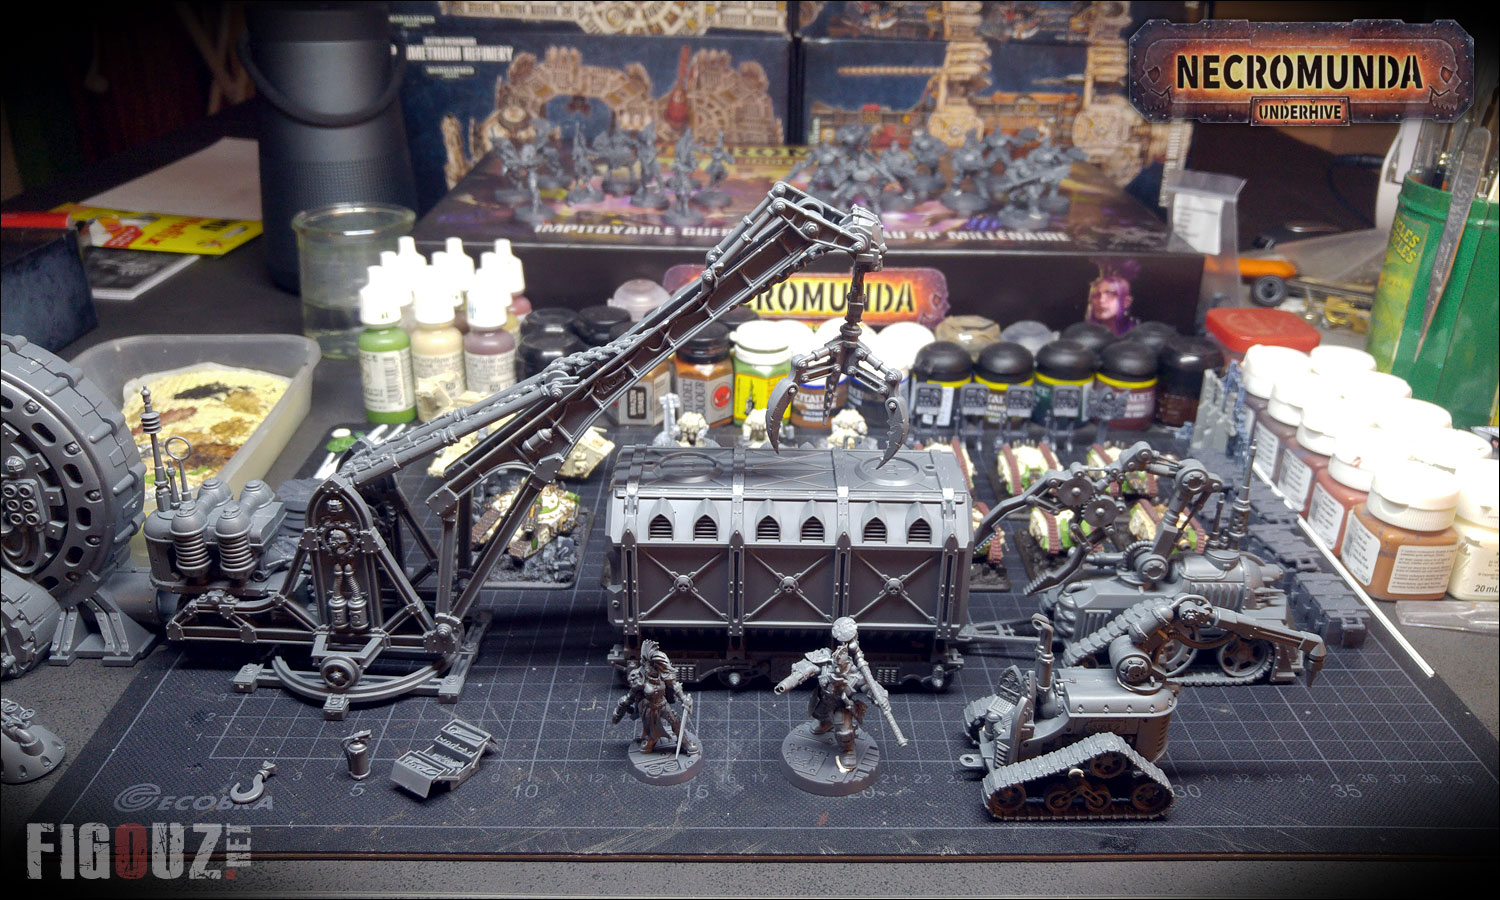
- The ingenious scenery kits of the Sector Mechanicus Galvanic Servohaulers box: Crane and Tractors - Click on this picture to open a high resolution version.Sector Mechanicus - first assembly tests
- Opening the first boxes of SECTOR MECHANICUS and cutting through the plastic frames -
Click on this picture to open a high resolution pictureSector Mechanicus scenery - Receipt of a huge order !

- Reception of 18 boxes of Games Workshop plastic kits to design a beautiful Sector Mechanicus modular gaming board -
Click on this picture to open a high resolution version
- Example of a Necromunda gaming board designed by the Warhammer World team -
Click on this picture to open a high resolution versionHelp file to choose wisely the Sector Mechanicus scenery
I advise you to complete this kit with the Ferratonic Incinerator, which is the second most advantageous set and which contains the straight walkways in addition to the stove itself!
You can therefore record it on your PC to view it in HD. If you share it, please cite the source and make a link to this page or the Figouz.net Facebook page.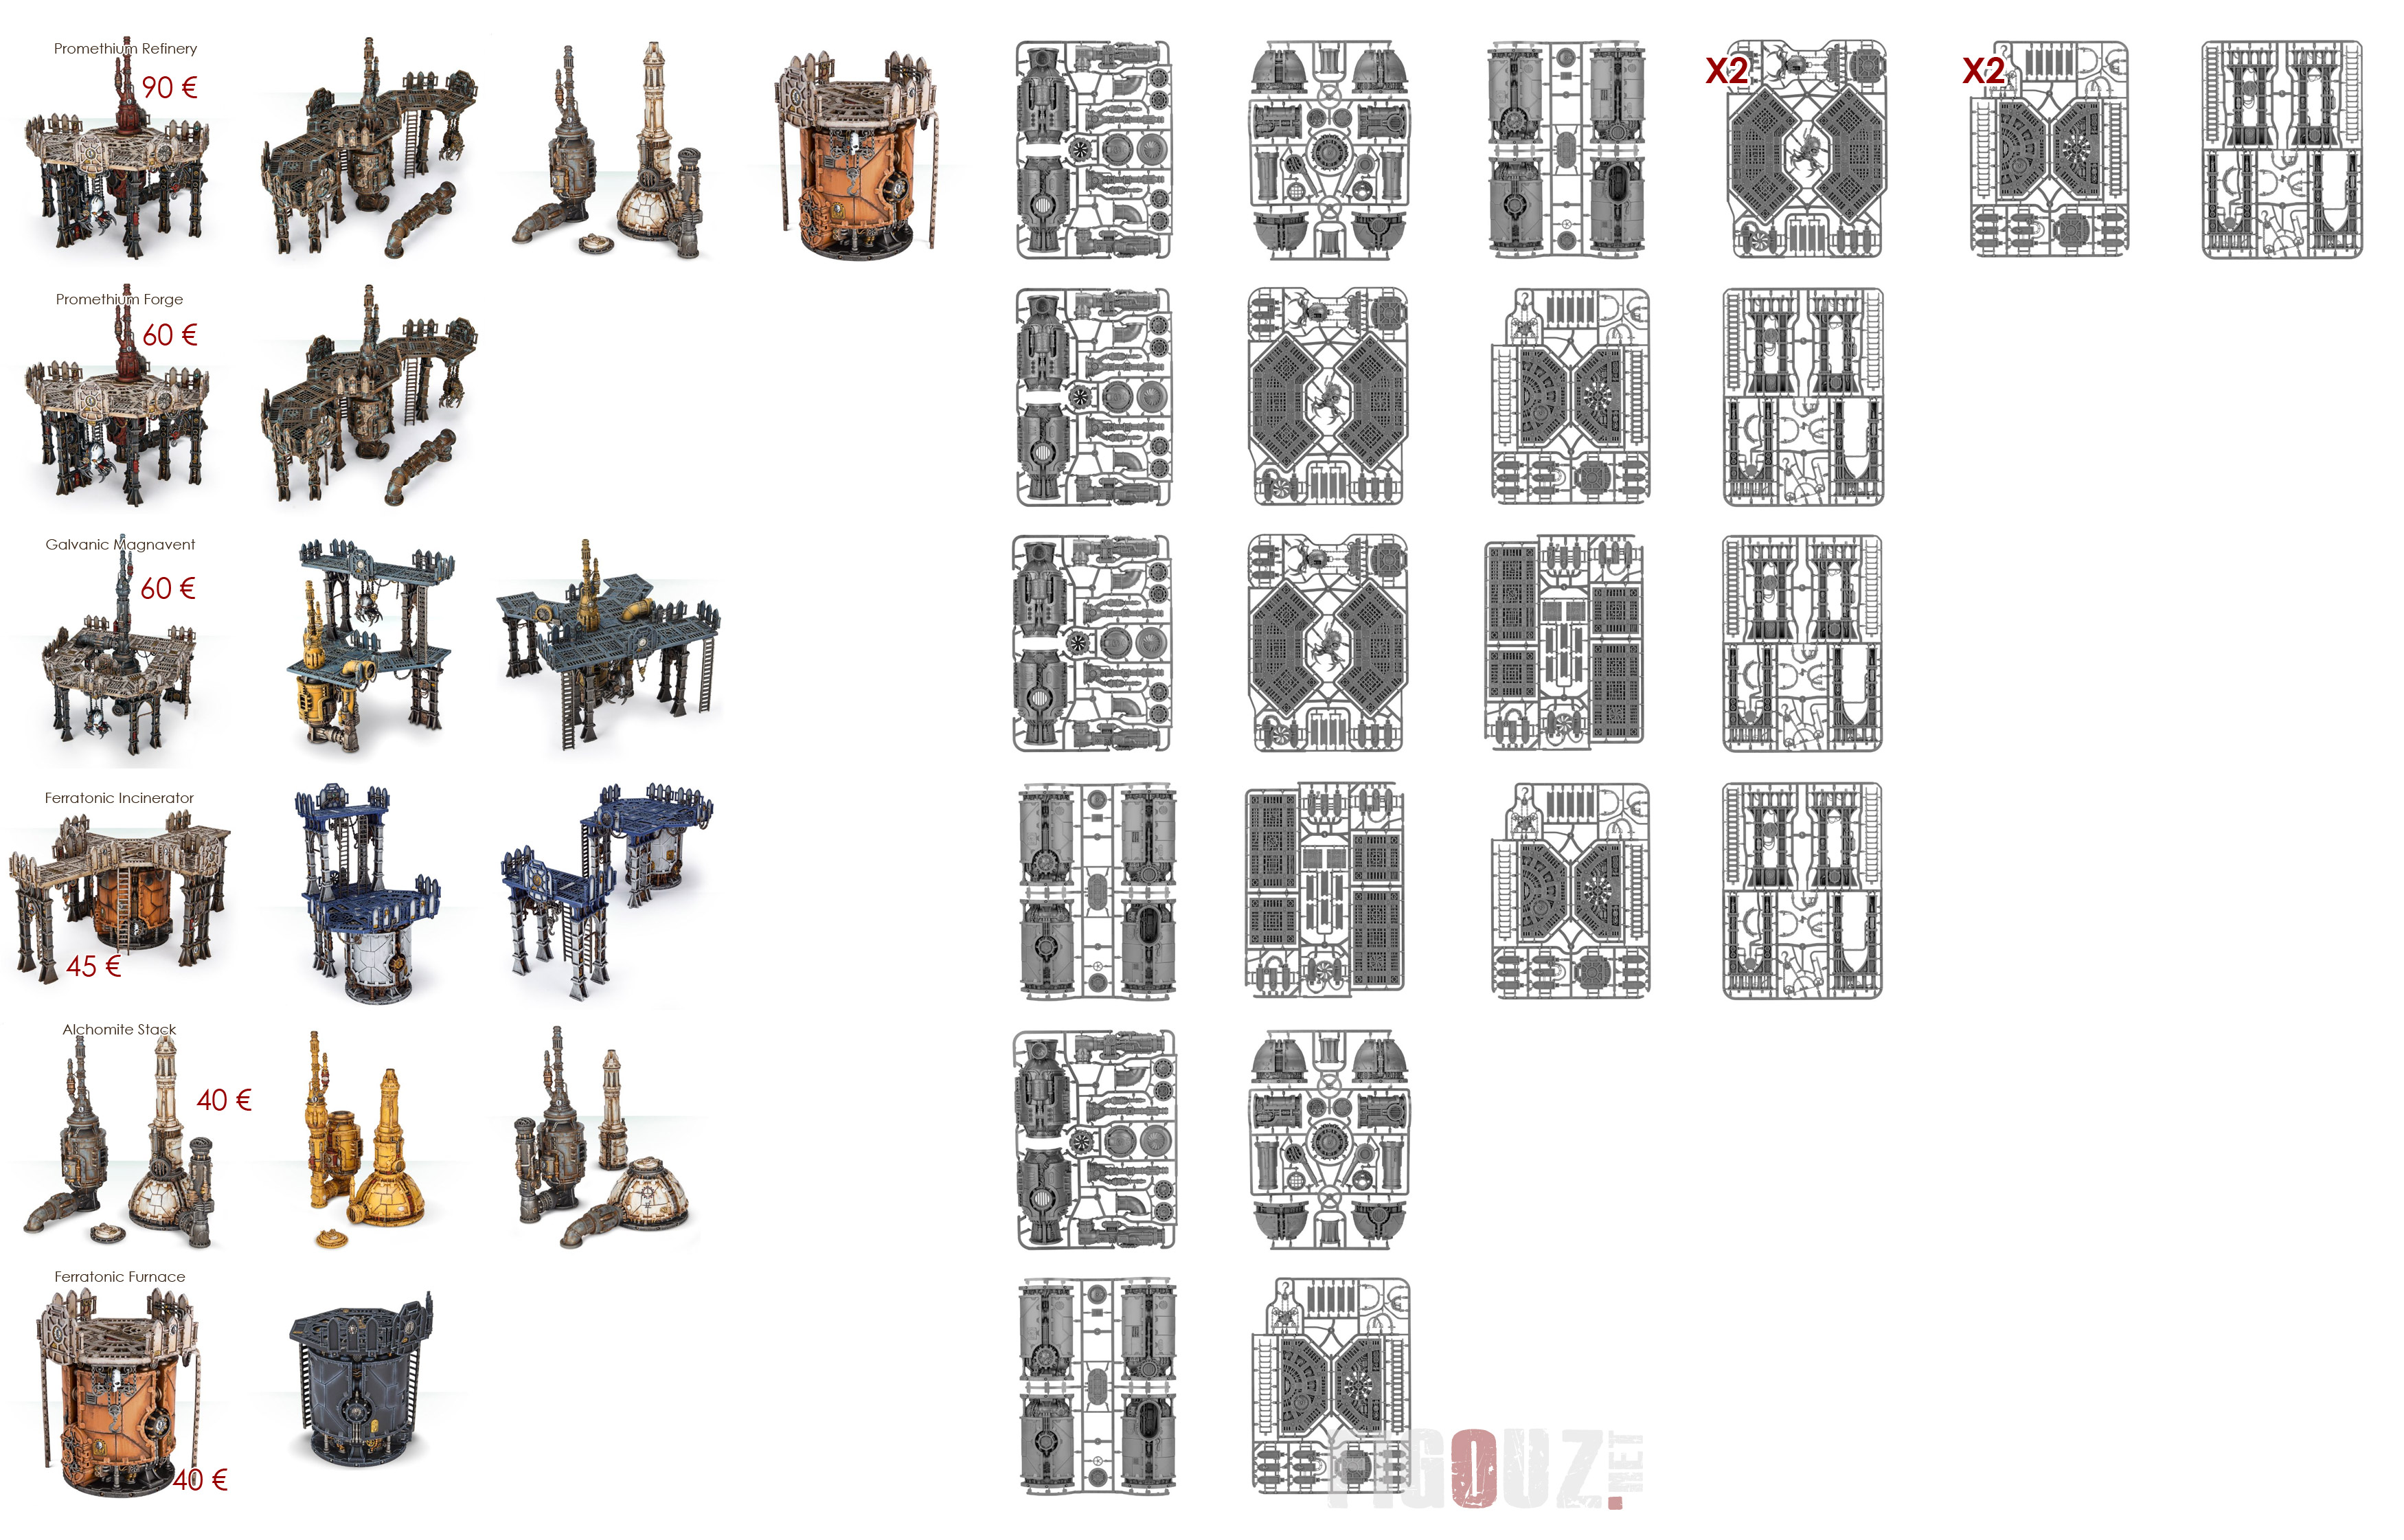
-Sector Mechanicus decor selection help file -
Click on this picture to open a high resolution version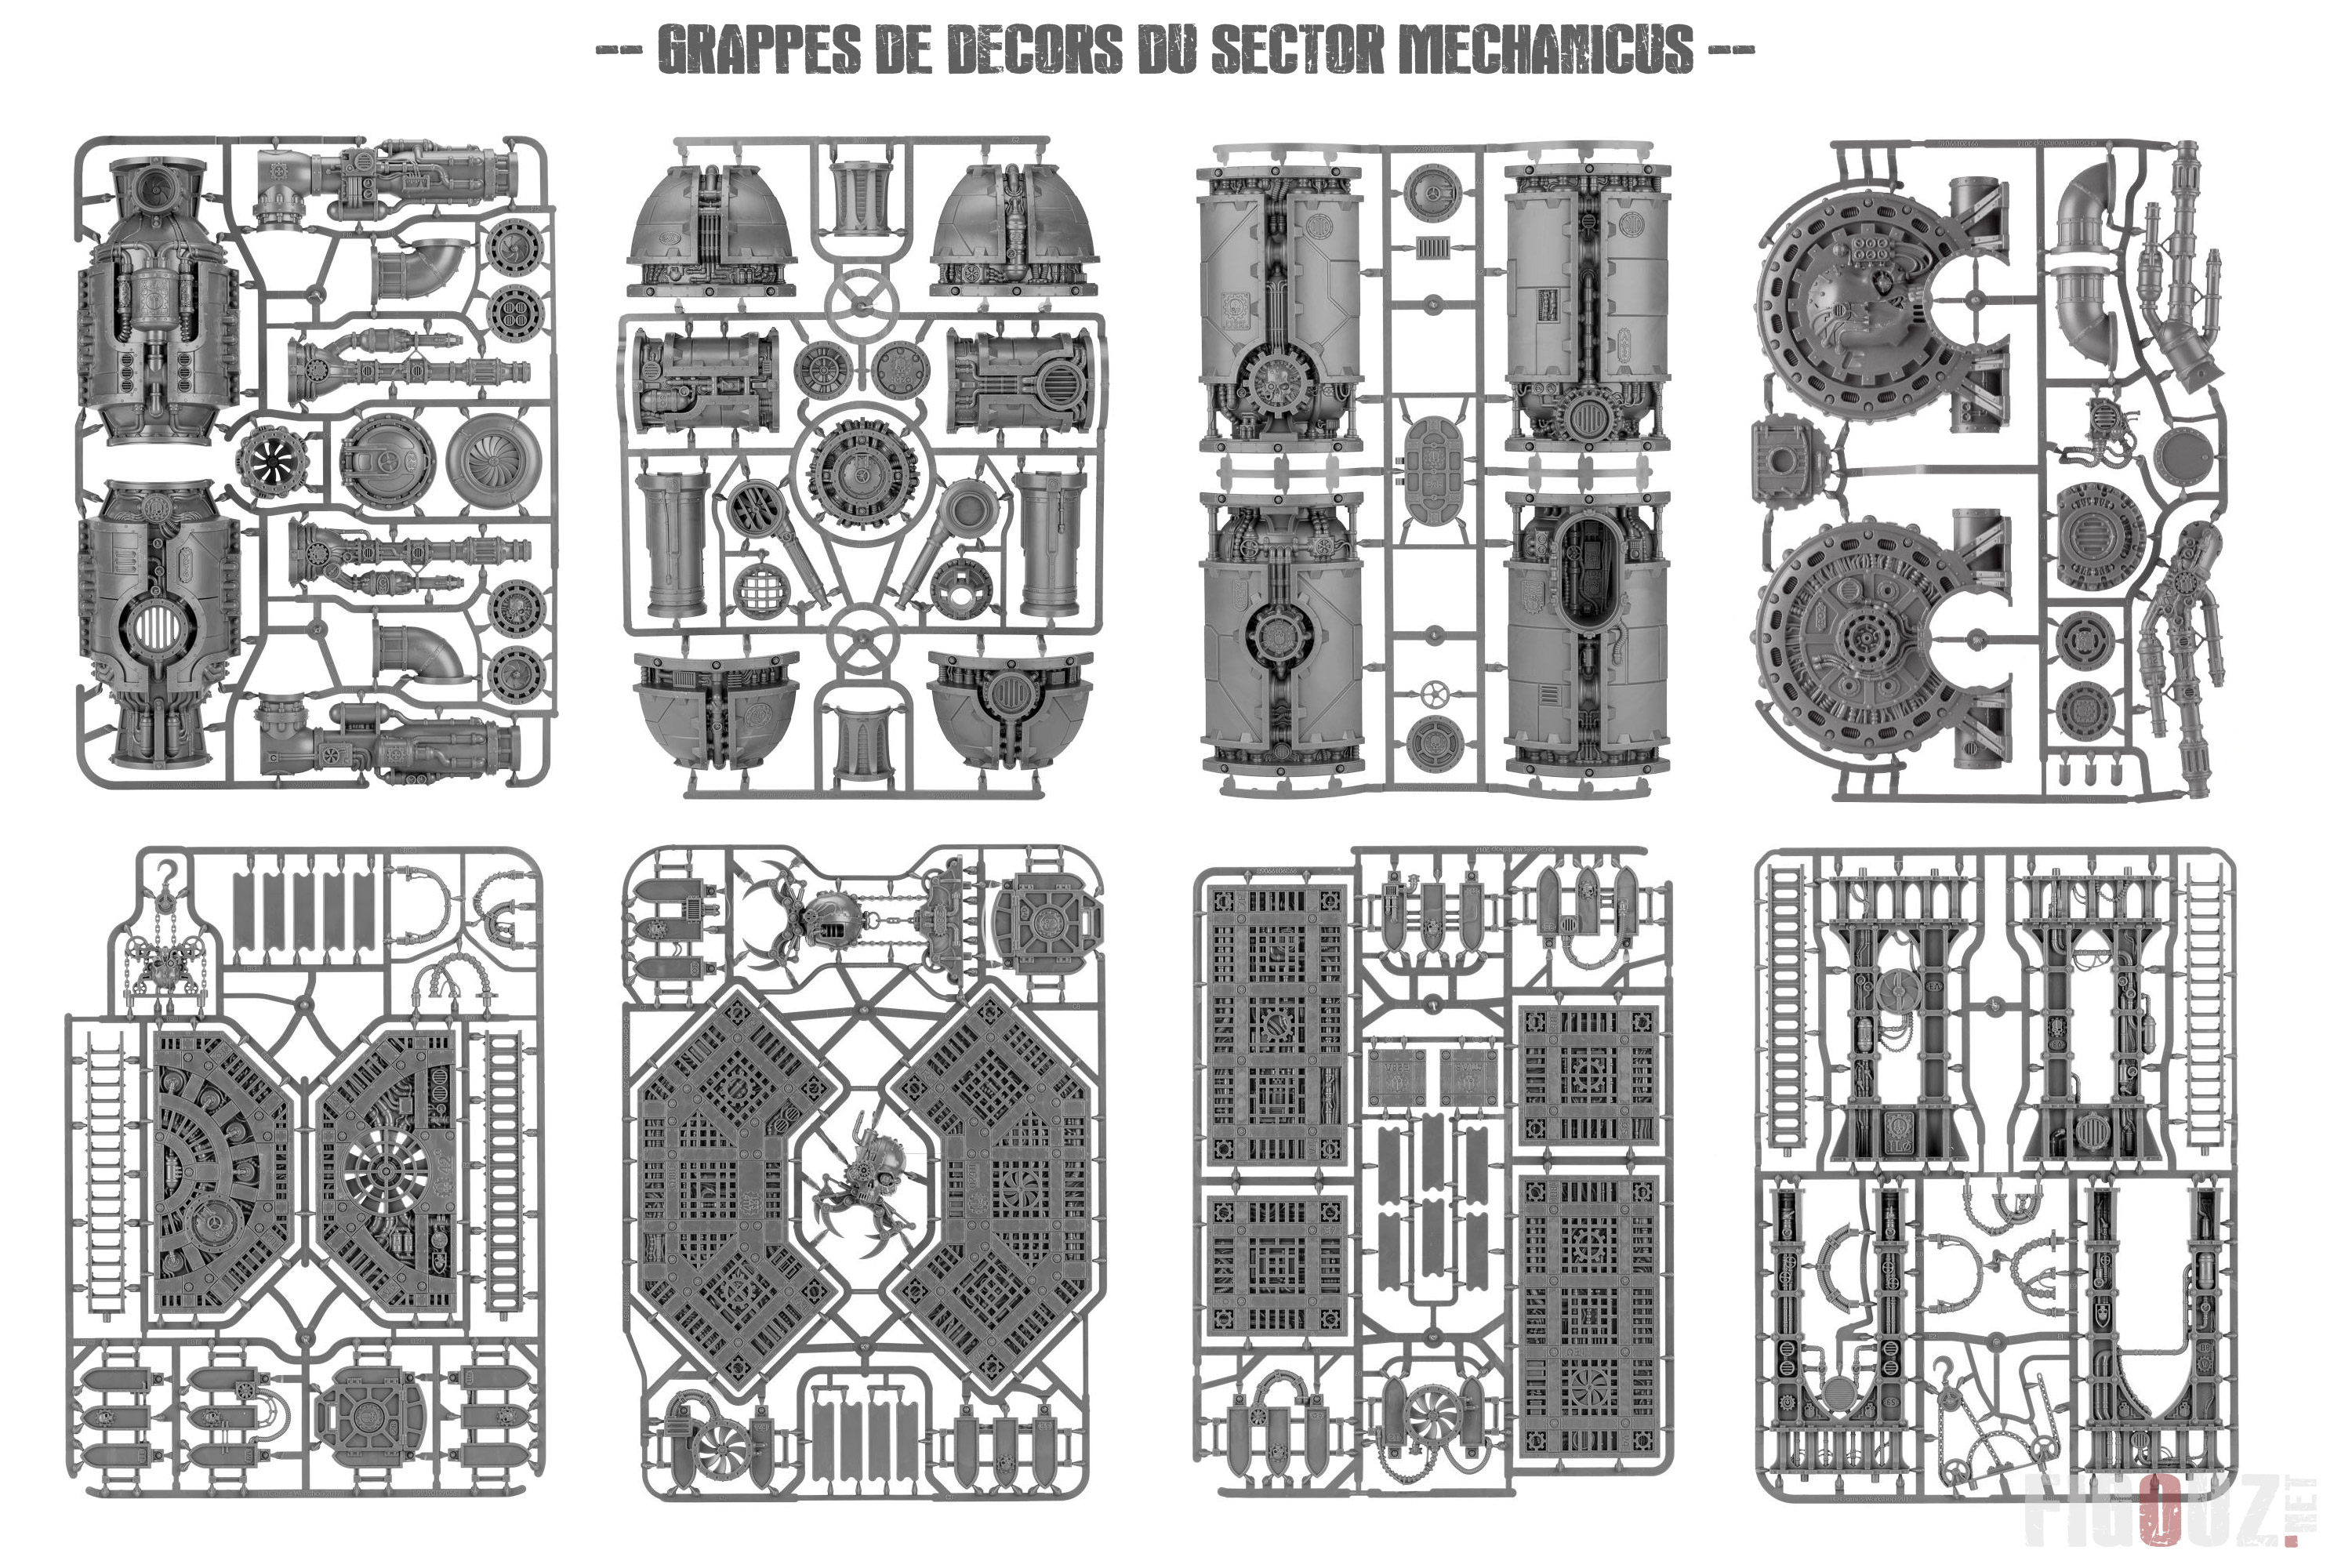
- Detail of Sector Mechanicus plastic frames -
Click on this picture to open a high resolution version


